
It’s a new year, it’s a new PrusaSlicer release. This one is 2.6, alpha 3 at this time at the time of me recording, and it brings with it some features that, each one on their own, are just, nice, but when you put them all together, it makes for an overall well-improved package. Of course, this isn’t just for Prusa machines, you can use PrusaSlicer with any 3D printer that speaks gcode, in fact, the 2.6 release now out-of-the-box has tuned profiles for the new Elegoo Neptune series, Creality Sermoon and Ender-5 machines, the AnkerMaker, and even for Print4Taste’s food printer, a printer I’ve reviewed here on the channel, too. Some of the new features we’re going to look at are adapted from other open-source slicers and then fine-tuned for PrusaSlicer, and, vice-versa, I hope that other slicers pick up the rest of the features, too. Open Source is pretty beautiful when it works!
Alright, before we start, this is a pre-release piece of software, bugs aren’t just possible, they are expected. For me, it was working flawlessly, but in any case, it uses a separate config directory, so it’s not going to mess up your PrusaSlicer 2.5 profiles.
Support Material
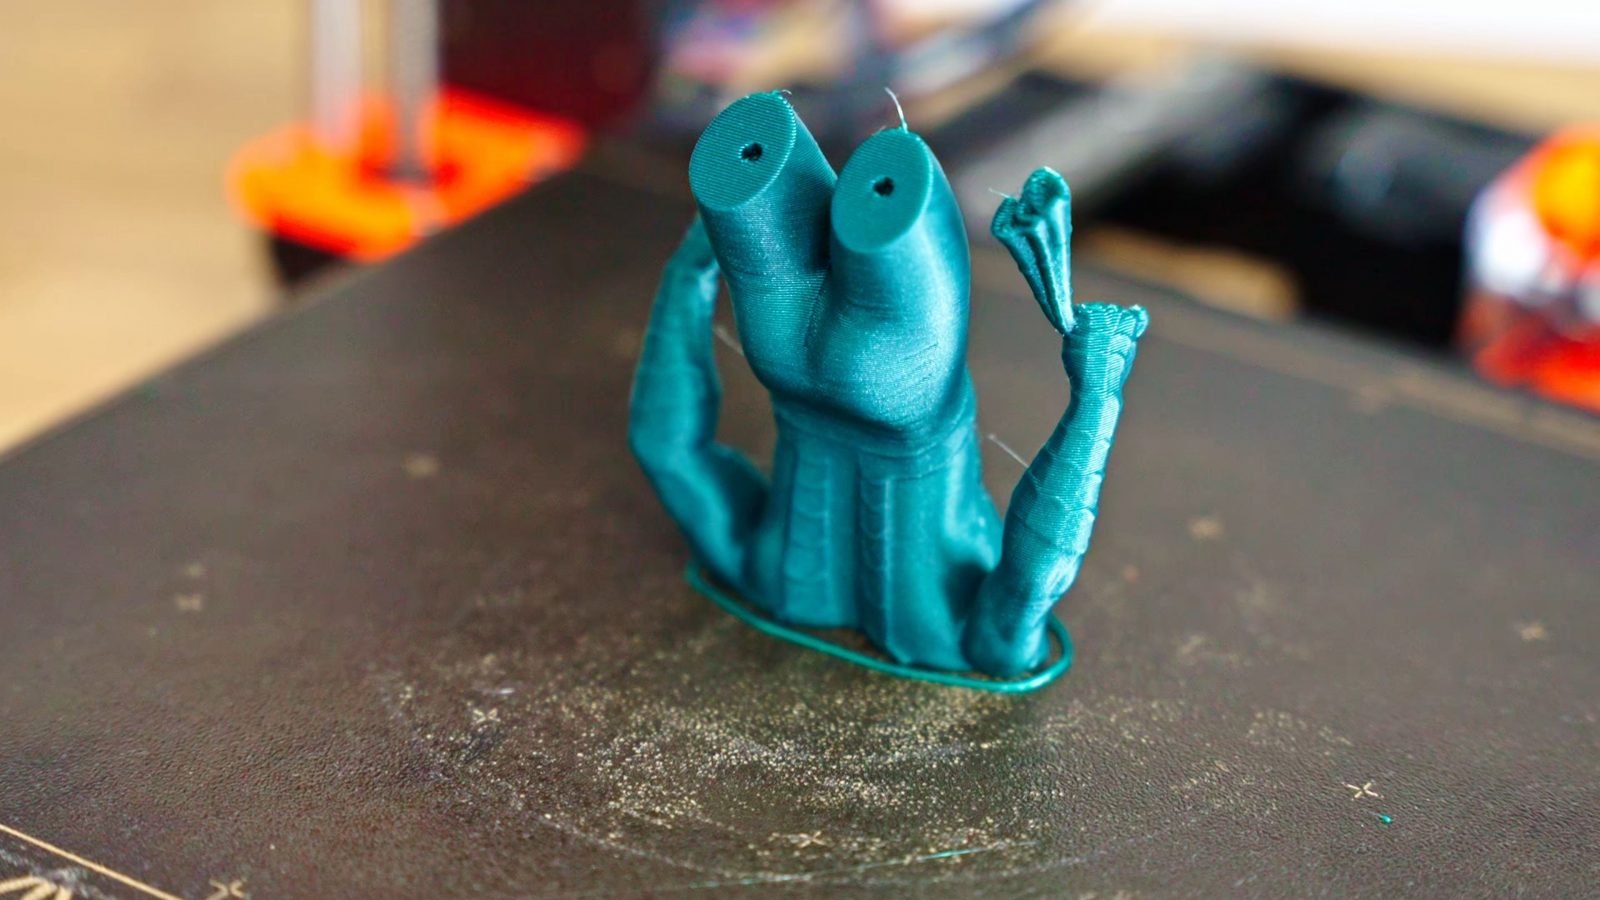
Okay, first big feature – support material. This is the big one. You now get tree support!
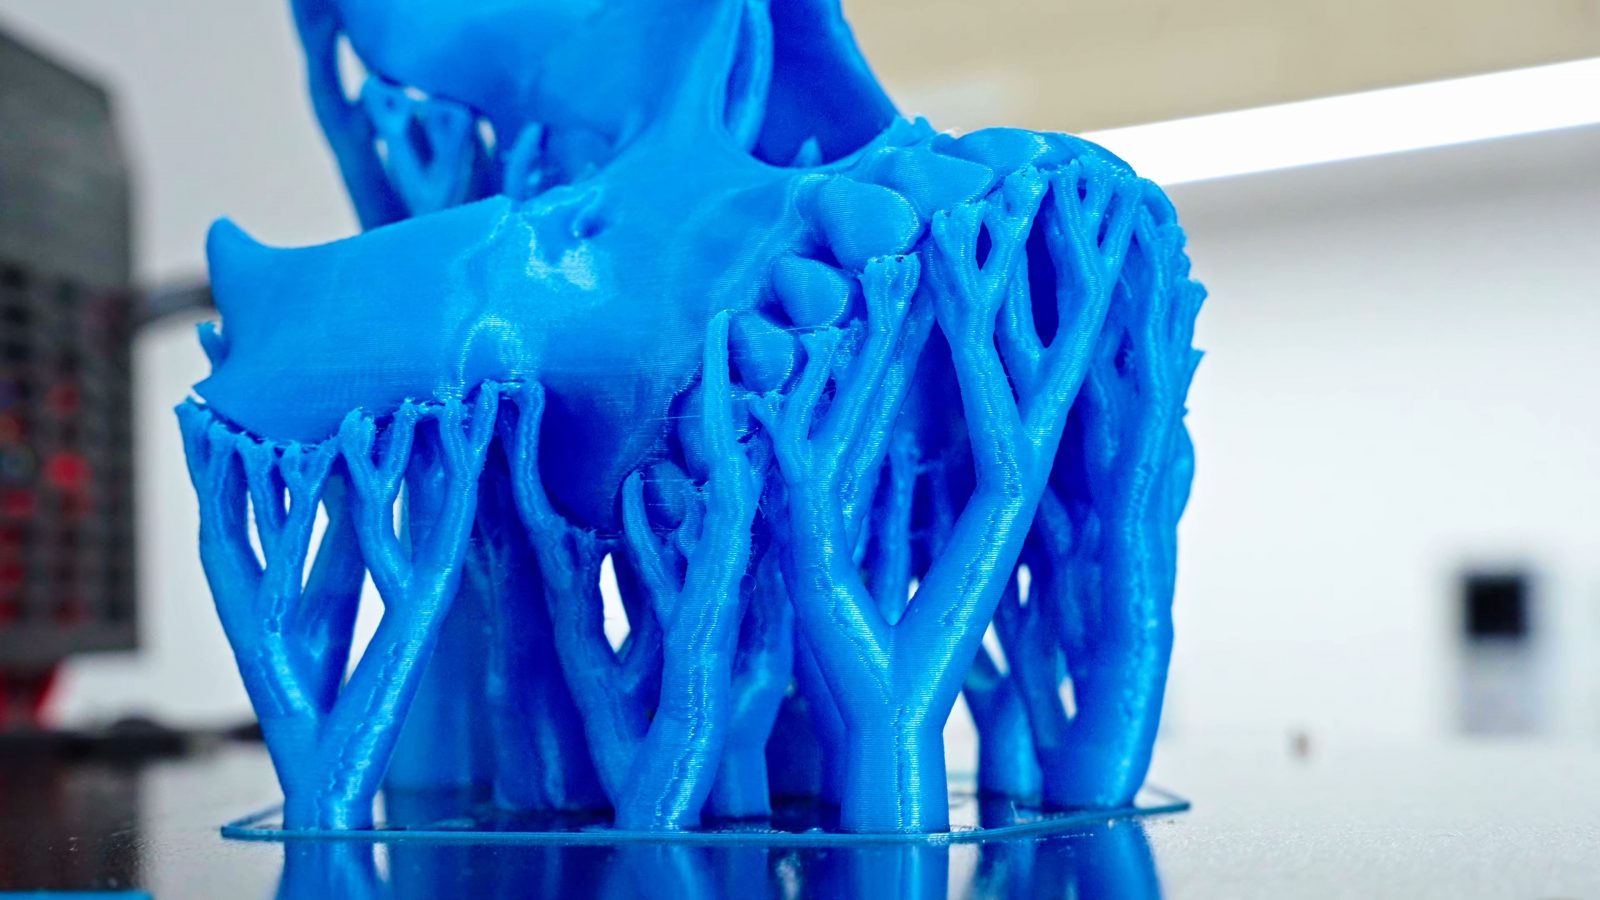
I’ve also seen it called “tentacle support”, that works, too, so instead of building these sparse blocks just vertically straight up to the area that needs supporting, these can now snake around your part from the build plate and reach into spots that otherwise would need to have support material printed on top of the part itself. That can leave scars, especially on darker material, and it’s pretty often awkward to remove from tight spots like holes and little cubbies.
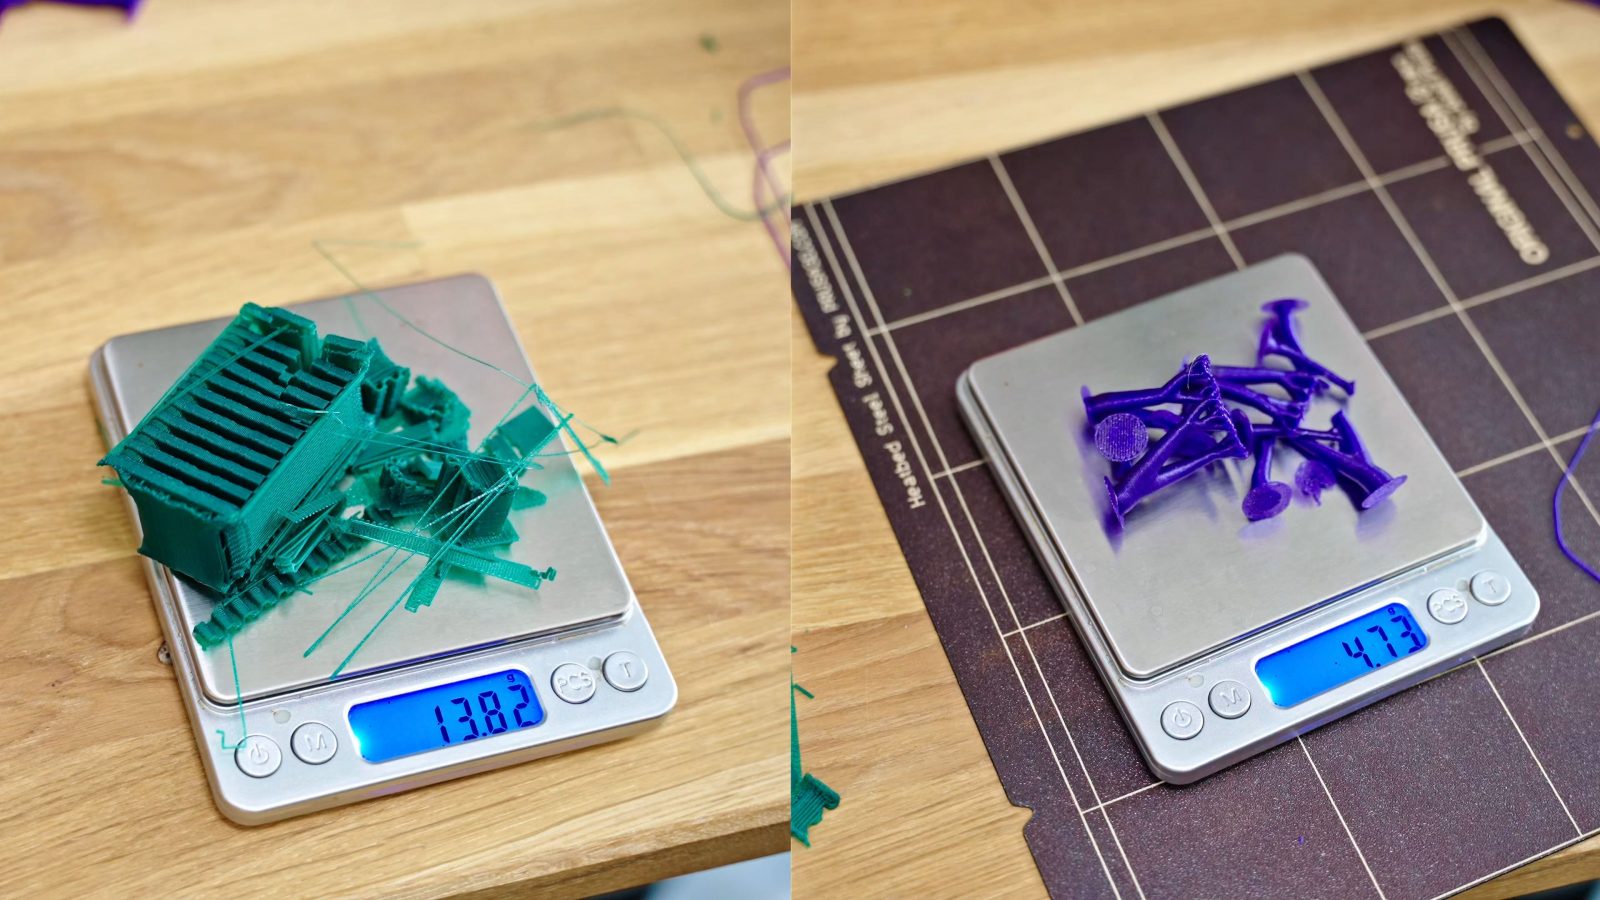
Tree support goes outside the part if it can, but if it must, it will still fall back to anchoring itself to the part. These branches are printed with limitations to how steep they can be so that they still print reliably, they’re just one wall thick for most of the time, so even though they are quite rigid, they weigh barely anything, in this case using PrusaSlicer 2.5 vs. 2.6, it’s using almost 2/3rds less filament for the support material.
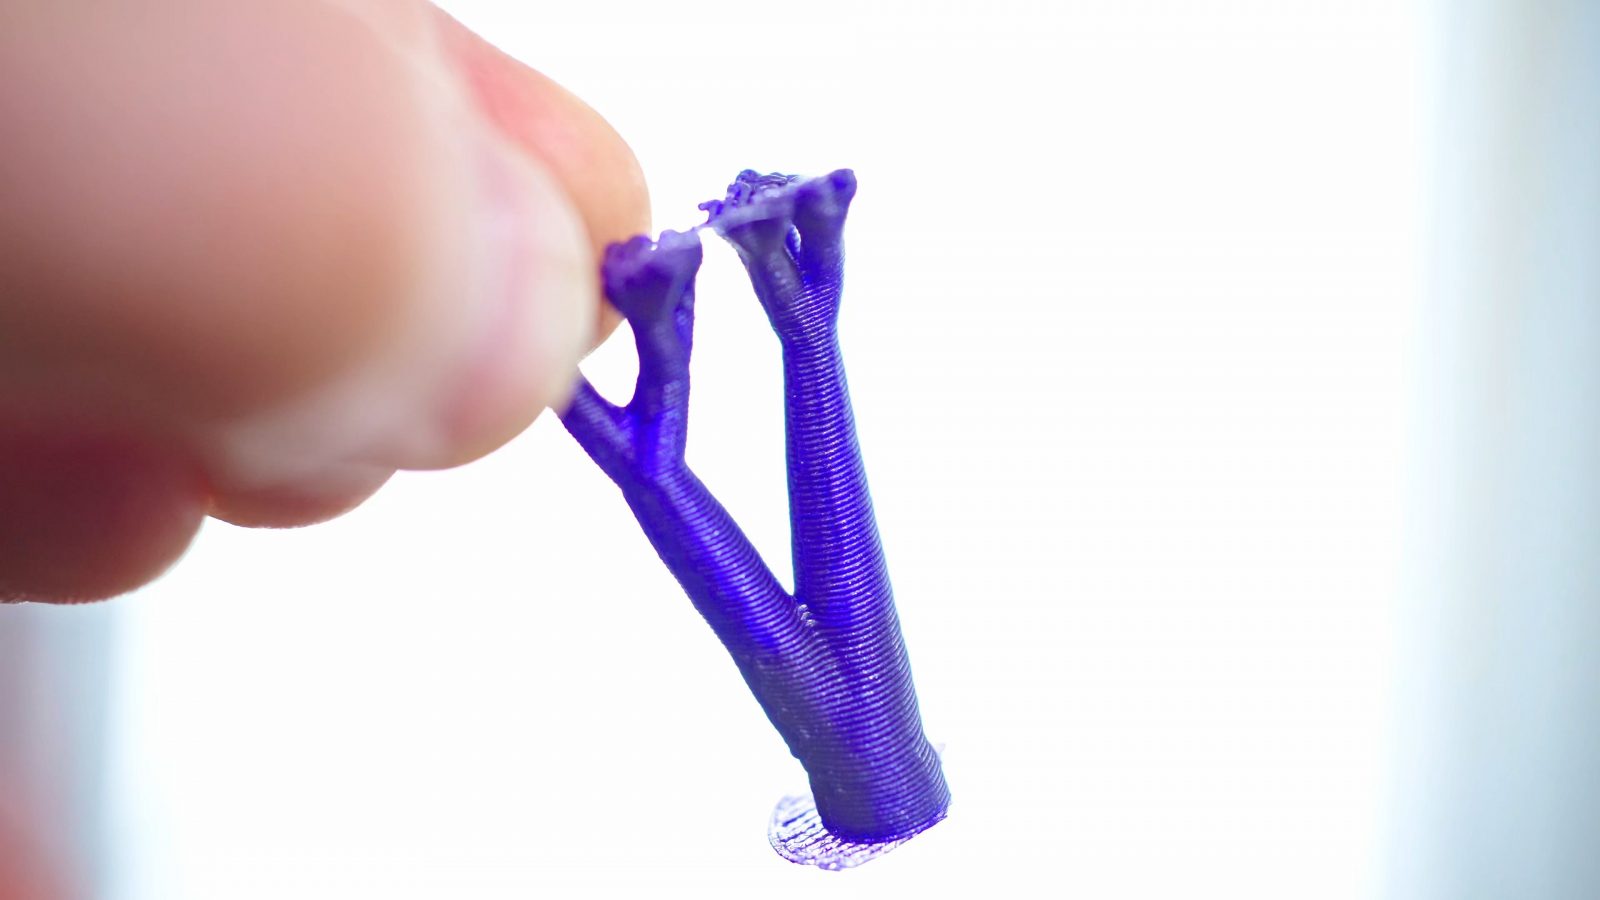
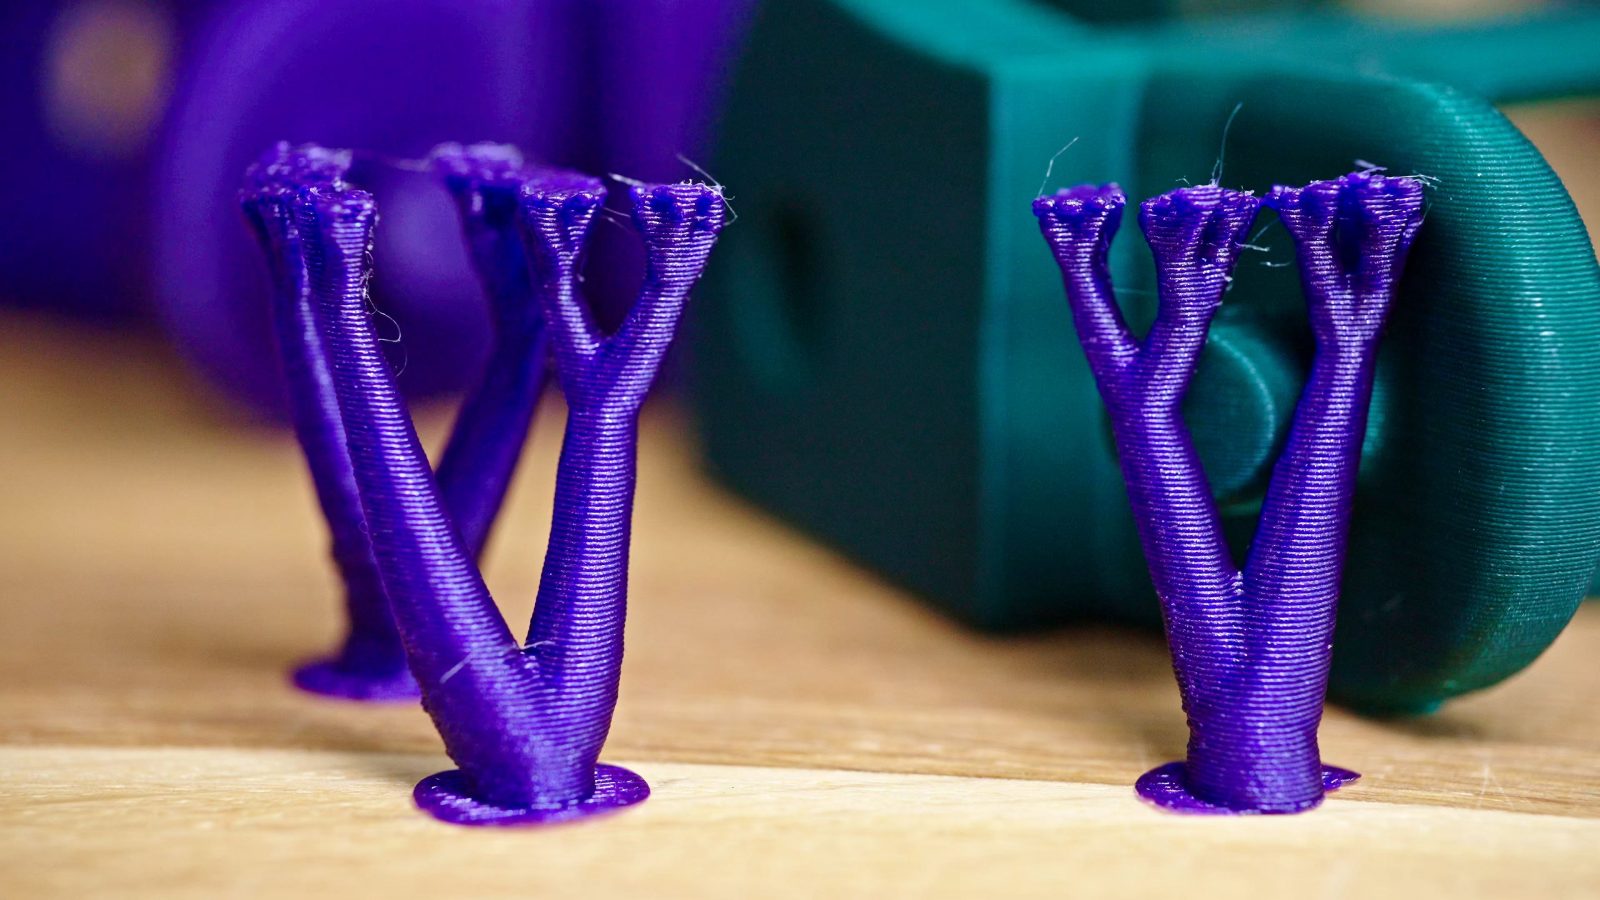
If you look at these branches, they do widen up towards the bottom, so they don’t fall over, but they also branch out towards the top, so one single printed column can actually support a good bit of area. You, can, of course, configure everything about these supports to your liking.
Automatic Support Painting
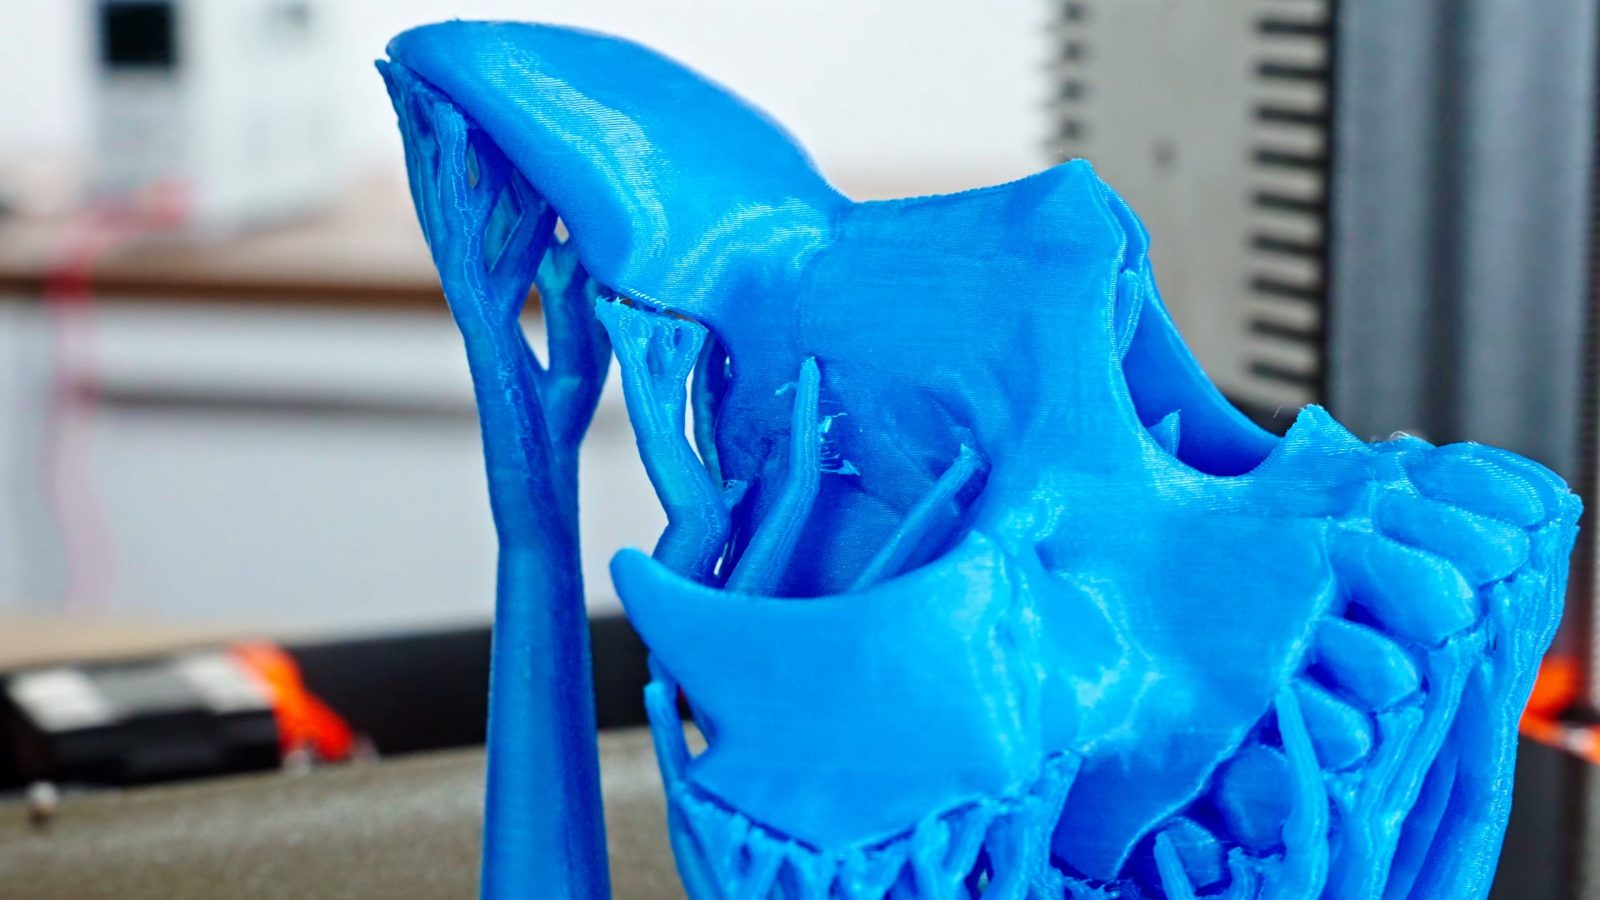
But the new supports actually work best with another new feature, and that is automatic support painting.
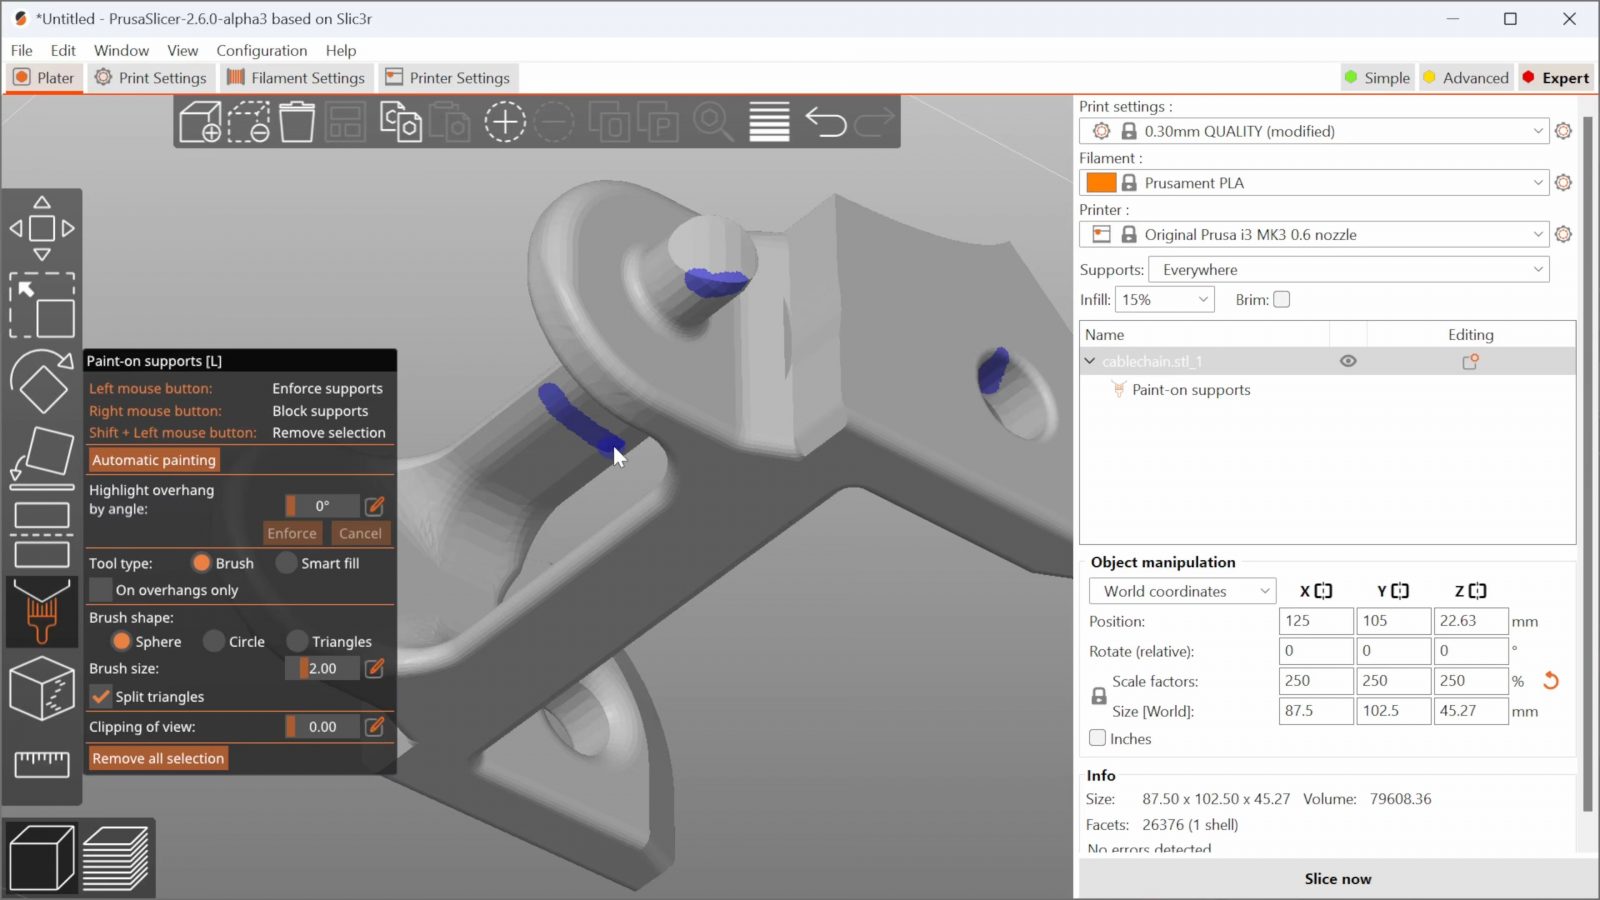
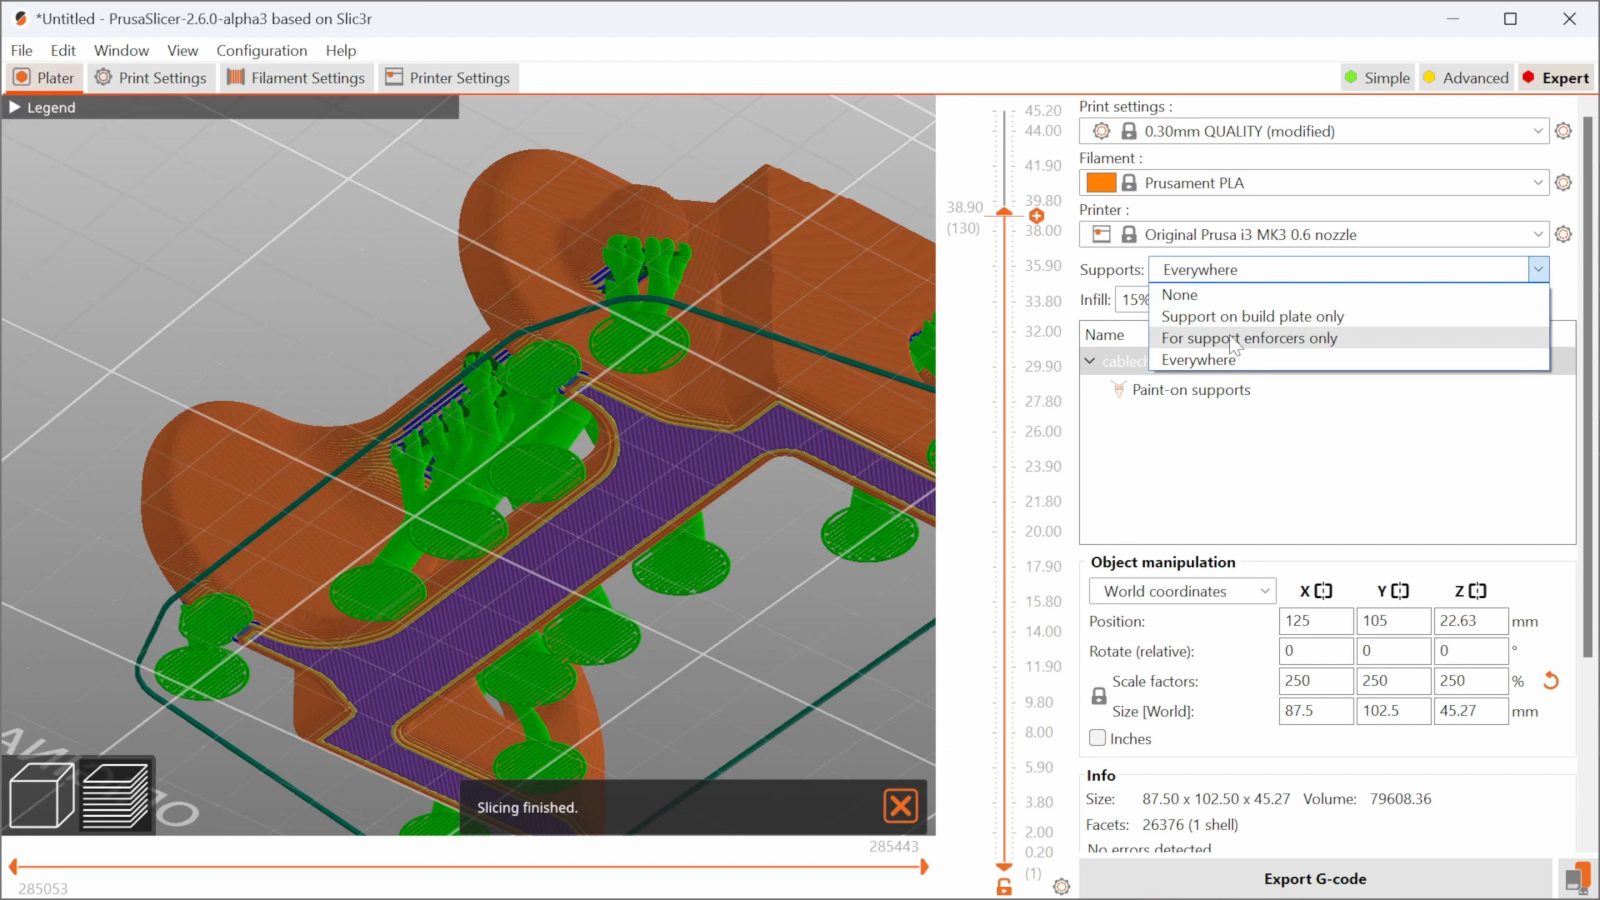
PrusaSlicer has long had support material painting where it would only generate support material for the areas that you explicitly marked. Now, thanks to new AI technology – no, it doesn’t use AI, it’s just smart programmers, I think – it detects which areas need supports and which don’t, and it does it a lot intelligently than the classic “support anything that has an angle over 60° from vertical” approach. So for example, bridges, if they’re short enough, get no support at all, and if they’re above a certain length, they get a bit of support material every now and then, and then essentially print as a bunch of shorter bridges between those. If you want to try the automatic support painter, make sure you also set the support mode to “enforcers only” or you’ll actually get more support material instead of less.
So final thoughts on support material: This is really cool.
I didn’t see any improvements in how well the tree support material worked with the auto painter, which I guess really wasn’t the point in the first place, but the part also didn’t look worse – and I think that is a huge win for using 1/3rd of the material, and being much easier to remove. I’ve seen speculations whether designers are now going to start factoring this in and mechanical and organic parts are just going to be printed with a bit of support from now on. Fewer design restrictions, more creative use of the geometric freedom that 3D printing brings without having to spend half an hour peeling your part out of a block of support material? Yes please.
Warning Messages
So there are a couple more headlining features that you’ll see everyone talking about, but before I also talk about those, I want to point out one easily missed, but really neat new feature that I think may have been a byproduct of the new auto support painter. And that is these little messages down here.
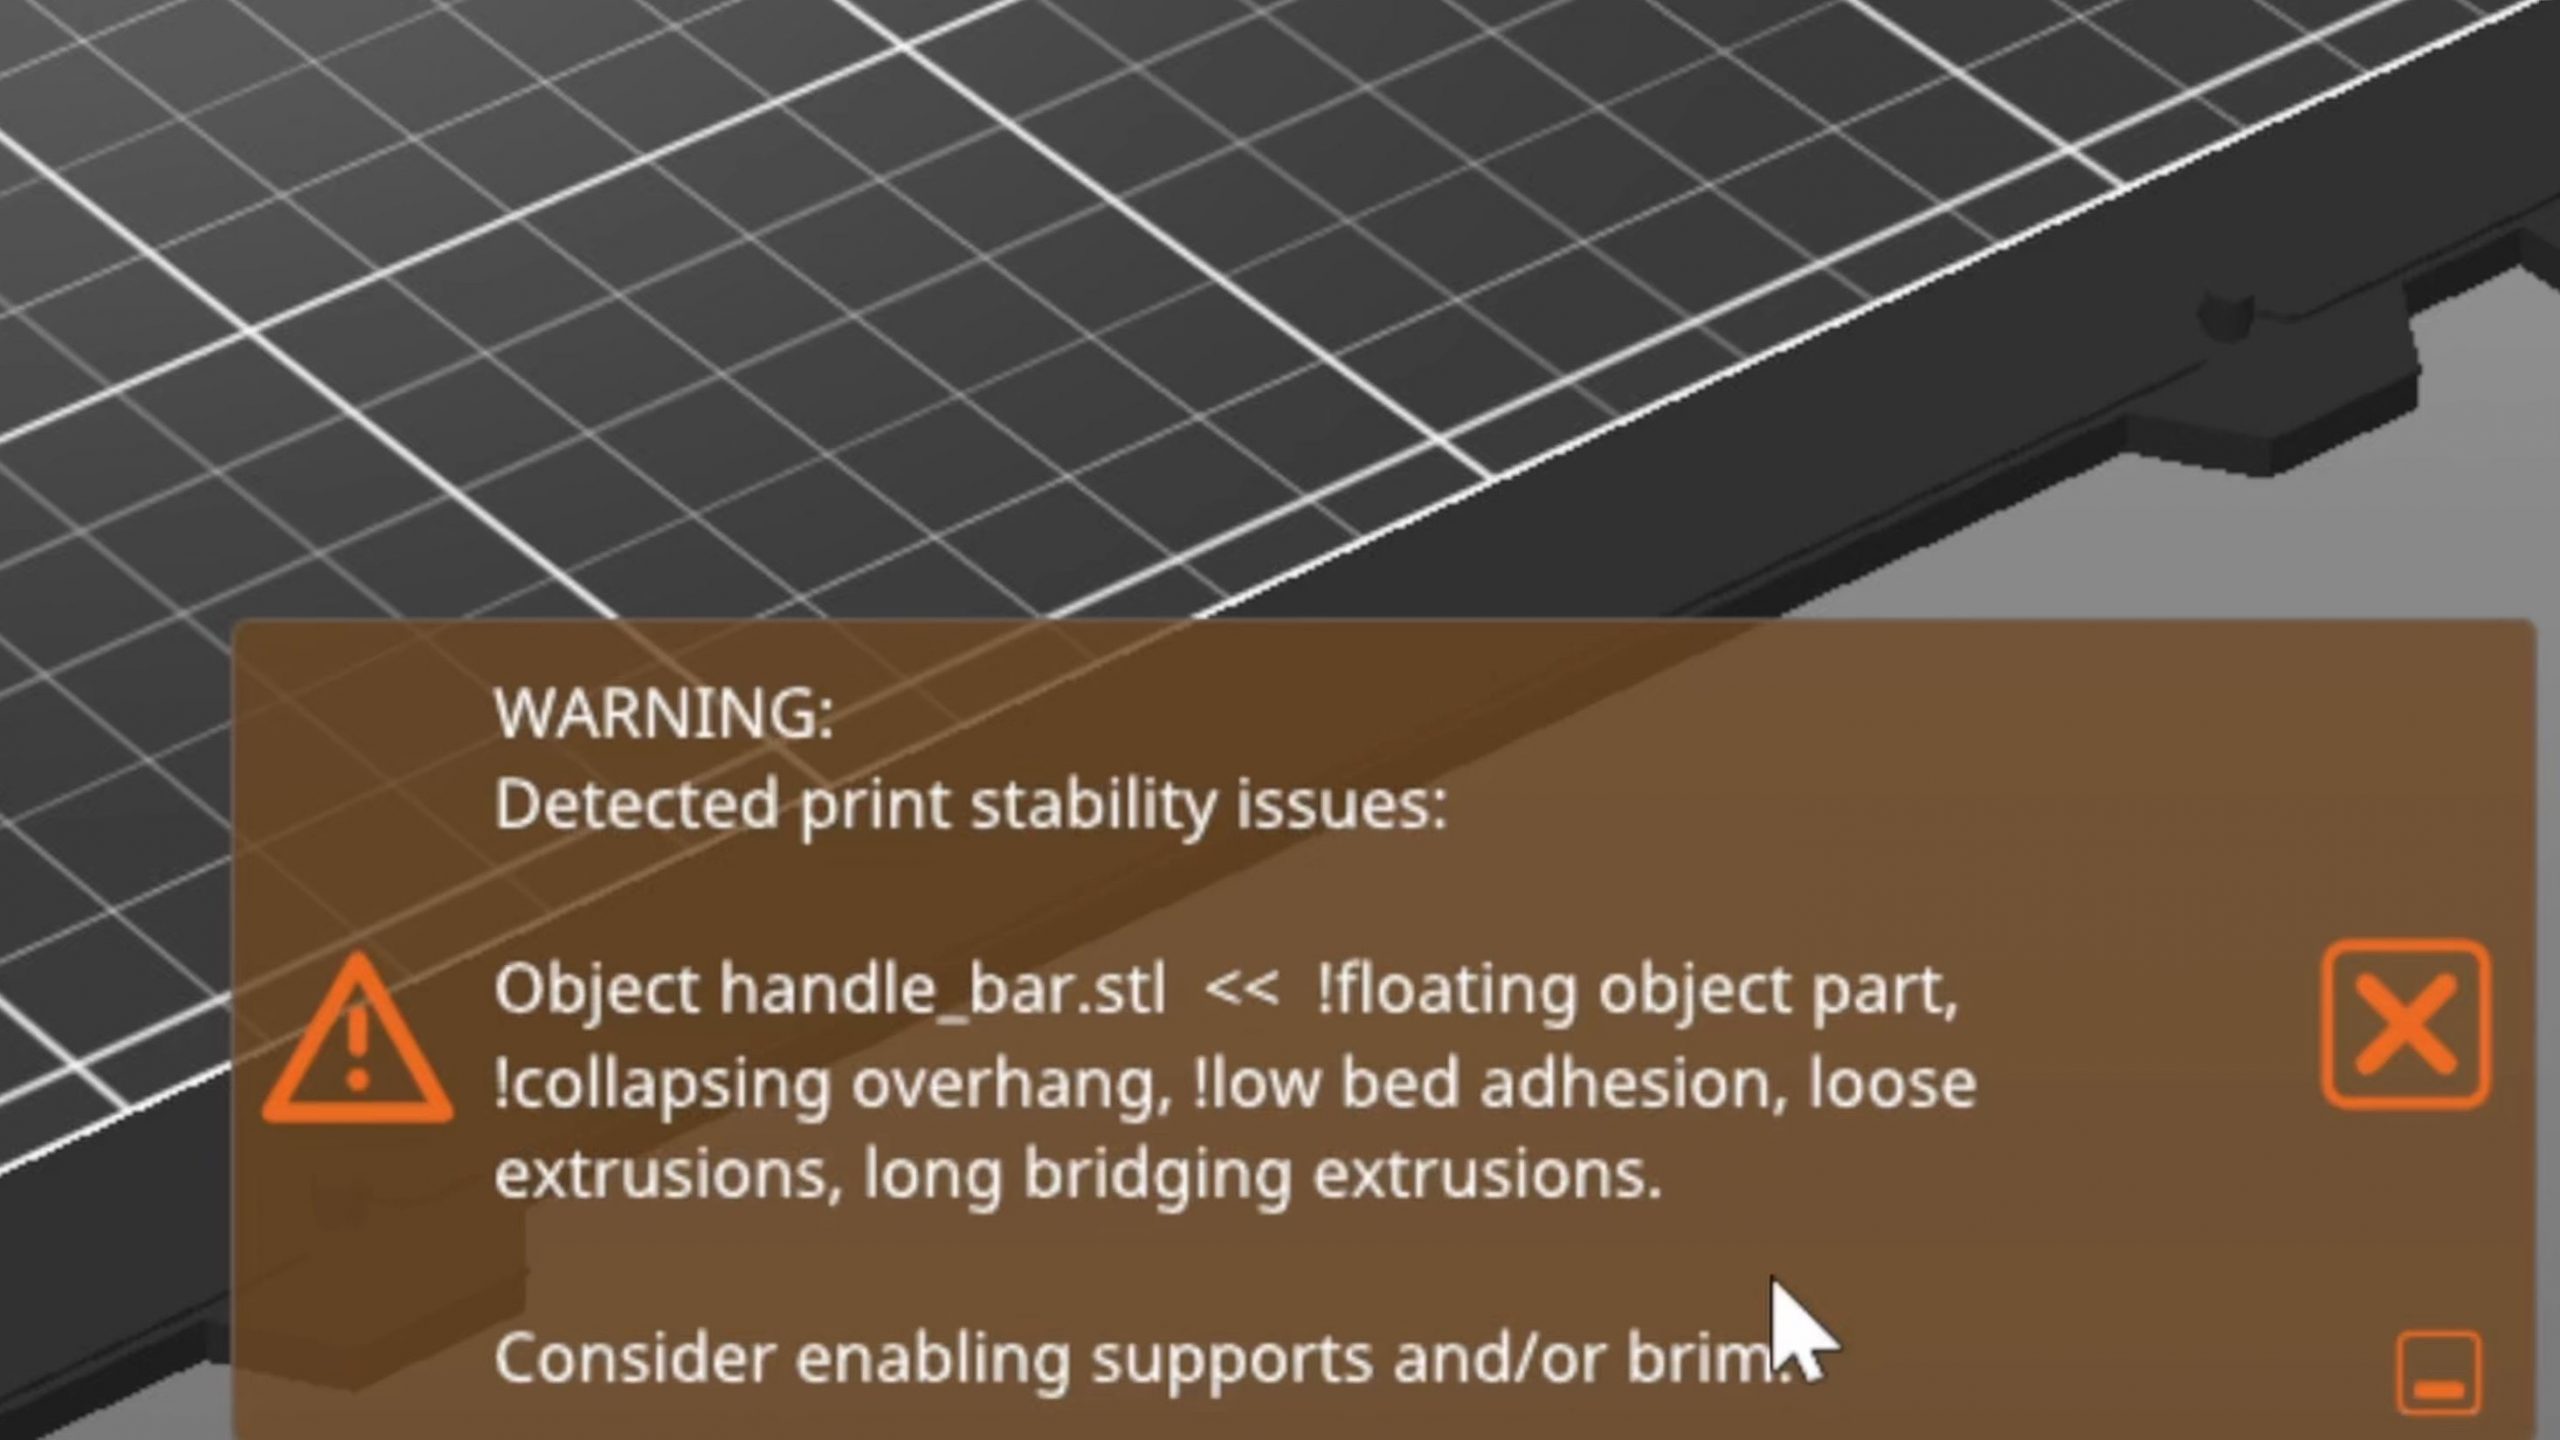
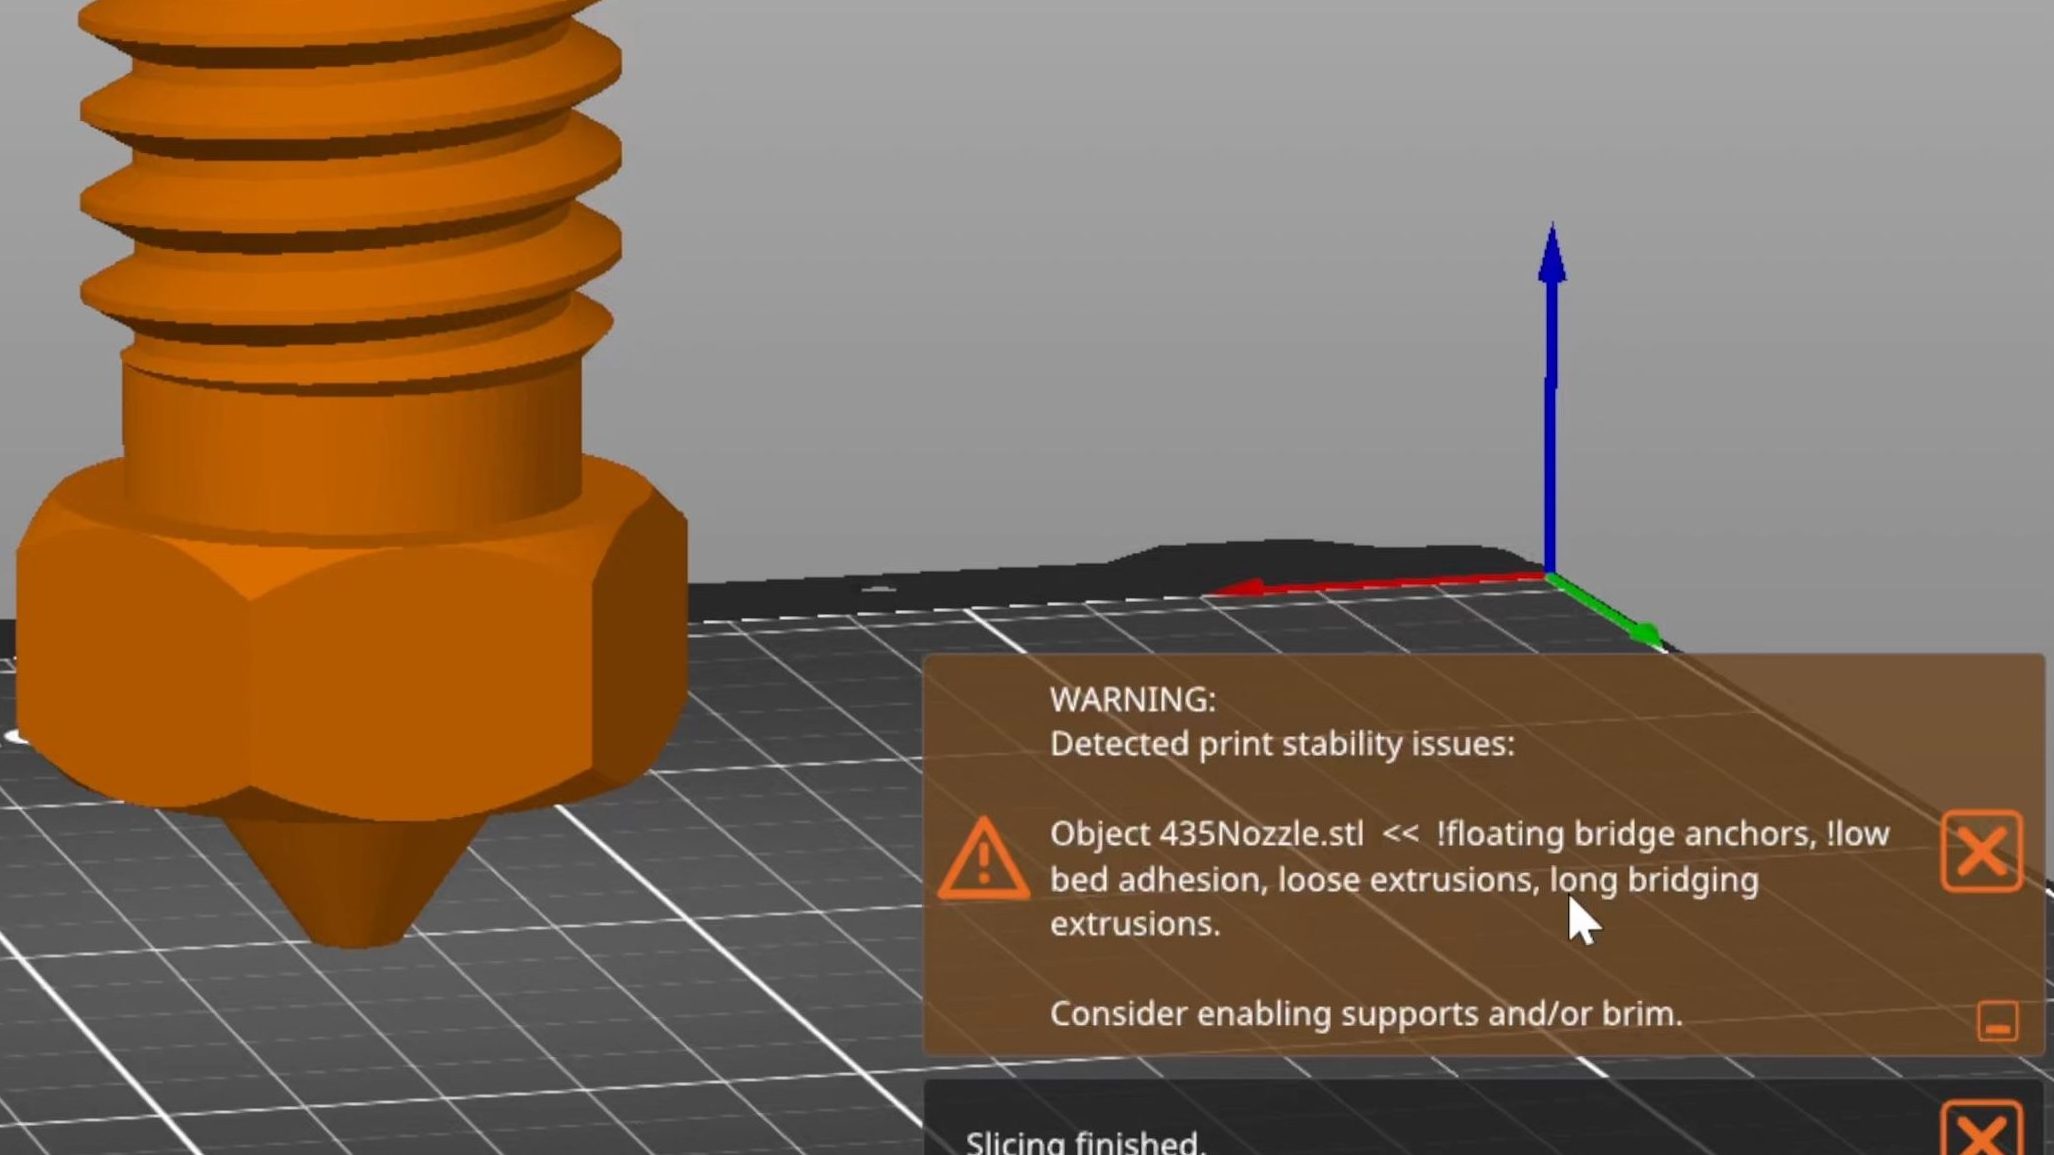
So when you’re trying to print a part that probably isn’t going to turn out well without support material, or one that has too little contact with the bed and might get knocked over, in those cases where it would take a bit of expertise, a bit of experience to see that what you’re trying to do is probably not a good idea, this now helps you with making better decisions for how to print your parts to get a good result first try. I’ve probably not even seen all the different ways that it can analyze your part and point you towards potential issues with the print, but I like the direction this is heading. There was a bit of a glimpse of the slicer trying to be smart in PrusaControl, that was an alternative user interface they did, I guess as an experiment, and when that was scrapped, the features that had mostly got carried over into PrusaSlicer. But anything that makes 3D printing more approachable without being overzealous or limiting, I think is a good thing, and so far, the hints this system was giving me were really on point.
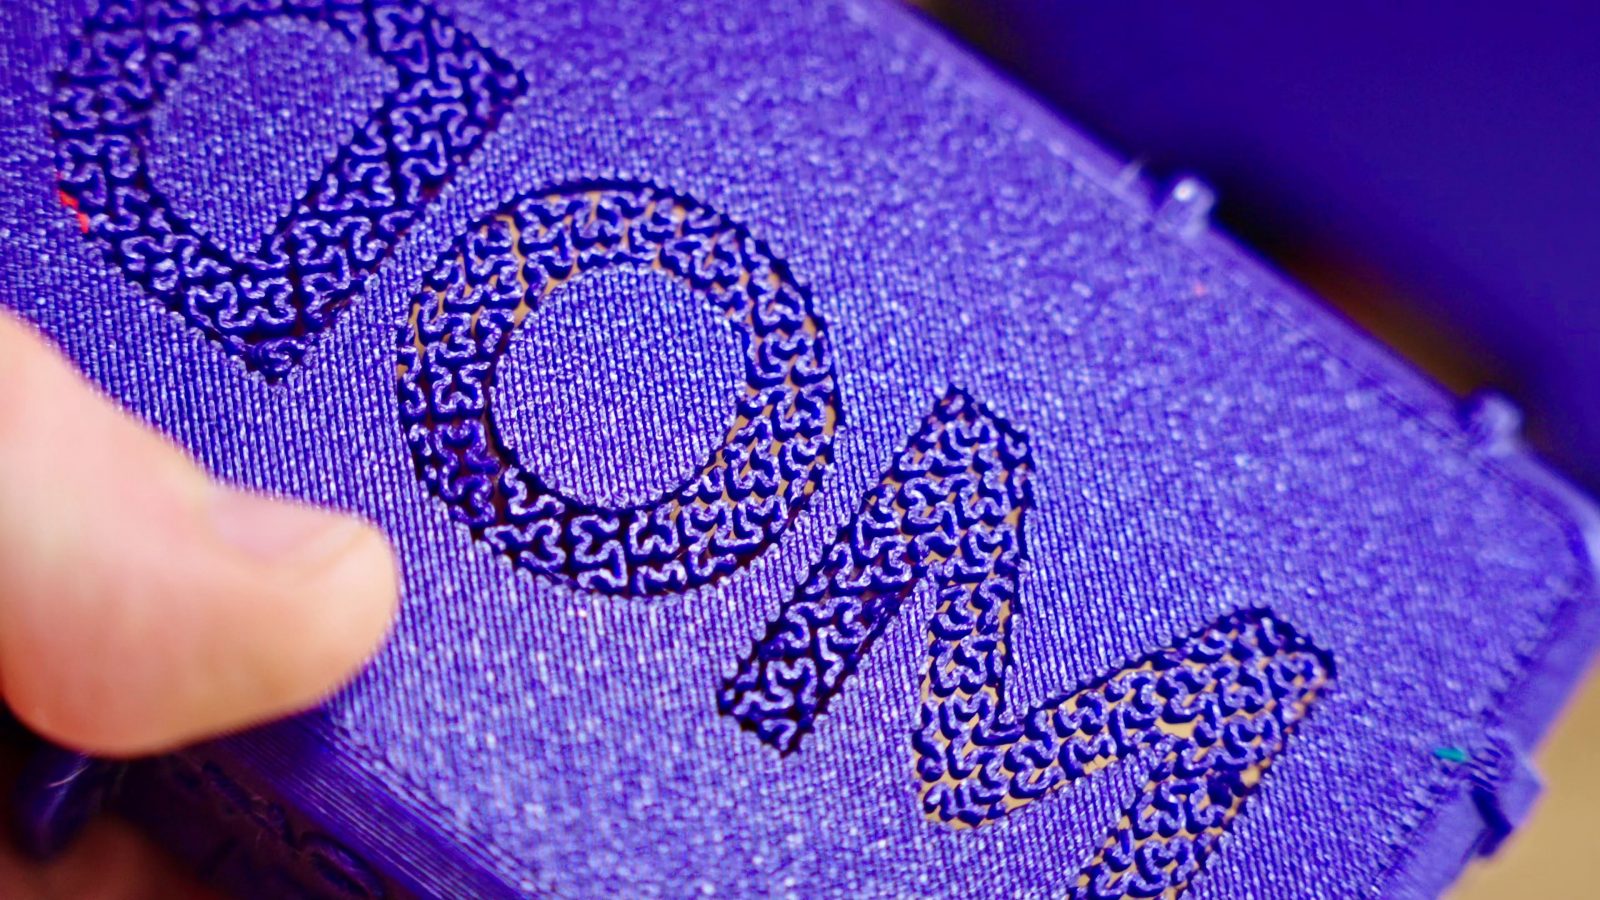
Text Embossing Tool
Okay, so the other headlining feature is the new and improved text tool. PrusaSlicer has supported some basic geometry manipulation for a while now, that is creating for examples cylinders or cuboids and using those to intersect with the model, or even using other stls for that. Text is just another one of those modifiers, where you spawn a new piece of text geometry and then add or subtract it from your model.
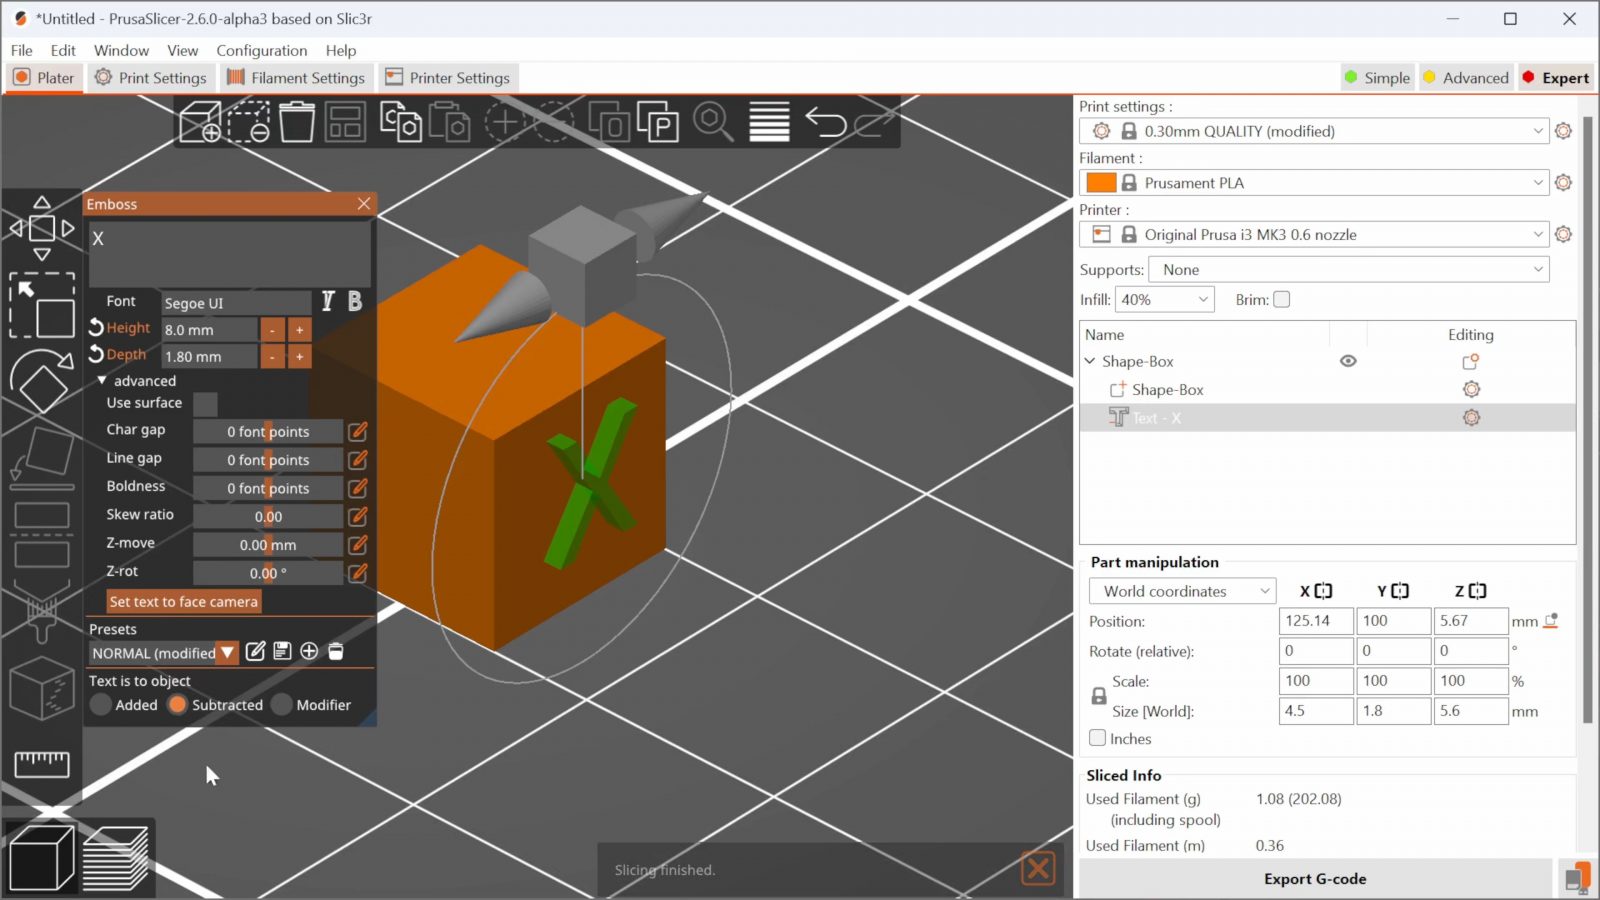

This is something that you can do fairly easily in CAD, too, and there are obviously use cases where that would be a better idea than doing it in the slicer, but here, you can modify and personalize any already exported stl. Now, the new feature in 2.6, is that you can automatically project your text onto the surface of your parts and choose how much you want to emboss or extrude it. And that is, onto any geometry you w ant. And this is something that is extremely annoying to do in CAD. It’s easy for some surfaces, but once you have more complex surfaces, CAD tools start to struggle hard to do this precisely – that’s what CAD is meant for. In PrusaSlicer, it just slaps it on there, no questions asked. Right now, it only does a “straight” projection, so if you try to add text around curved surfaces, it’s only going to look good if you don’t go too close to the edges, that’s the big limitation it still has. Just like before, you can also use the text geometry as a modifier, so if you want to, for example, just have the infill poking through for your lettering, you can also absolutely do that.
One concern I had here is that this would be work you’d do on one iteration of your model, and when had to make changes to your design upstream in CAD, you’d then also have to repeat the entire text adding process in PrusaSlicer again for the updated model, but no, if you save the entire thing as a 3mf project, you can then come back to it later and simply swap your stl for an updated version and as long as the origin, the relative position of the mode didn’t change, it will just apply all those modifications to the updated one. So I guess this is just a part of CAD that you’re now outsourcing to the slicer. Huh. More thoughts on that once we sum everything up.
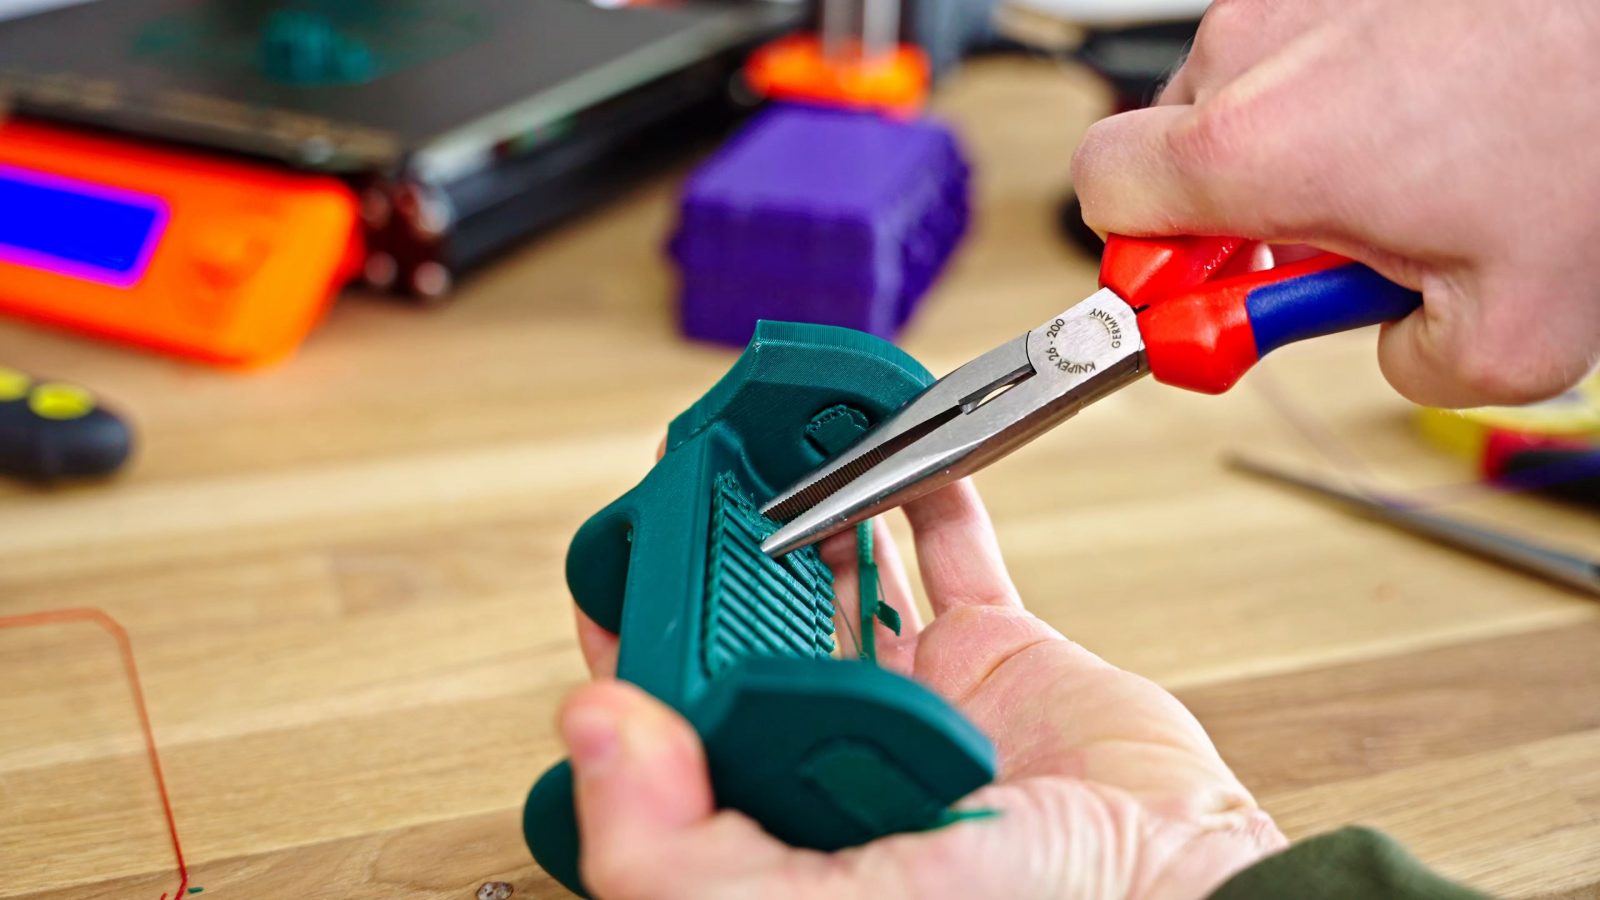
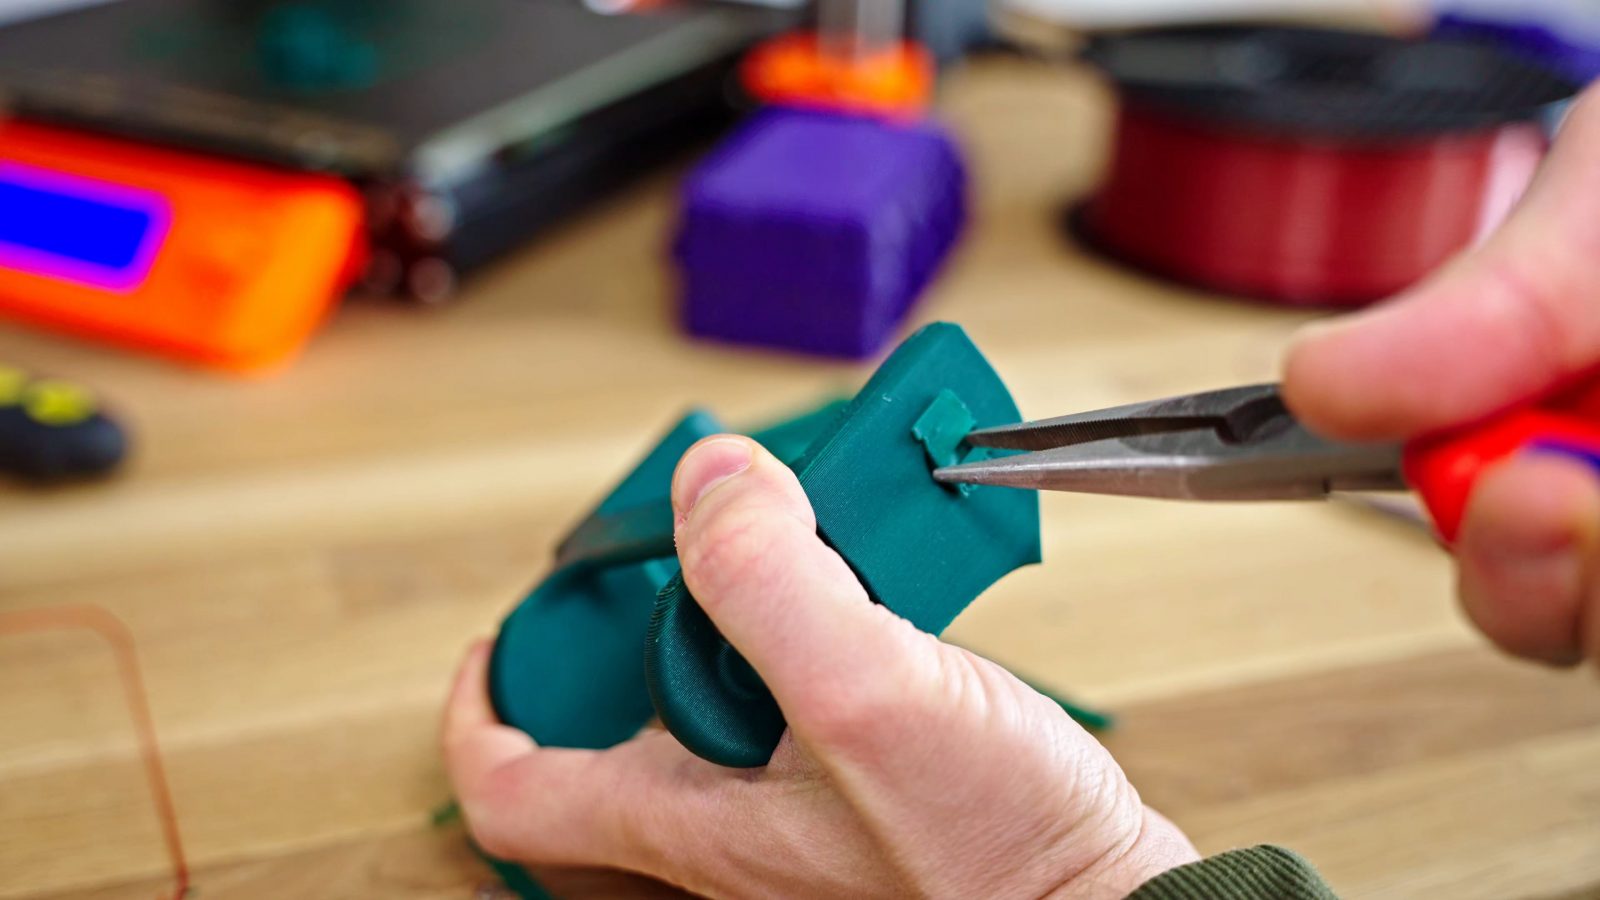
Cut Tool
But on the topic of PrusaSlicer encroaching on CAD, the cut tool. It’s actually usable now. Well, I mostly used it for trimming models before, but it could only cut at a certain Z height, so I’d have to juggle the model to align it, then cut it, then realign it to the bed. Now you can just change the angle. And you can add pins for alignment!
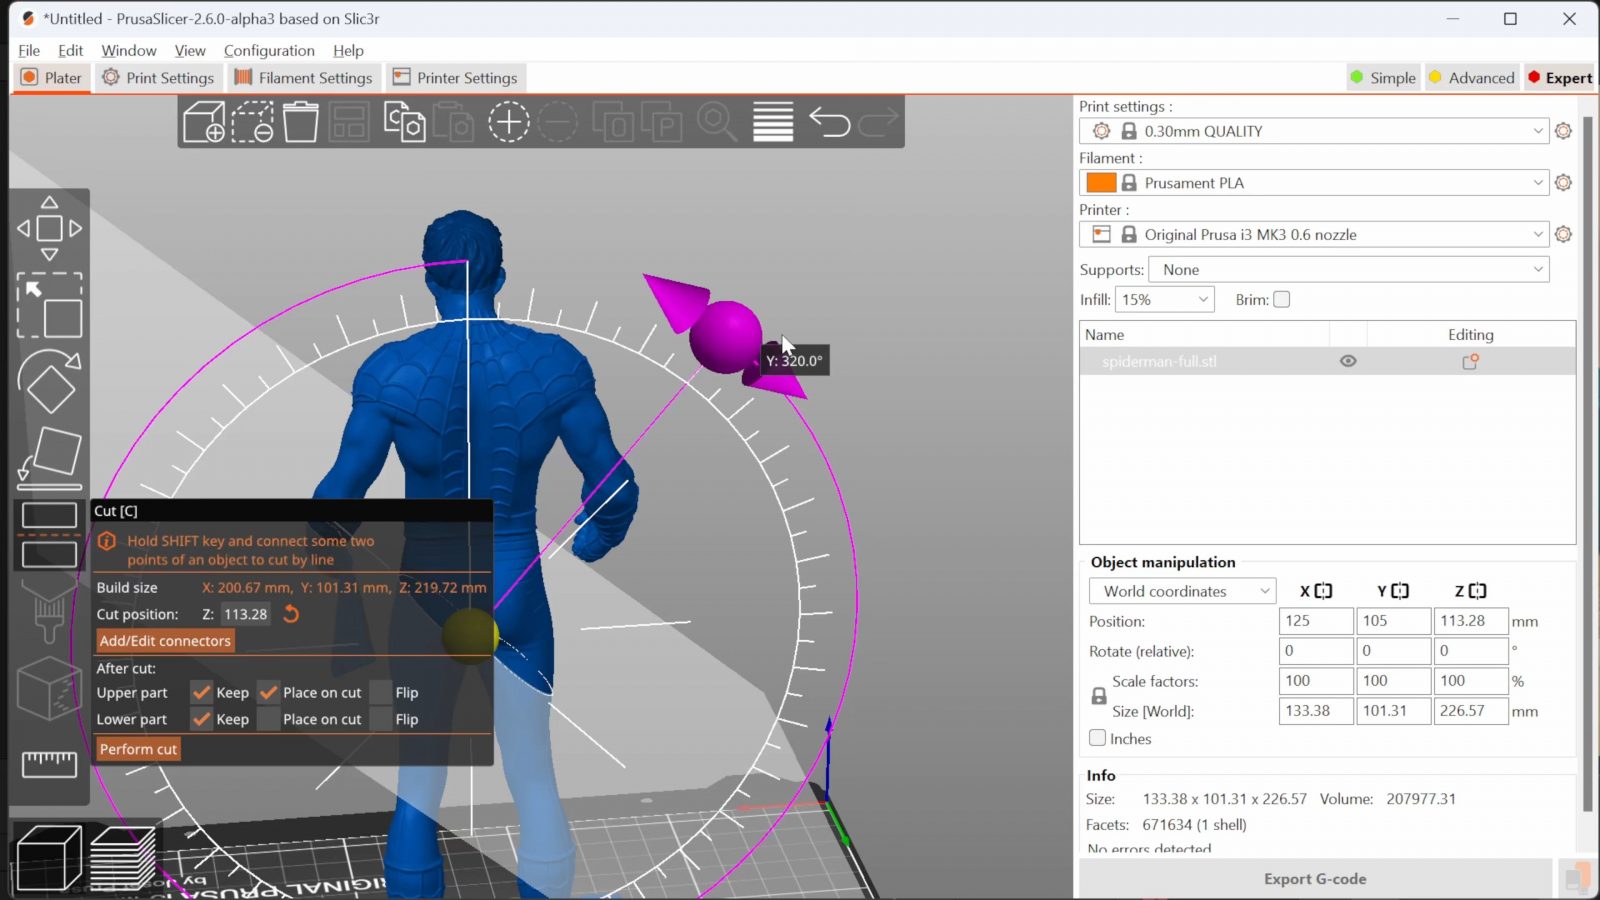
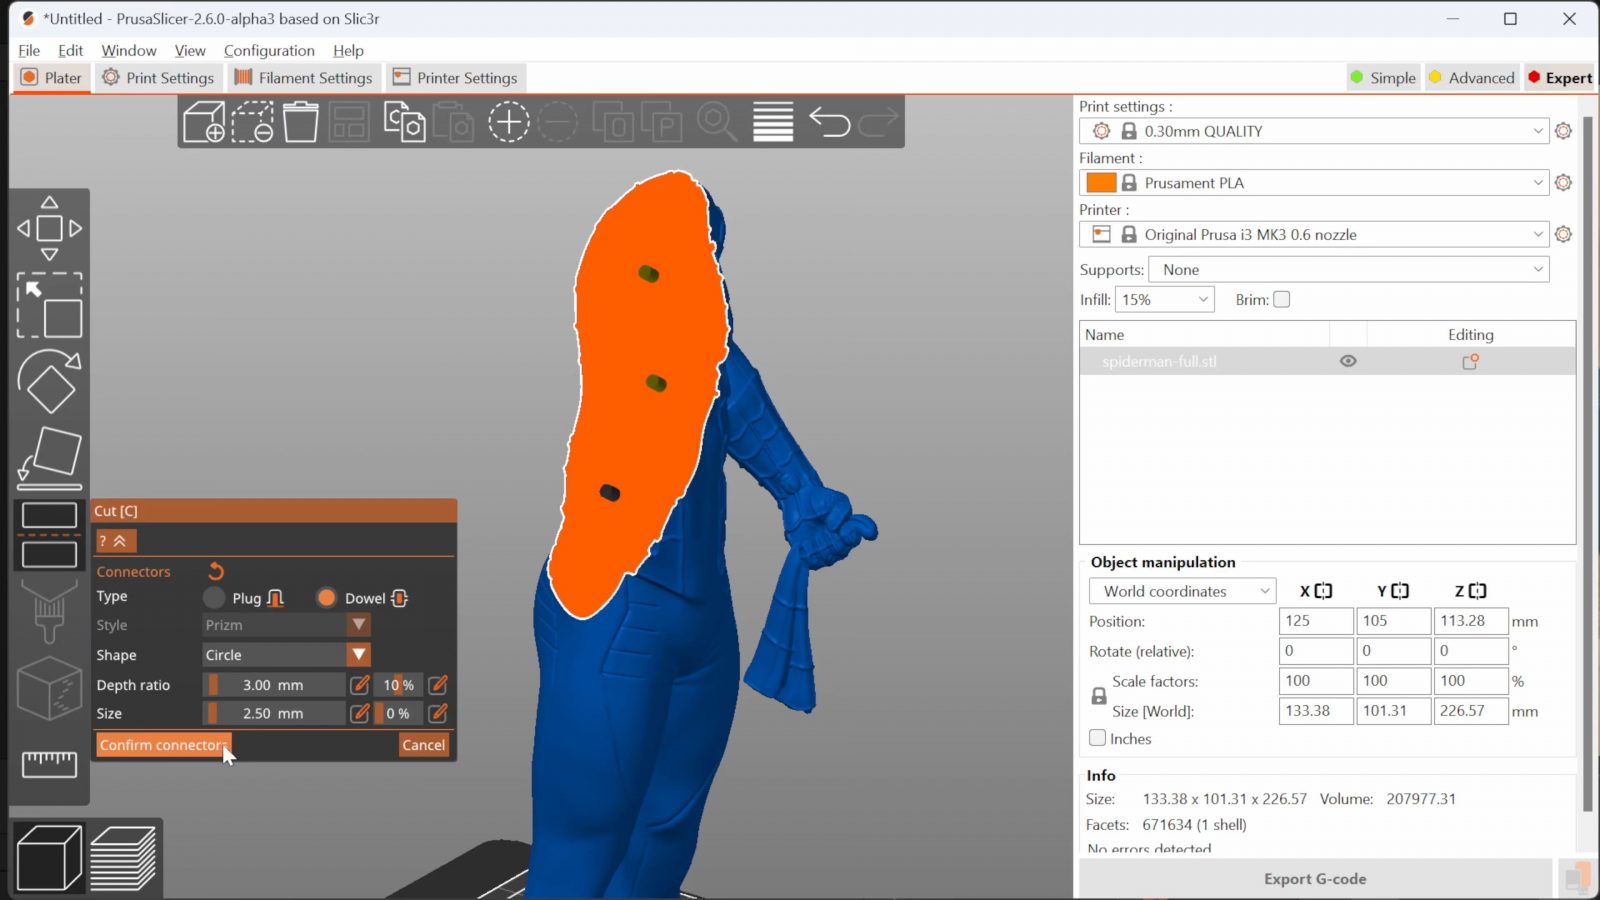
The tool works in much of the same way as the SLA hollowing hole-punching tool, you choose whether you want separate pins or ones printed onto one of the halves, click the spots you want them, and it chops your part in half and creates the pins for you. It’s so easy! Two use cases here, printing parts that would need tons of support material otherwise, like figurines with arms, or just for printing large models on printers that are too small otherwise.
If you glue the seam with epoxy or superglue, it will be just as strong as if you printed it in one piece – plus, you can choose the layer orientation for every section separately so you get optimal strength for each one. Again, that’s something that you’d do in CAD typically.
Couple more things that they’ve added that maybe aren’t worth spending a whole bunch of time on, but I think are still worth pointing out:
Measurement Tool
There’s now a measurement tool, it’s incredibly basic at this point, it only measures distance and angle between two points, edges, or surfaces. It doesn’t do the length of a single edge yet, you have to click the two ends, it doesn’t do surface area yet, it doesn’t do radiuses, but it’s there, that’s something that I think only Netfabb really did so far, and while it’s still clunky, it’s still nice to have.
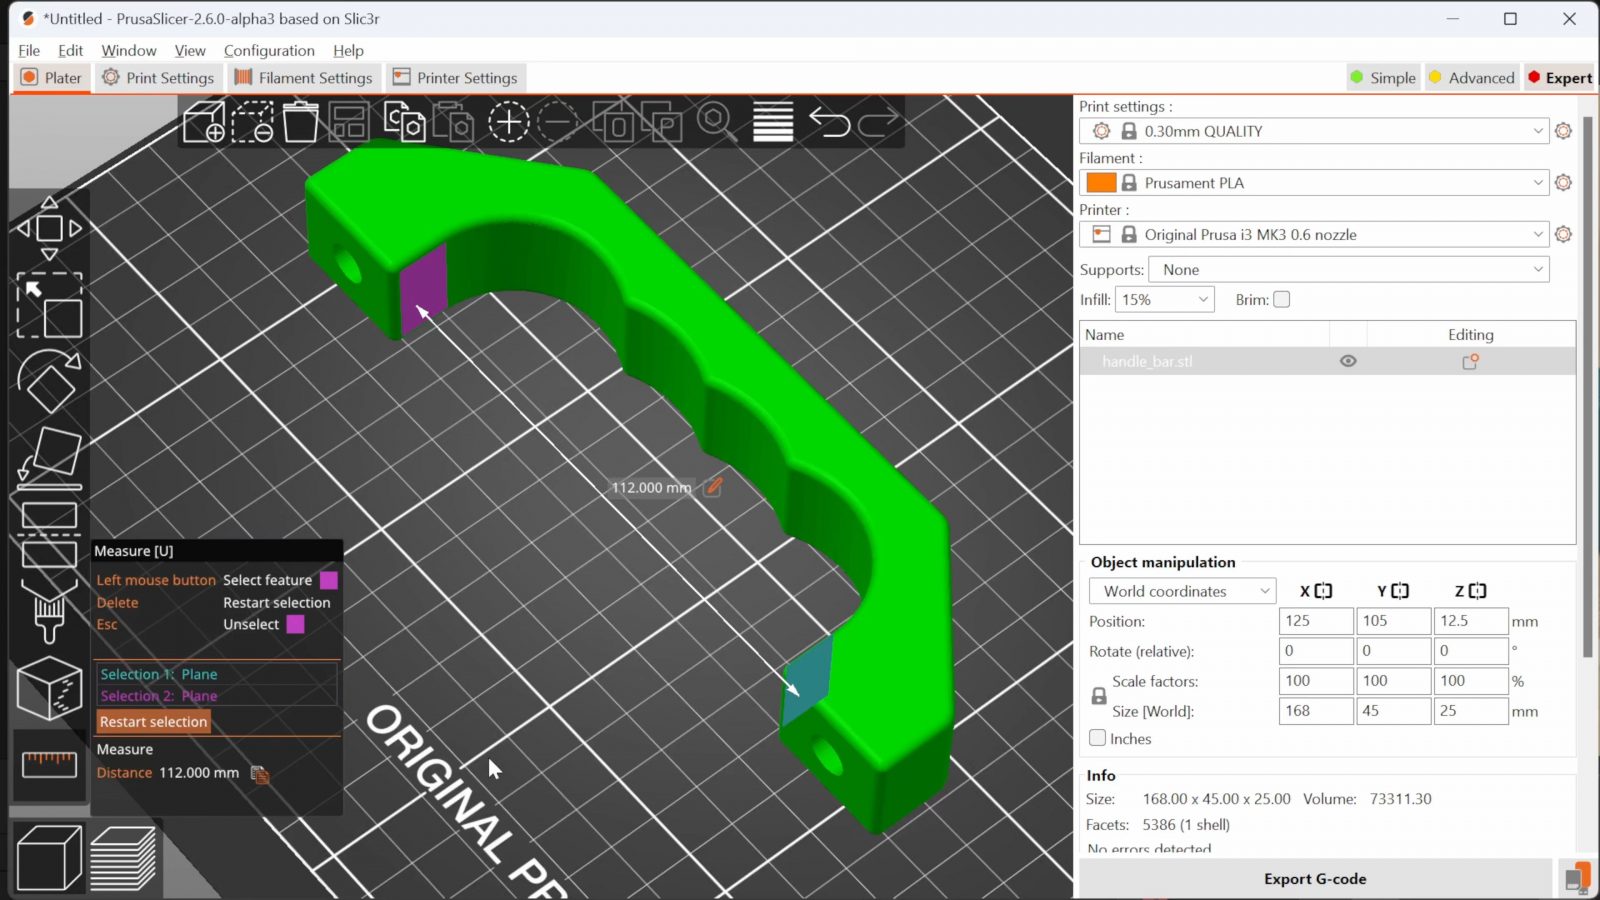
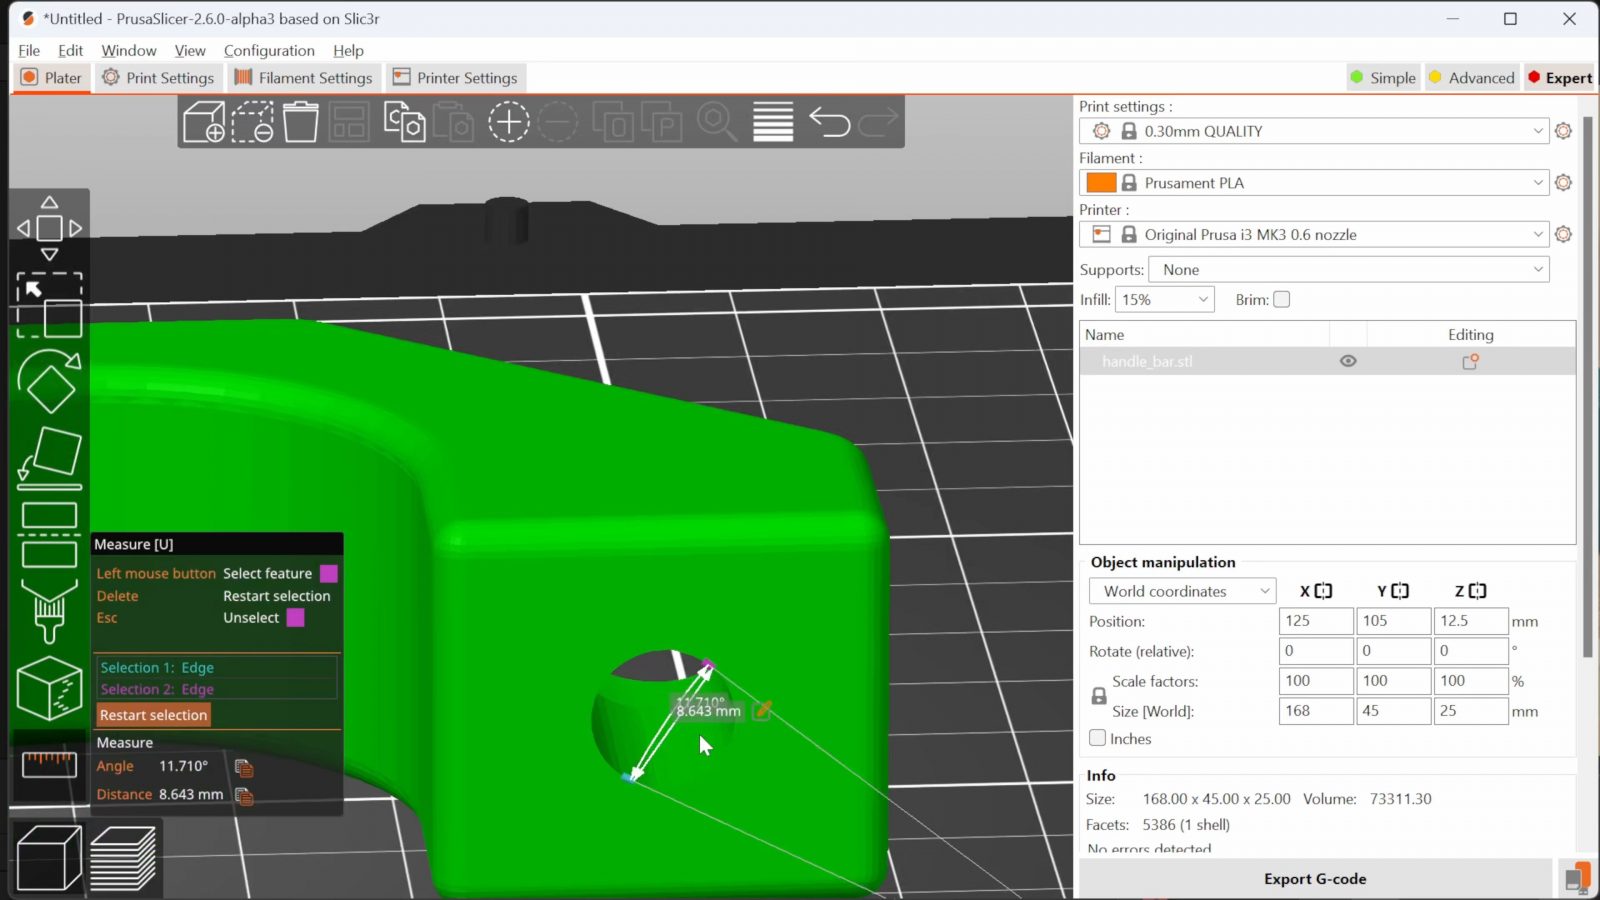
Plus, once you measure a dimension, without doing any math, you can just say “hey, I want this to be 40mm instead”, and it will scale your part accordingly. Just don’t use this for “calibrating” your printer, please.
Extra Perimeters on Overhangs
Then, there’s a new feature “extra perimeters on overhangs”, which I was hoping would work similarly to the circular overhang approach Stefan made a video about recently, but I really didn’t see any difference in how my parts turned out with it enabled or disabled.
Import Designs from Printables into your Slicer
There’s now a “open in PrusaSlicer” option on Printables, you have to enable it both in PrusaSlicer 2.6 and in Printables, and then it’s literally one click to get designs from Printables into your slicer. The best thing is, this is just a URL handler, at first I thought it would be some cloud service where now you’d need to log into your account in PrusaSlicer and then it would somehow synchronize in the background, but only if the servers worked – nope, it’s just an entirely local process that works instantly.
3mf Format
And lastly, PrusaSlicer is making the 3mf format more usable – if you don’t know, 3mf is a much more feature-rich format than stl, at its most basic, it can just be a wrapped-up stl file, but it also supports other, better geometry formats and it can store metadata about those files, for example specific to PrusaSlicer, what settings you’re using, the texts you’ve added, assemblies, all that stuff. But when you’d open that 3mf and treat it just like you would an stl, PrusaSlicer would want to import all that info and possibly overwrite some of your print settings in the process.
Now, it asks. Thank you.
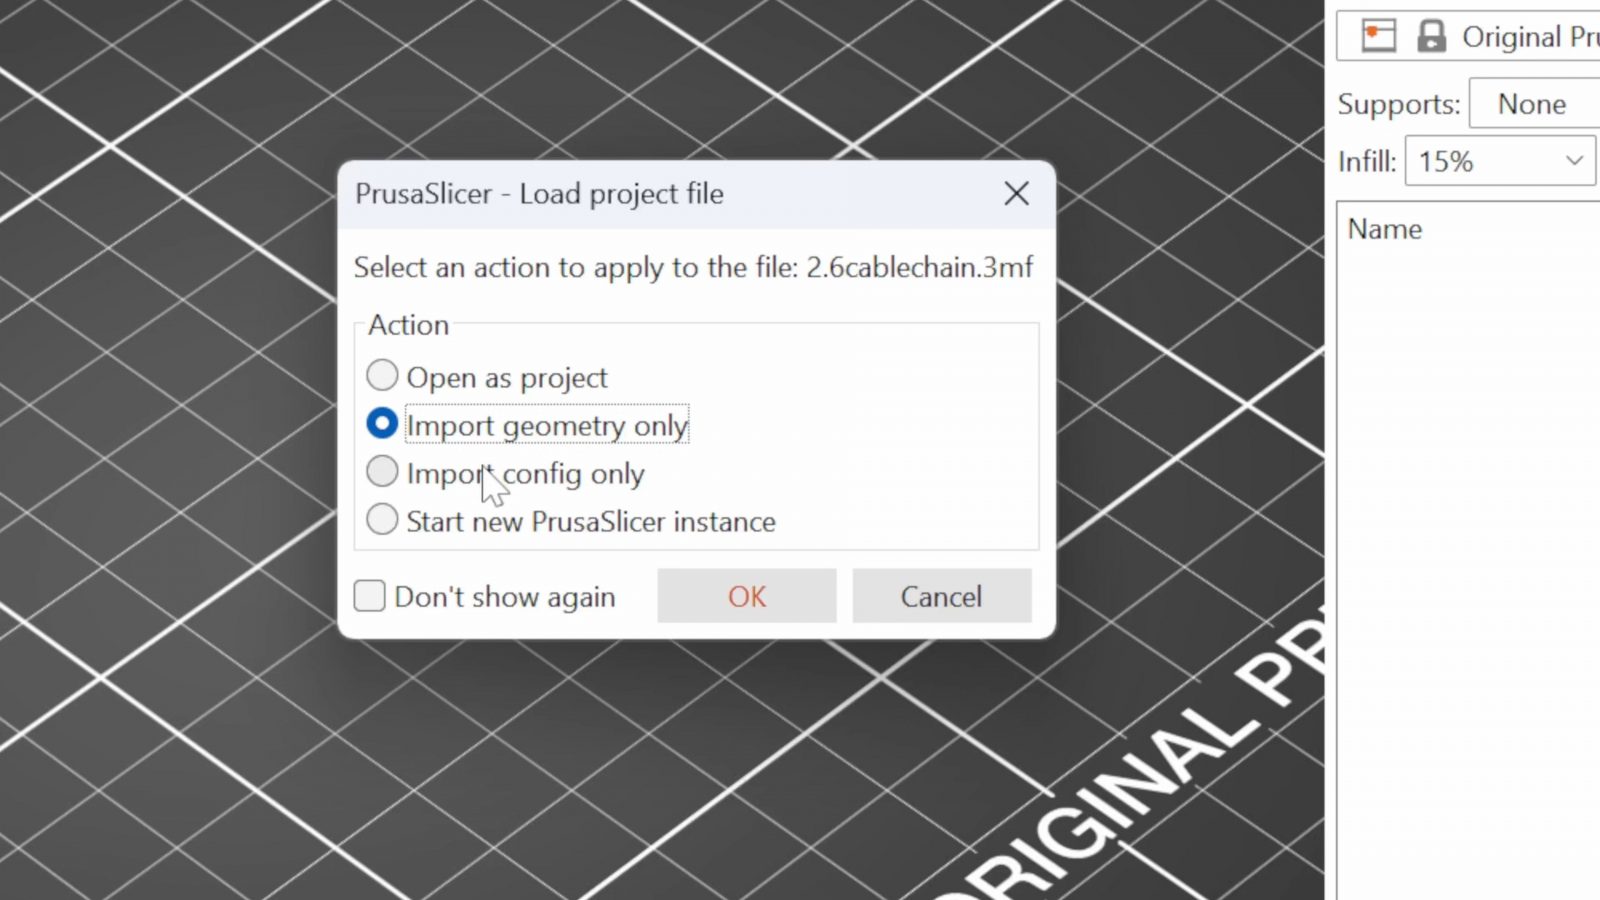
I think this is mostly about figuring out what 3mf is supposed to be, whether it’s a format specific to, like slicer projects, the entire scene and setup, or whether it’s also supposed to be a better replacement for the humble stl. Because, really, it can be both, but right now there’s no way to tell which one you’ve got by just looking at the file, and therefore, no way to tell what PrusaSlicer is going to do when you open it. Good thing it asks now.
My Conclusion
And that brings us to the final thoughts. A lot of these changes sort of put PrusaSlicer in an identity crisis of sorts. On the one hand, yes, i absolutely love that it’s implementing more features and it’s doing it in a way where it’s making them super simple to use. The folks working on PrusaSlicer see that there’s absolutely a need for features like the new cut tool or text or the other simple geometry editing tools that have been available for a while. On the other hand, I don’t know if what they’re adding is really still feature for a slicer, really, it’s becoming more of a 3D-printer-file-preprocessing-suite. With the better support material options now, too, it’s sort of shifting the traditional approach of doing all the design work and optimizations for 3D printing in your CAD tool or design tool or whatever else you’re using to make files, where ideally, you’d get an stl that then, really, you would just need a tool that converts that converts that geometry into gcode your printer understands. Now, the approach seems to move towards not worrying too much about 3D printing specifically during your design stage and then having PrusaSlicer or some other preprocessing tool as an integral and ultimately unskippable part of your 3D printing and design workflow.
I don’t know if all these tools are really supposed to be in a slicer anymore, but this is what the PrusaSlicer team have to work with, and I definitely appreciate them adding all this stuff in here. Maybe in the future it’s going to be PrusaCAD, that would certainly be interesting, but hey, you can really use the tools however you want. If you want to try PrusaSlicer 2.6, currently alpha 3, it’s of course linked below.
Current PrusaSlicer ALPHA releases at Github
Models shown:
Skull holder for glasses by 3D in Plastic
Rugged Box (Parameterized) by Whity
Spider-Man/Peter Parker by Eastman
💙 Enjoying the videos? Support my work on Patreon!
Product links are affiliate links – I may earn a commission on qualifying purchases (at no extra cost to you)

Check out my second channel “More Layers” on YouTube for livestreams