
Hello from the new, old, old, new studio! I’m not quite fully set up in here yet, but it’s usable, and today we’ll be talking about Benchies!
I don’t think I need to explain what this is – if you’re watching this video and you’ve got a 3D printer, you will most likely have already printed a 3DBenchy at some point. And I think that’s great! I’m going to argue that this is pretty much the ultimate calibration or benchmark print. I’ve never printed a calibration cube, well, maybe once, but that was pretty much to show how much of a waste of material that calibration cube was. The Benchy does so much with so little material, and I kind of want to show you how to use them, there are a lot of hidden features and implications on the Benchy that really make it a model that is so far ahead of other single-purpose setup prints.
So I want to get one thing out of the way first because it’s a super common complaint when you print a little plastic boat: I don’t think printing these is wasteful, bad for the environment, or anything like that. First of all, we’re talking about really tiny amounts of waste that we’re producing – a Benchy weighs about 13.5g, and, when printed with PLA, which is derived from corn, causes about 60g of CO2 to be released in total, for the production of the PLA, and the electricity used to run the printer. For comparison, if you do a single 0 to 60 run in a gas-powered car, this is the amount of gasoline you’re going to burn, about 80ml, from fossil sources, which is going to cause about 250g of CO2 emissions. So basically, for every one or two seconds of stepping on the gas, you’re roughly doing the same amount of environmental harm, when it comes to CO2, as printing a single 3DBenchy. Kinda puts a perspective on things.
And printing a 3DBenchy overall actually saves waste on your printer in the long run. It is much better to do a small test print and use that to tweak your printer, than having to eventually throw away a much larger print because it had a flaw you weren’t anticipating.
Plus, these are decorative, if you will.
What makes the 3DBenchy such a great testing model is quite a few things actually. What I find most important is that it doesn’t just cover a single tuning parameter. When you’re making changes to your printer’s setup, it is super easy to over-optimize for one single thing, because most settings you have access to affect a multitude of aspects of your prints, some aspects you’re going to improve, and others you are often going to make worse, for example, as you increase temperature, within reason, you’re going to get stronger parts, but you’re also going to get droopier bridges, more stringing, and worse top surfaces.
As you increase jerk and acceleration, you’re going to get rid of ridges on round features, but you’re also introducing ringing and extruder control issues to your prints. Because the 3DBenchy has such a wide range of feature sizes, geometries, and details, you’re always inadvertently also checking for all of those areas where you might have made something worse.
But the 3DBenchy isn’t a benchmark for benchmarking’s sake.
I’ve made some test parts in the past that really hone in on some specific details, but what the Benchy does is to be realistic – there are no crazy long bridges, there are no details that are smaller than your nozzle, there are no crazy overhangs, and that is sort of what your typical 3D print is going to look like, too. Very rarely are you going to work with parts that are not in some way optimized for 3D printing.
But this is also becoming a bit of an issue for the Benchy as a “torture test”. When the Benchy first came out, it was an actual benchmark test, you could clearly see the differences between printers. But nowadays what you can expect from 3D printers is a lot better than what you could then, and honestly, if an off-the-shelf machine can’t print a near flawless 3DBenchy straight out of the box, I’m going to have to assume the manufacturer is either lazy or incompetent, or both, or the machine is broken.
How to print a Benchy
Before we go over all the things to look for on a Benchy, let’s briefly touch on how to print one. First of all, I think this should be obvious, don’t use any special profiles or settings for it, print it the exact same way you would print other parts as well. If a profile has issues as-is with printing a 3DBenchy, those issues are going to show up in some other print at some point, too.
And secondly, also print the Benchy as-is. Don’t change its geometry, and especially don’t scale it up or down.
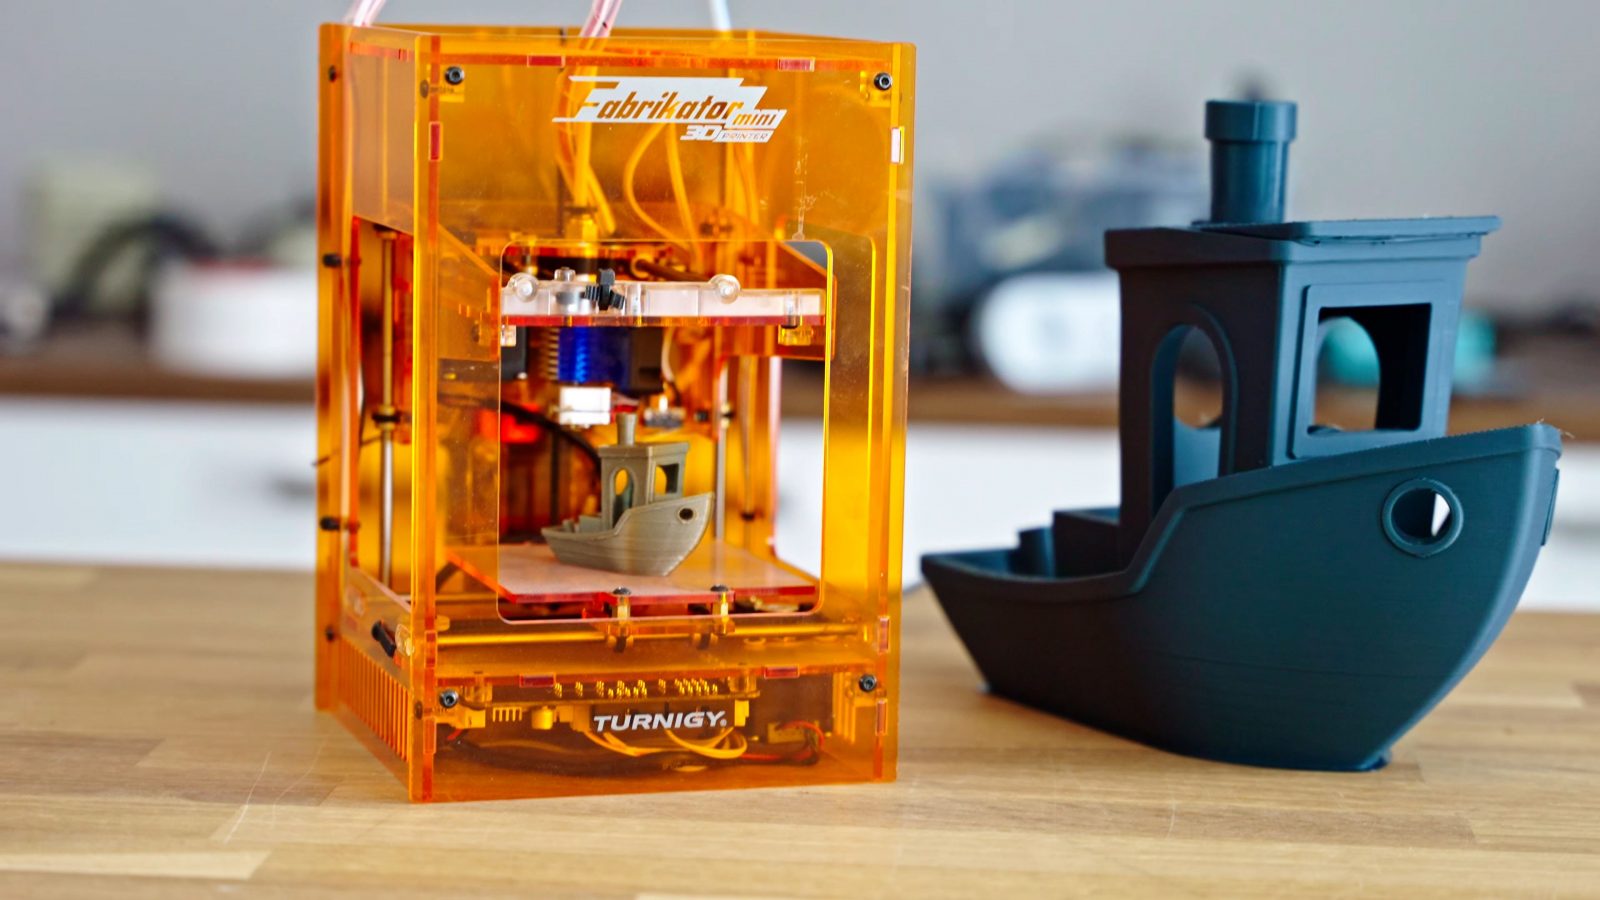
You know, a big Benchy, printed with thick layers and a smooth, matte finish, looks great. This is Prusament Gentlemen’s Grey PLA, it’s a pleasure to look at, except for that layer skip up here, my bad, but as far as benchmarks go, this isn’t representative of anything, really, and it completely erases the ability to compare the Benchy of one printer to a Benchy printer on a completely different machine.
All the features are much larger, which makes some of them easier to print, and some of them harder to print, so you can’t really make any deductions with a print like this that isn’t done at 100% scale. The Benchy at its intended size is small enough that it will fit on virtually any printer, and I think that was a great part of the design goal, too.
Details to look for in a 3D Benchy
Let me give you an overview of the things I tend to look for in a 3DBenchy and how they relate to your printing, aka. your slicer settings. Starting with some of the more obvious ones:
If there are issues like warping, excessive stringing, holes in the hull of the Benchy, or layer skips, fix those first. To even judge some of the more differentiated benchmarks built into the Benchy, it needs to be a fairly solid print and at least resemble the part you’re trying to print – so with holes in the perimeters, check your extruder and hotend, if it’s warping or detaching from the bed, make sure your nozzle distance is correct and the bed surface is suitable and clean enough for the filament you’re printing, if it’s covered in strings, dry your filament and make sure you’re not printing too hot. Once you’ve got those things out of the way, we can start looking at not just fixing the print profiles, but tweaking and improving them.
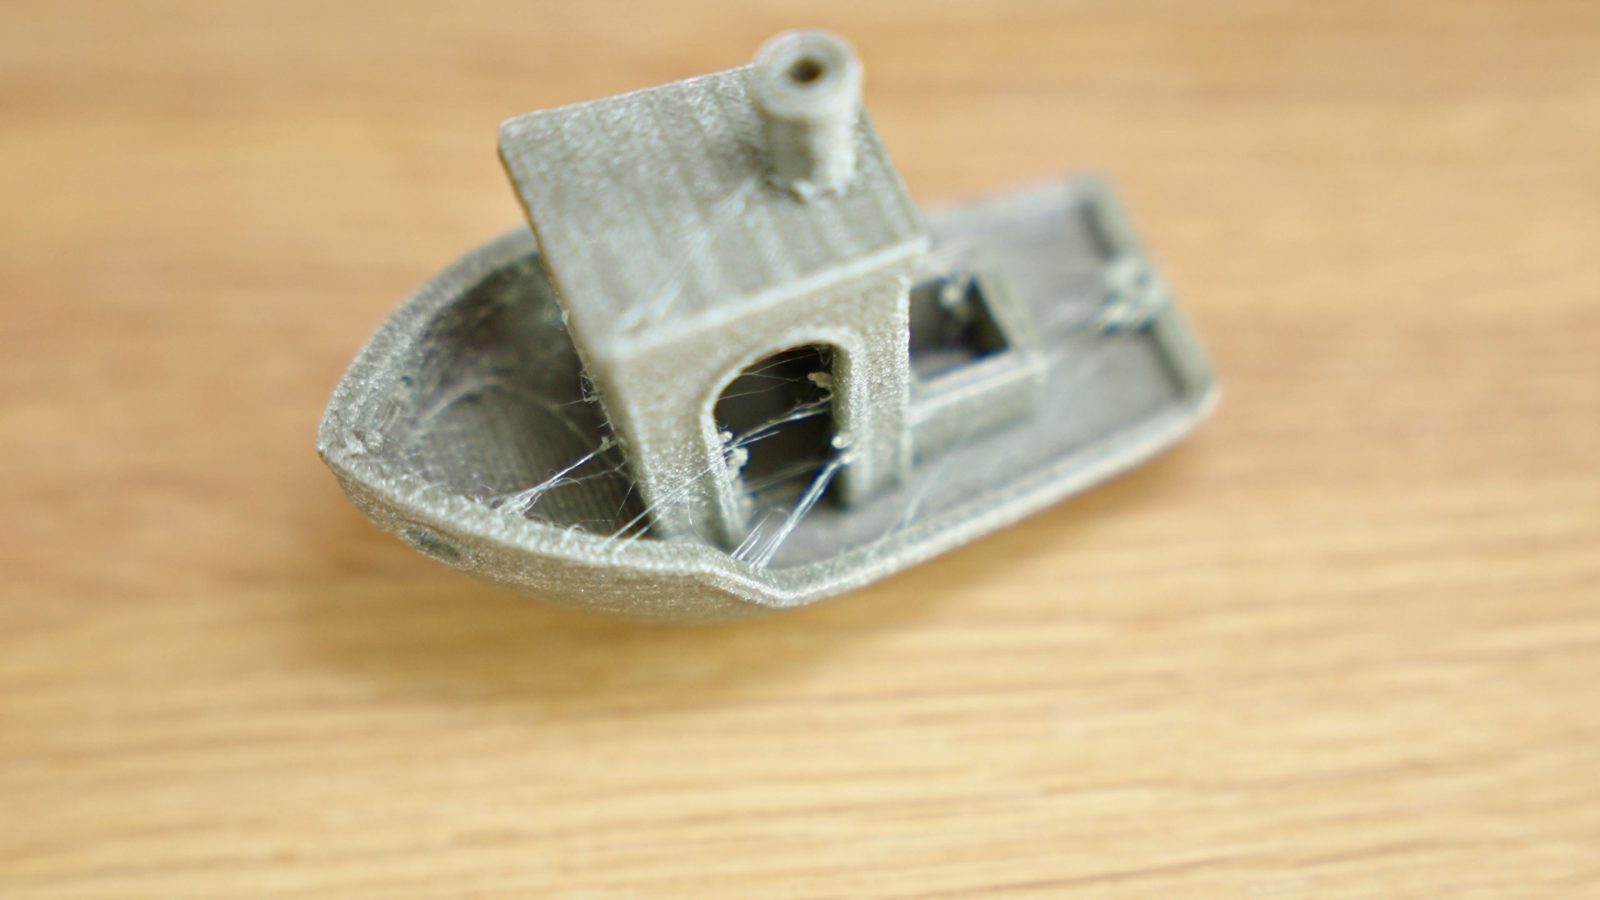
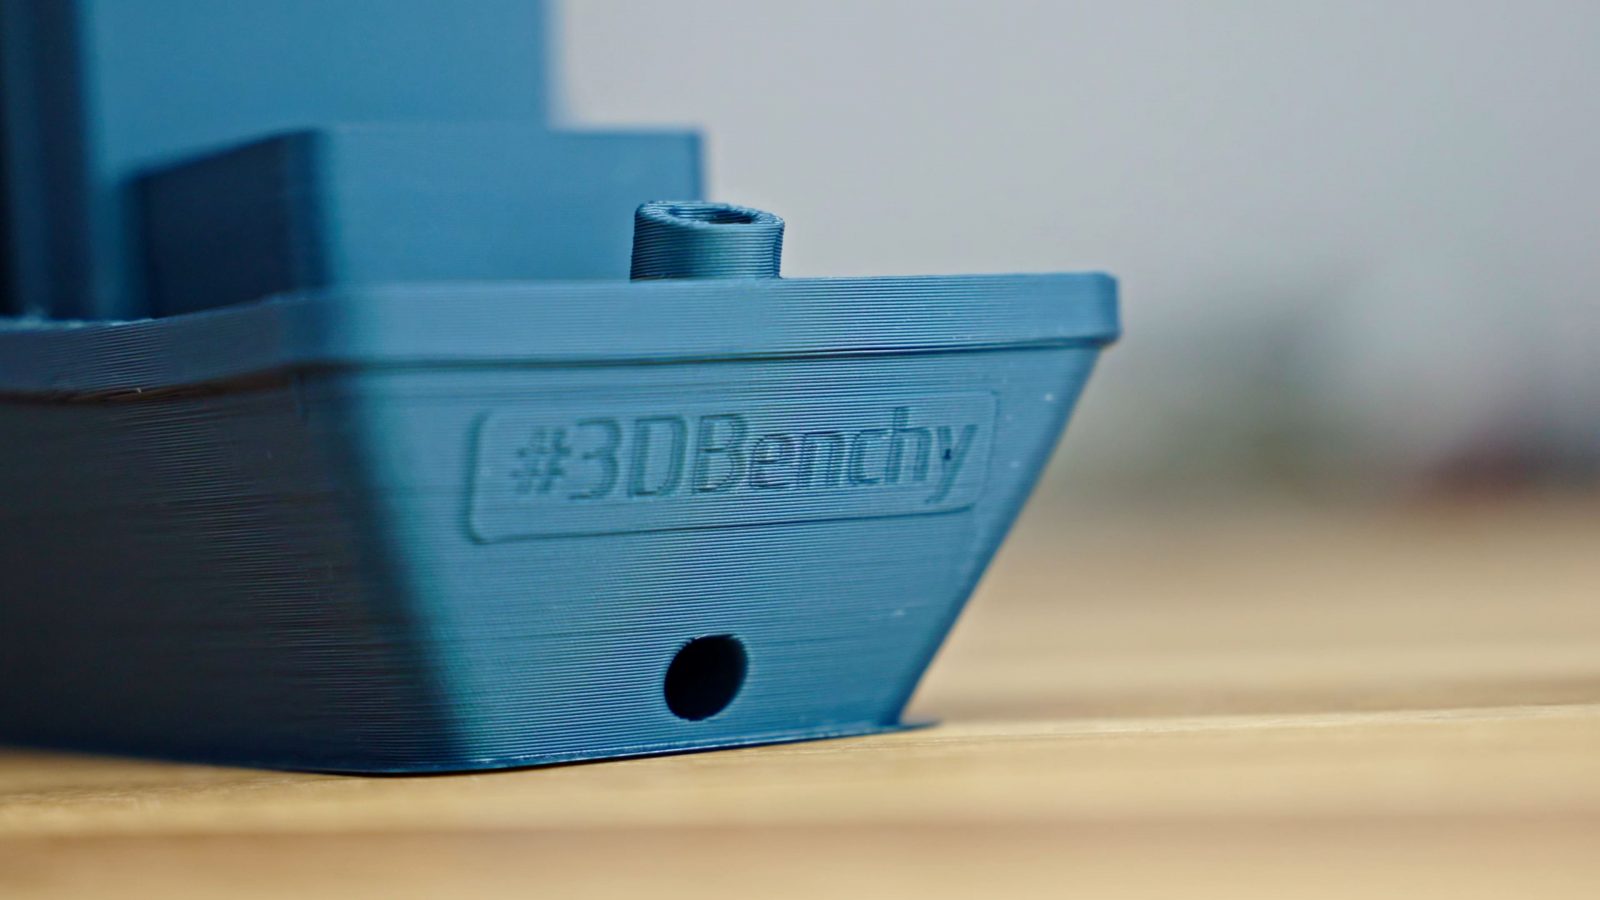
The Bow, the Surface, the Backlash, the Corners
The four bits that I look for first are ones that you don’t need any measuring for, though there are certainly enough opportunities on a 3DBenchy to use it as a full calibration cube replacement, and we’ll get to those in a bit.
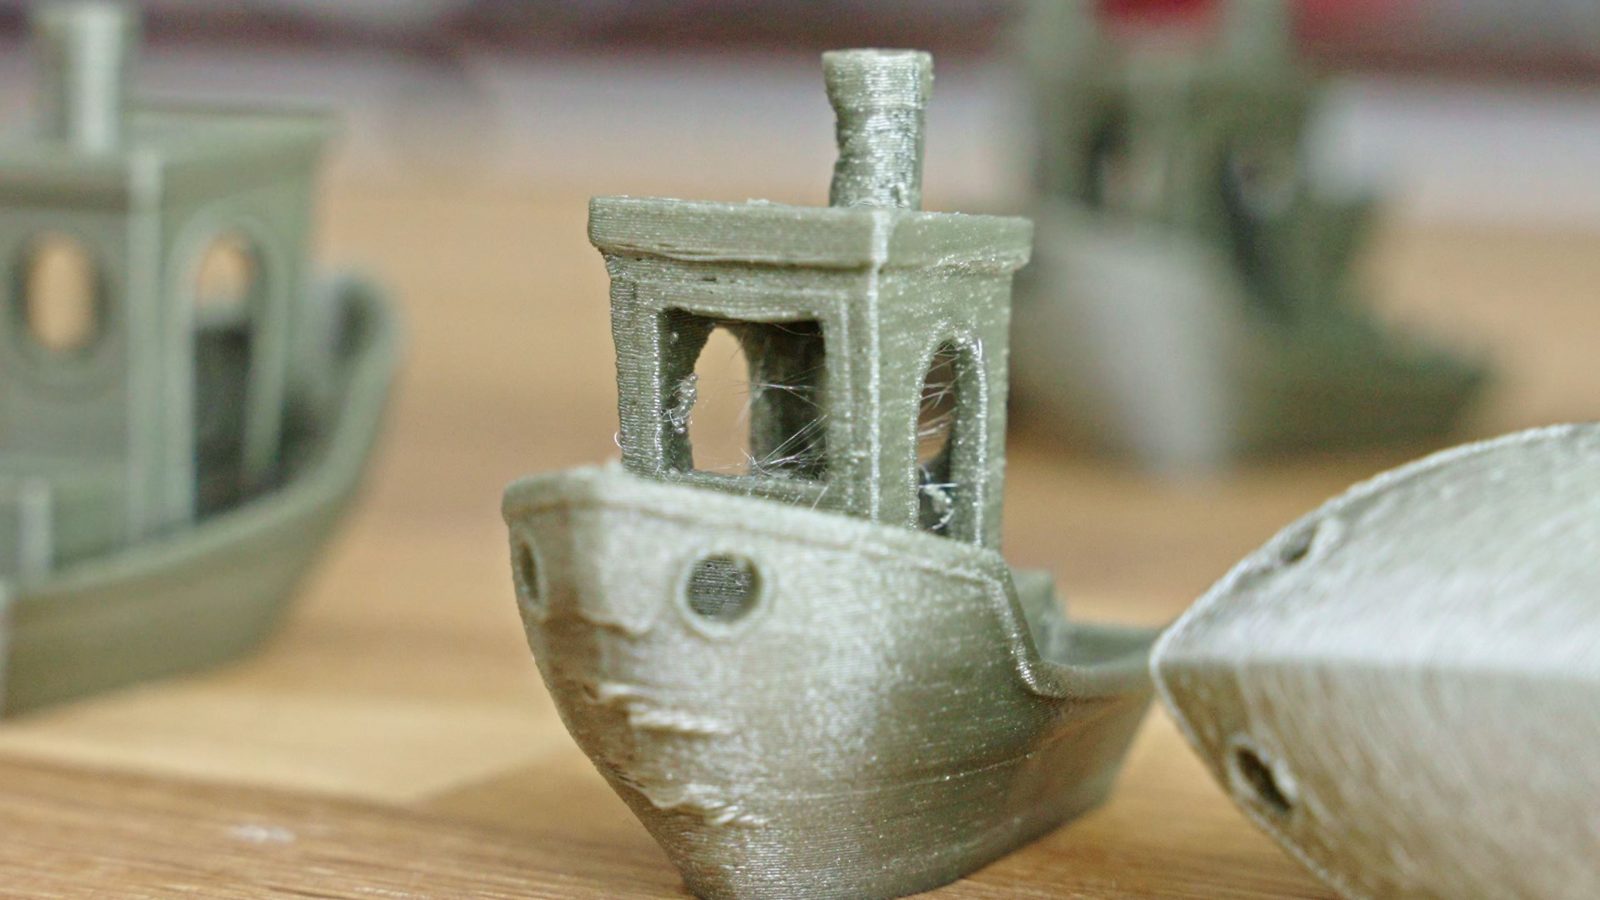
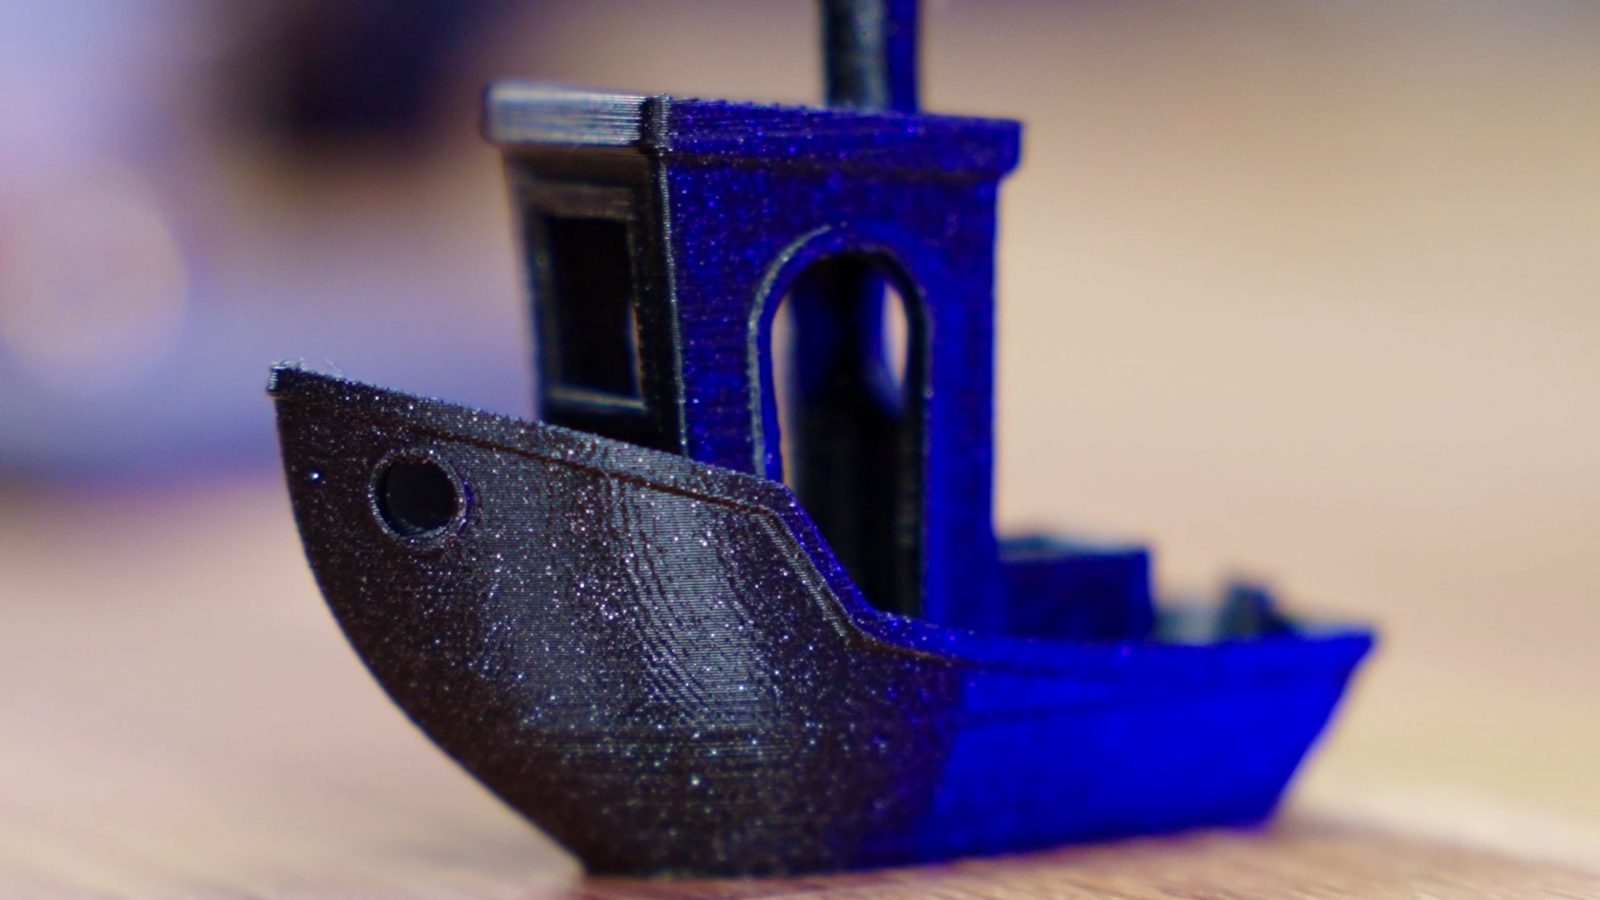
First, is the bow. This is a 40° from horizontal overhang, so, somewhat challenging, and in a good Benchy, it should be smooth and even.

However, if it has a little kick-in on the bottom section, chances are your bed temperature is too high to allow the material in those bottom layers to fully solidify and resist the pulling forces from the layers above it.
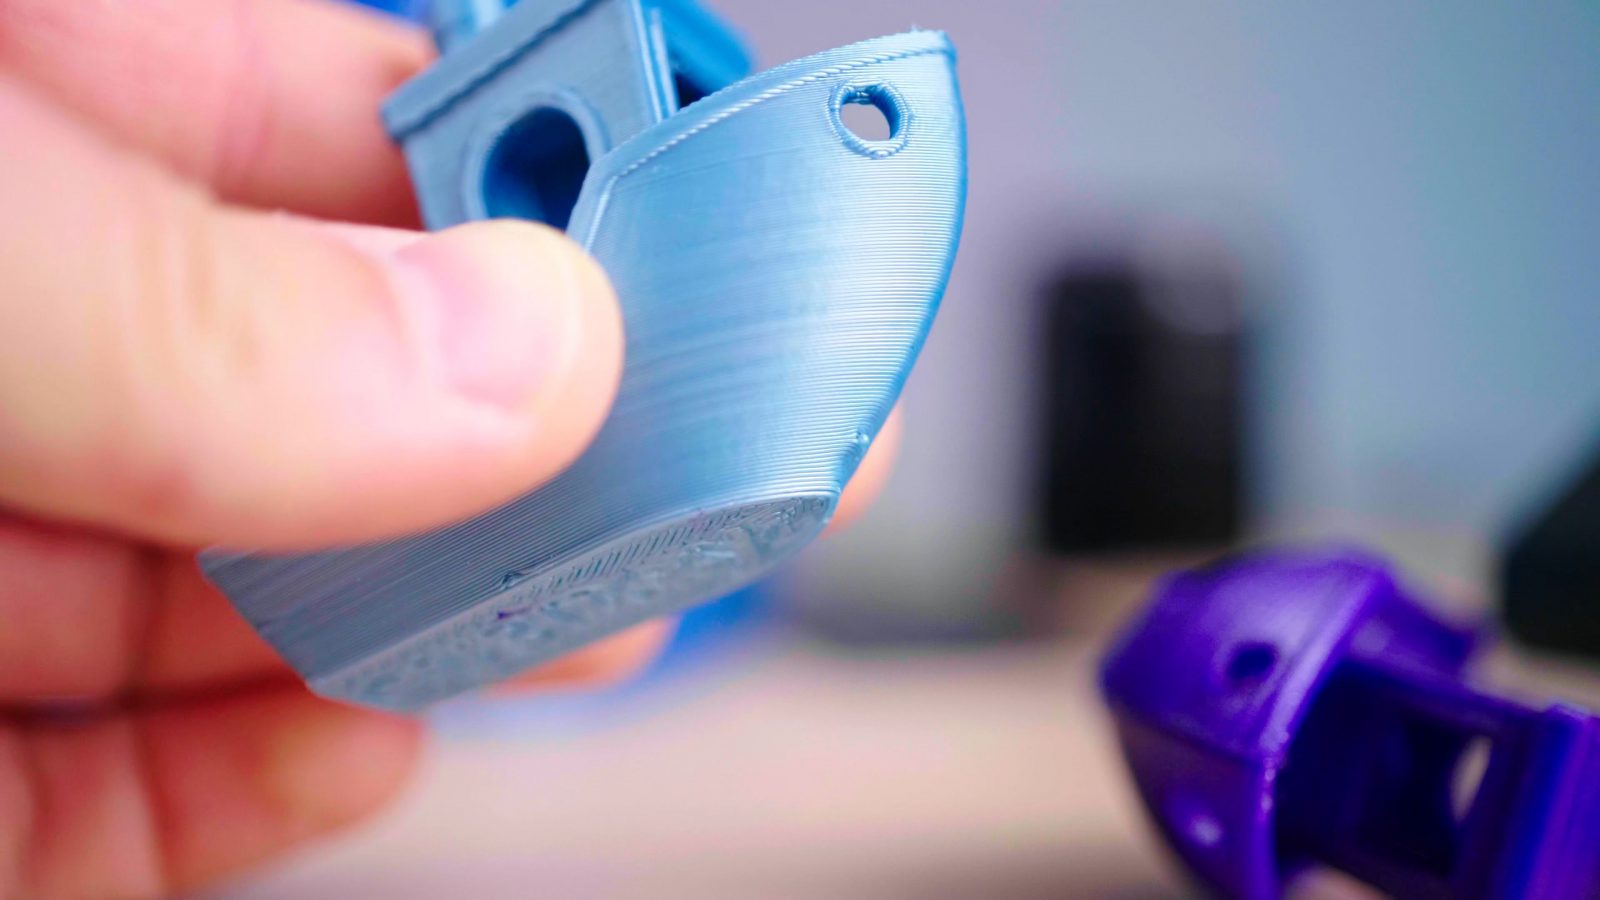
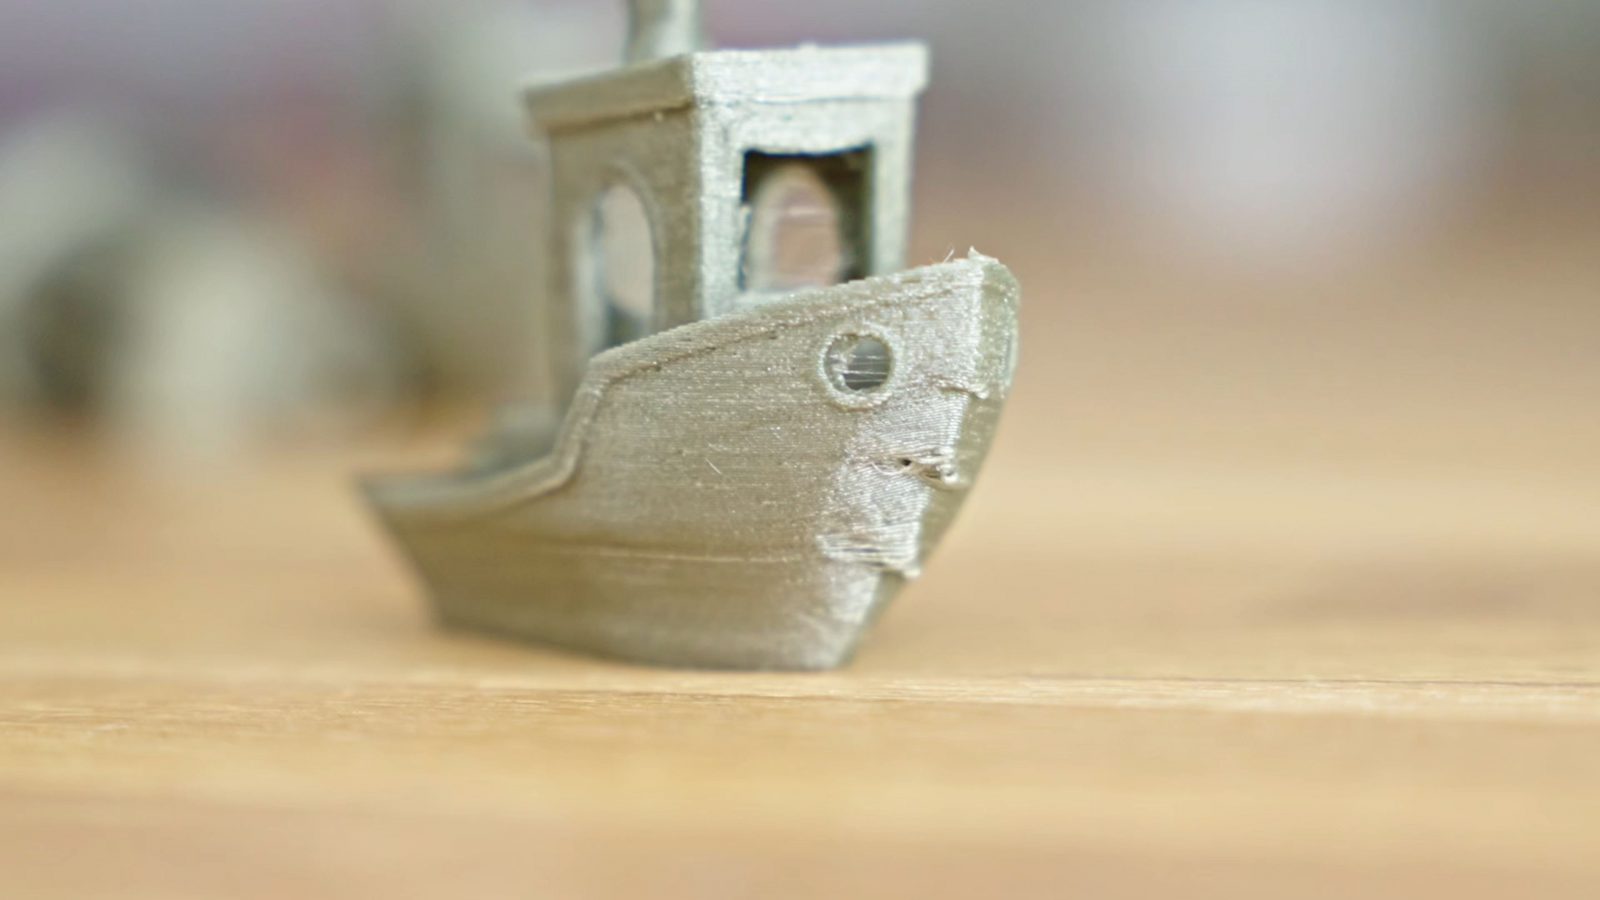
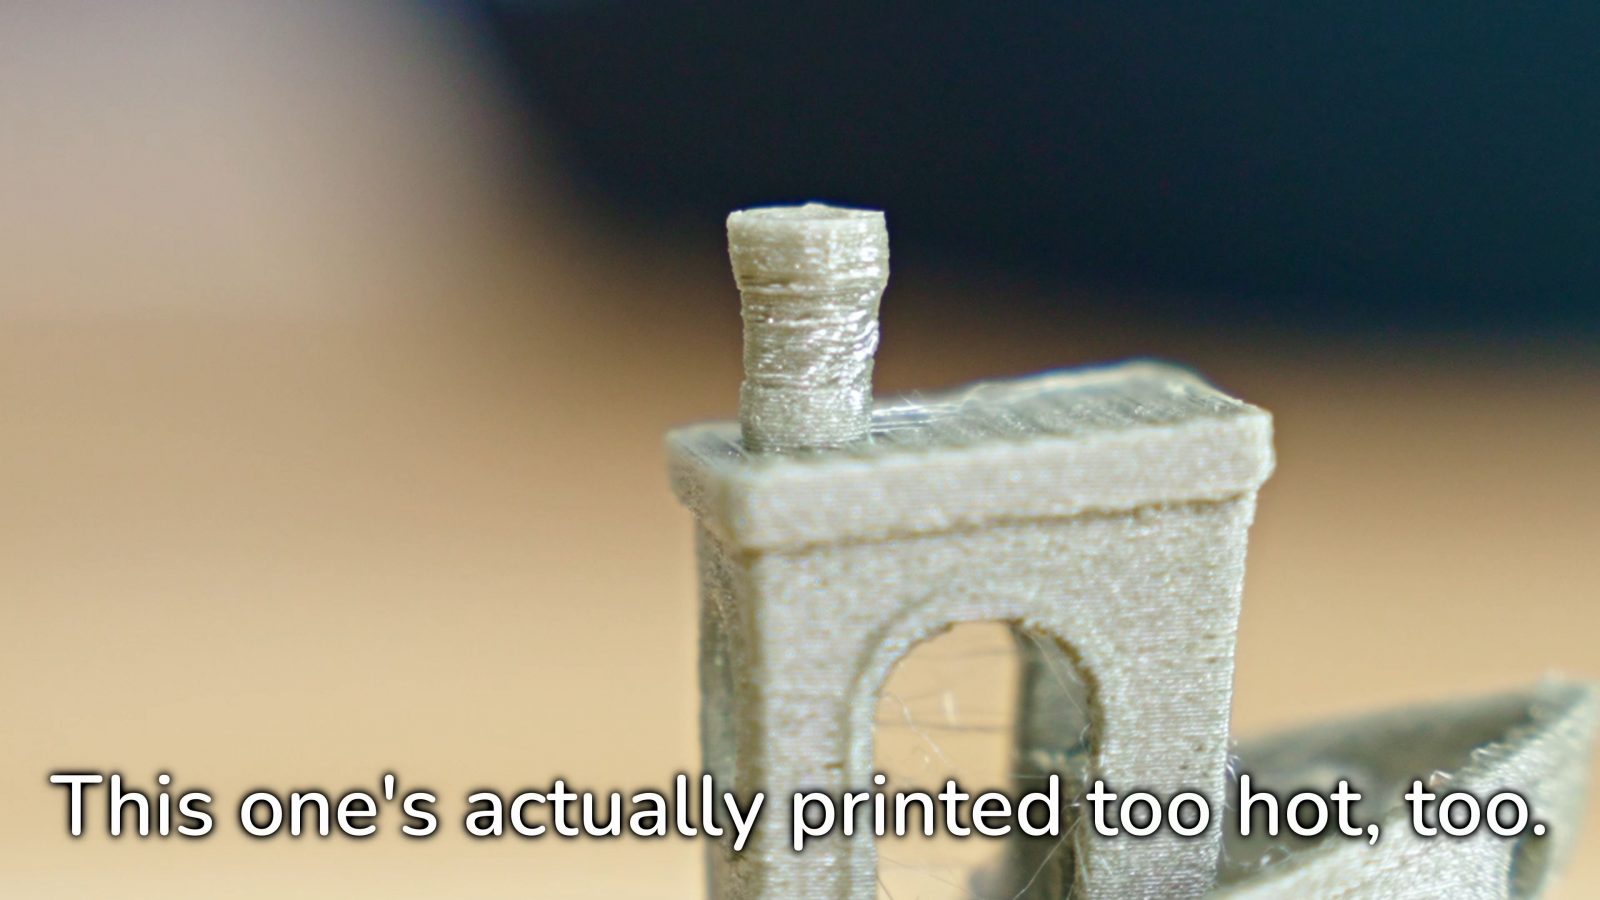
However, if there are more extreme issues like crimping further up on the bow, you are most likely printing too hot or have insufficient or uneven cooling from the part cooling fan. Another good indicator for temperatures being too hot, too little cooling, or in this case, specifically, a minimum layer time that is too brief, is the chimney not printing crisp and sharp, but as a melty blob instead. So those are some of the temperature indicators.
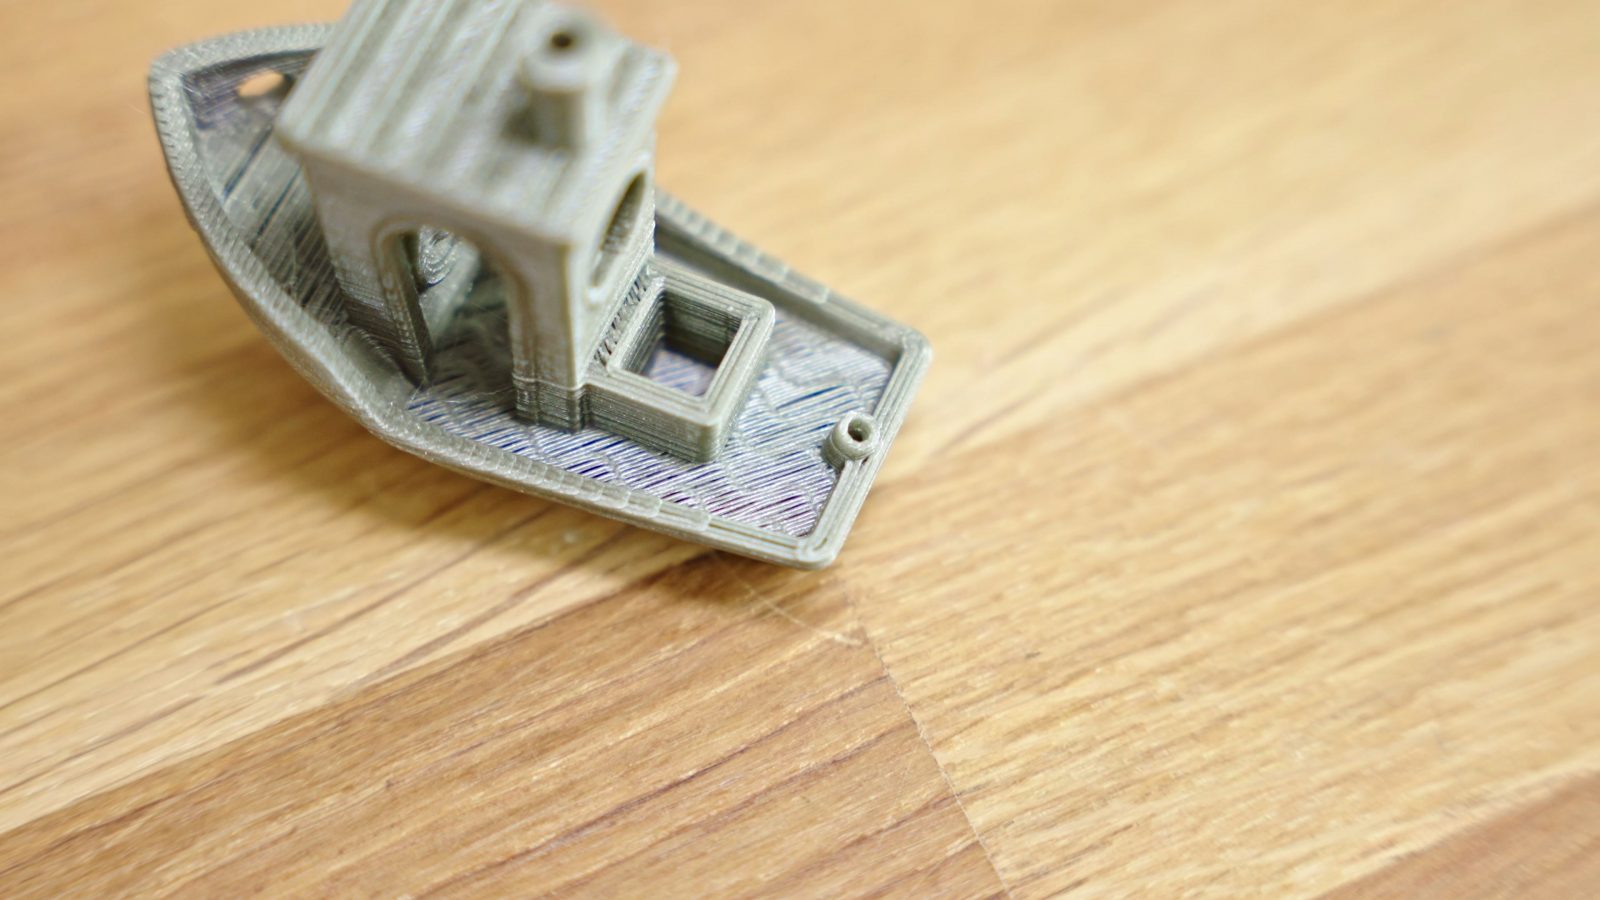
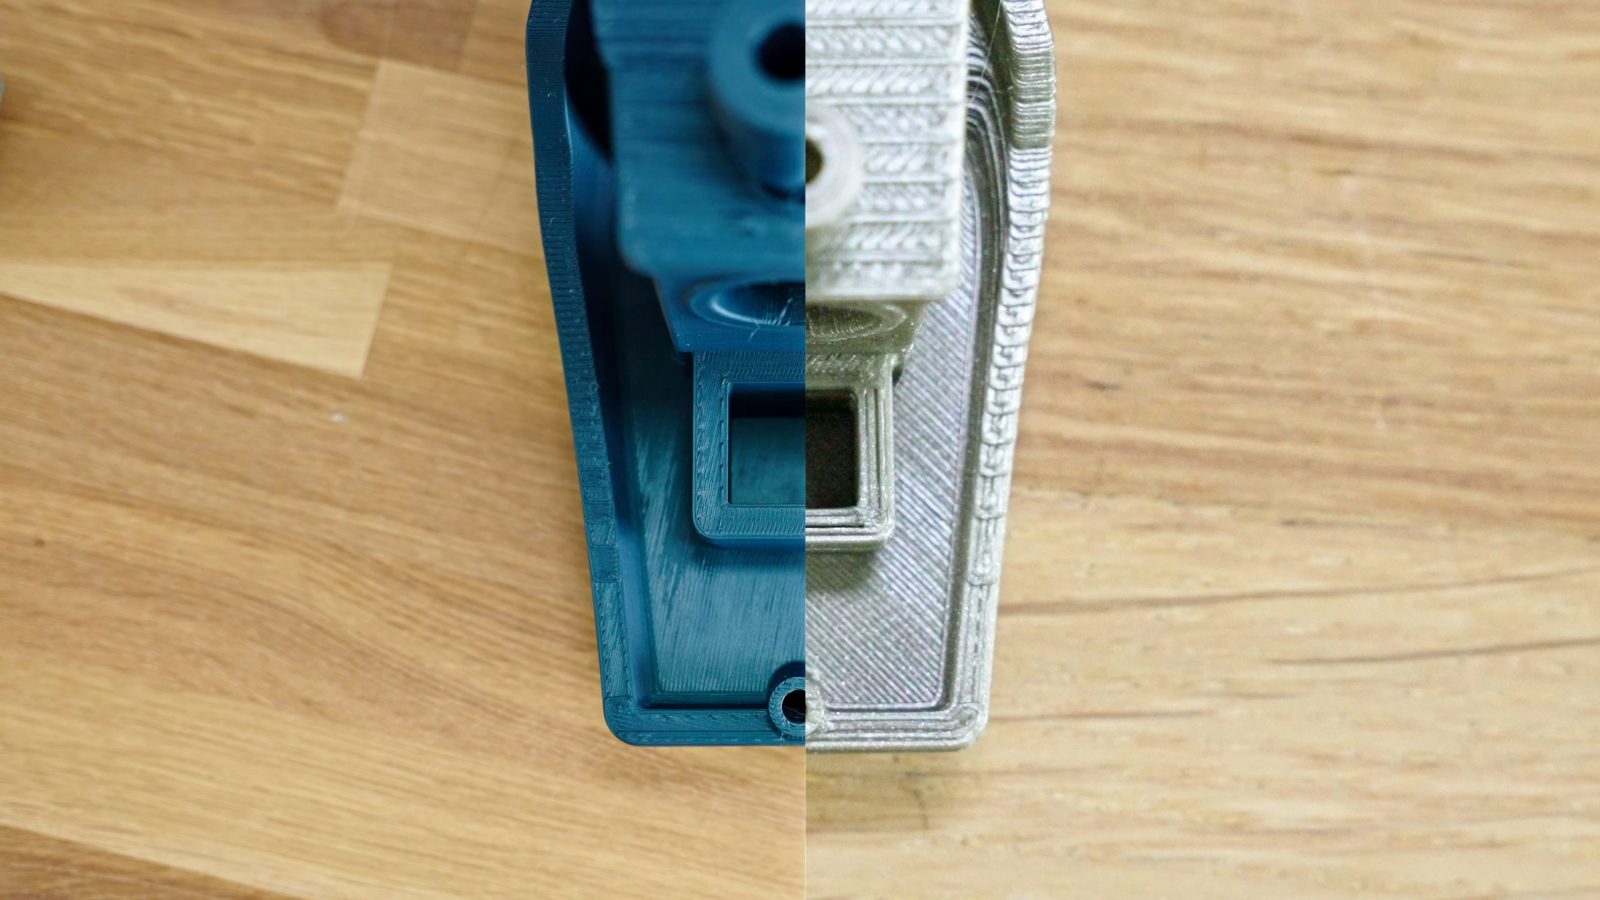
Second, the quality of the top surfaces, in the deck area back here. If you can see the infill printing through the top layer, either you have too few top solid layers for the infill percentage – less infill will require more layers on top to cleanly span over the infill structure – or you’re, again, printing too hot.
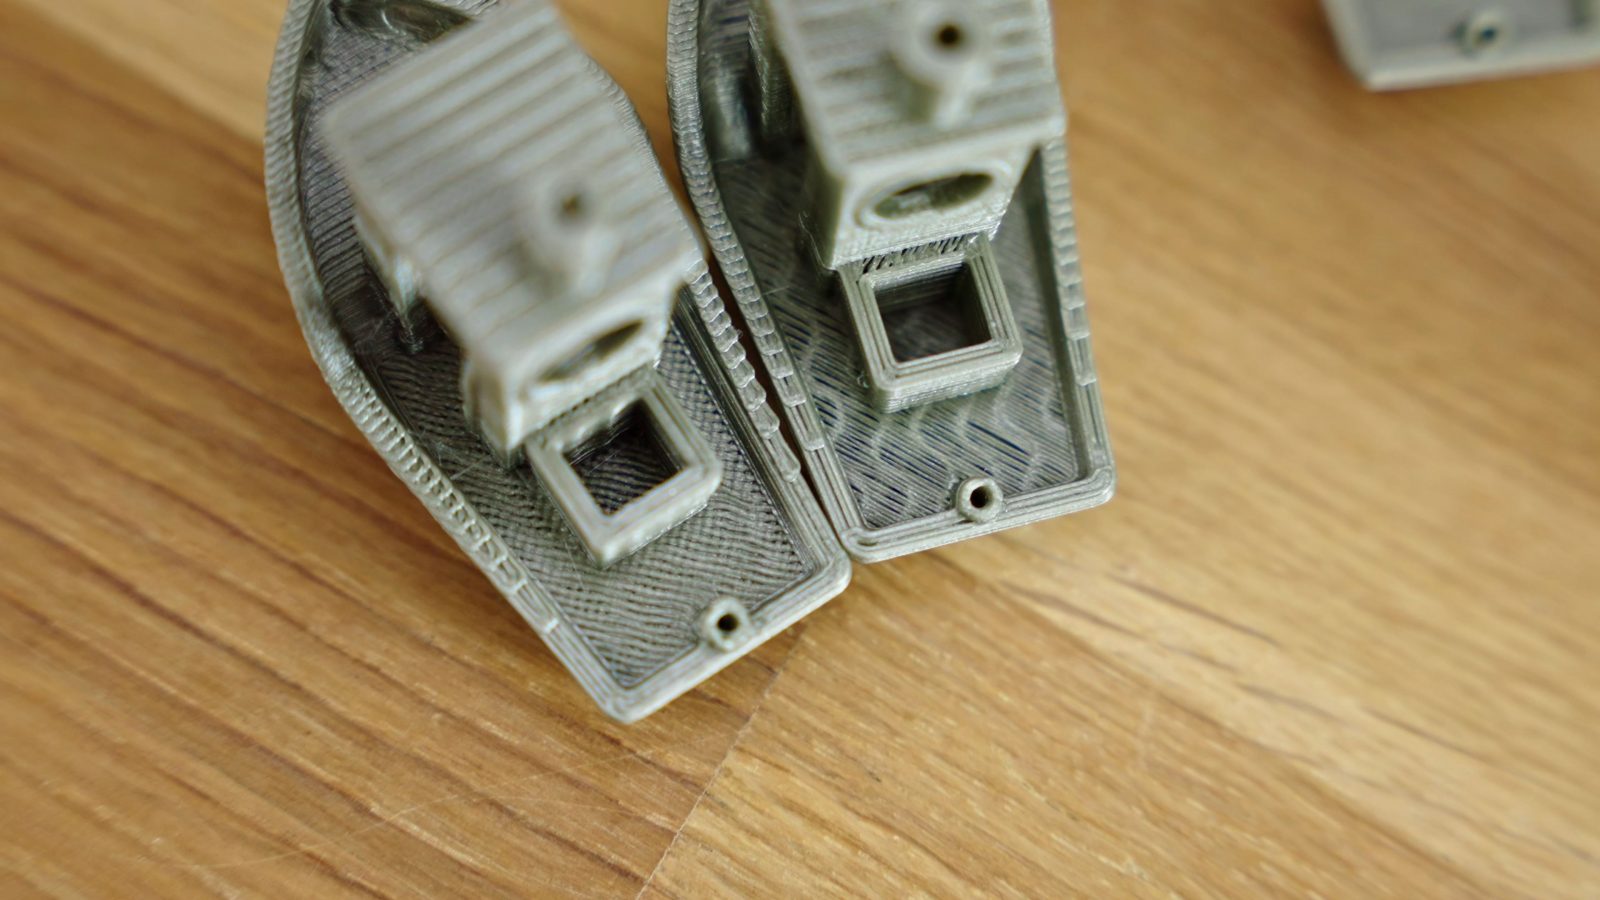
In this case, you’re printing many short bridges over the infill and if the nozzle temperature is too high, the filament will continue to droop into those gaps as it gets printed.
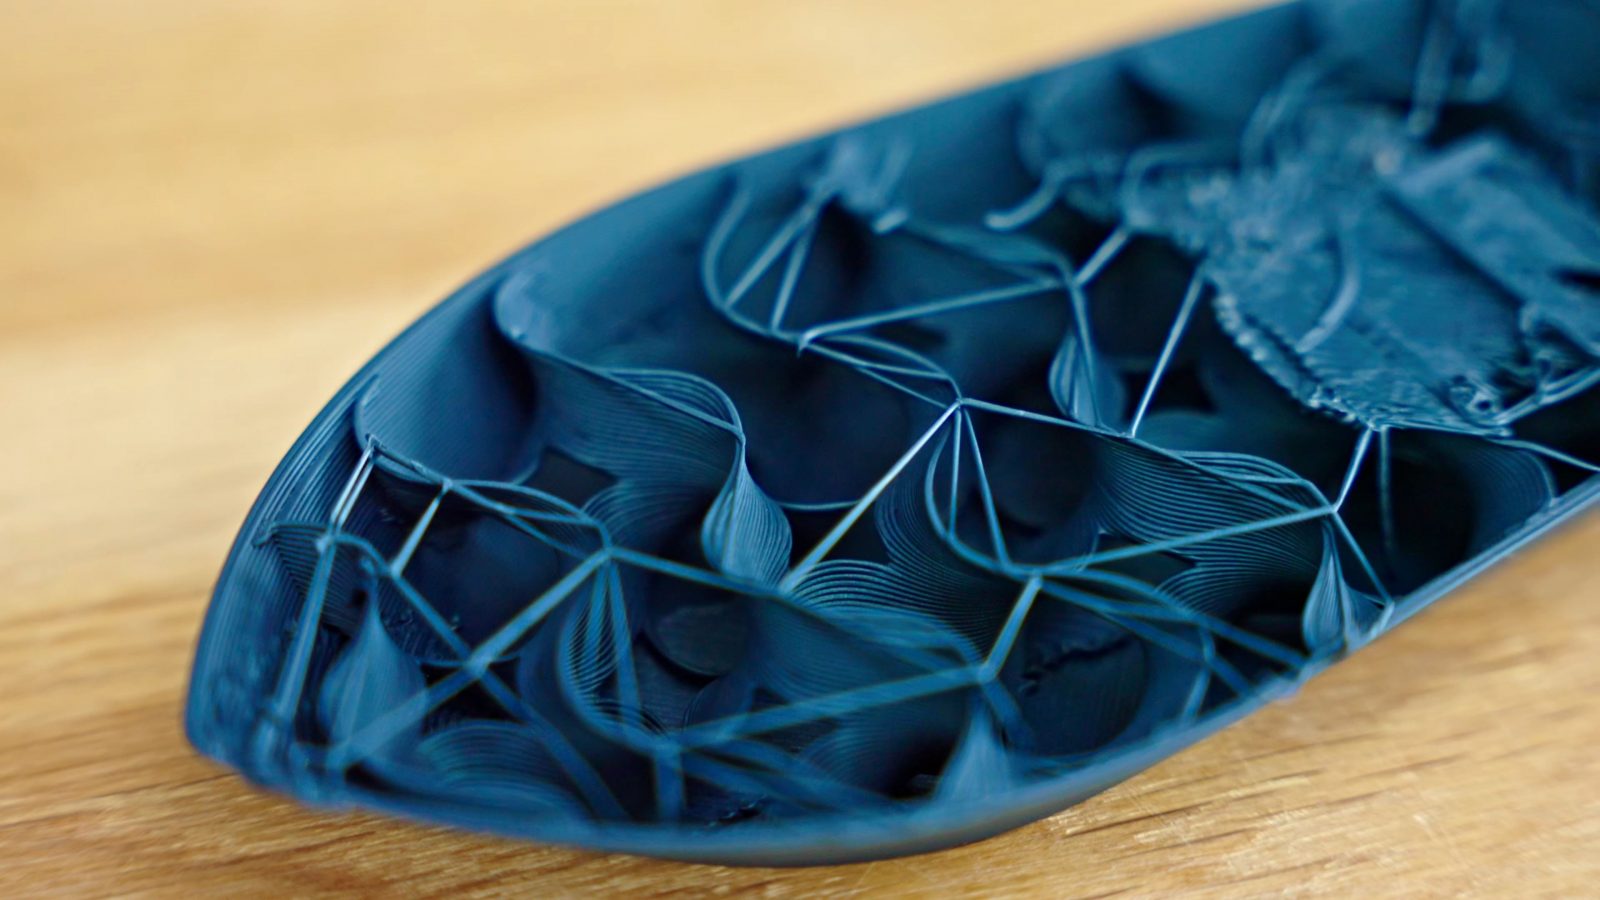
Now, if the deck area is flat, so it’s bridged well, but not filled in all the way and still has gaps between the individual infill lines, that can be two things actually. The first and maybe obvious one would be underextrusion, but the second one takes us to the third area I’d be looking for…
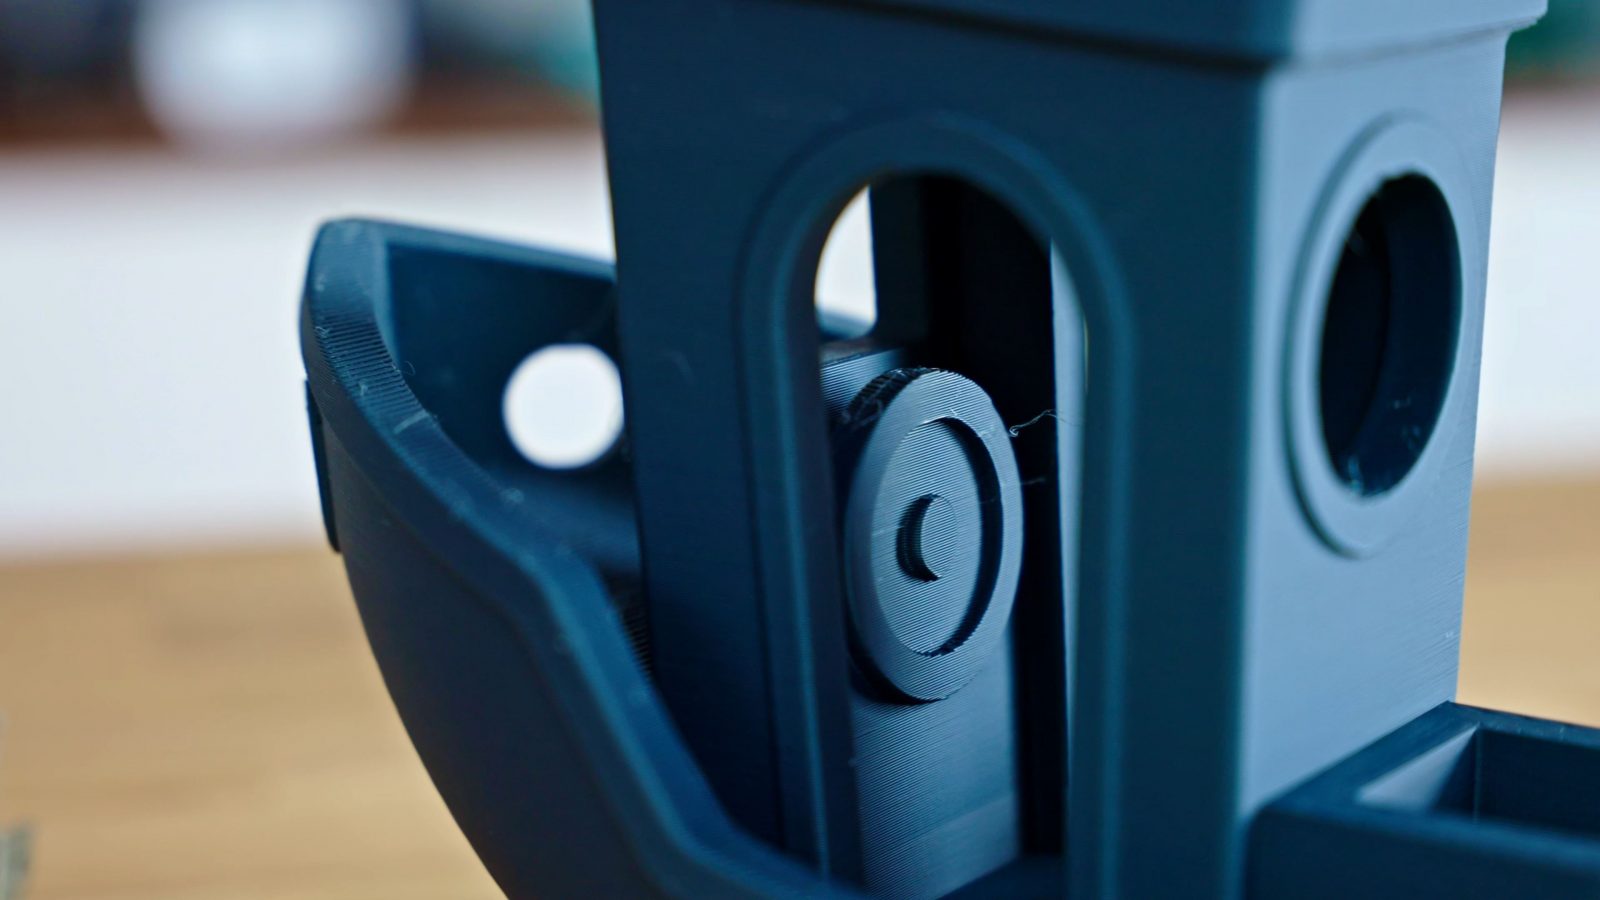
… and that’s backlash. If you have gaps in the top infill, that is one indicator that you might be dealing with backlash, the other indicators are, to a degree, gaps between infill and perimeters, but most strikingly, the chimney up top.
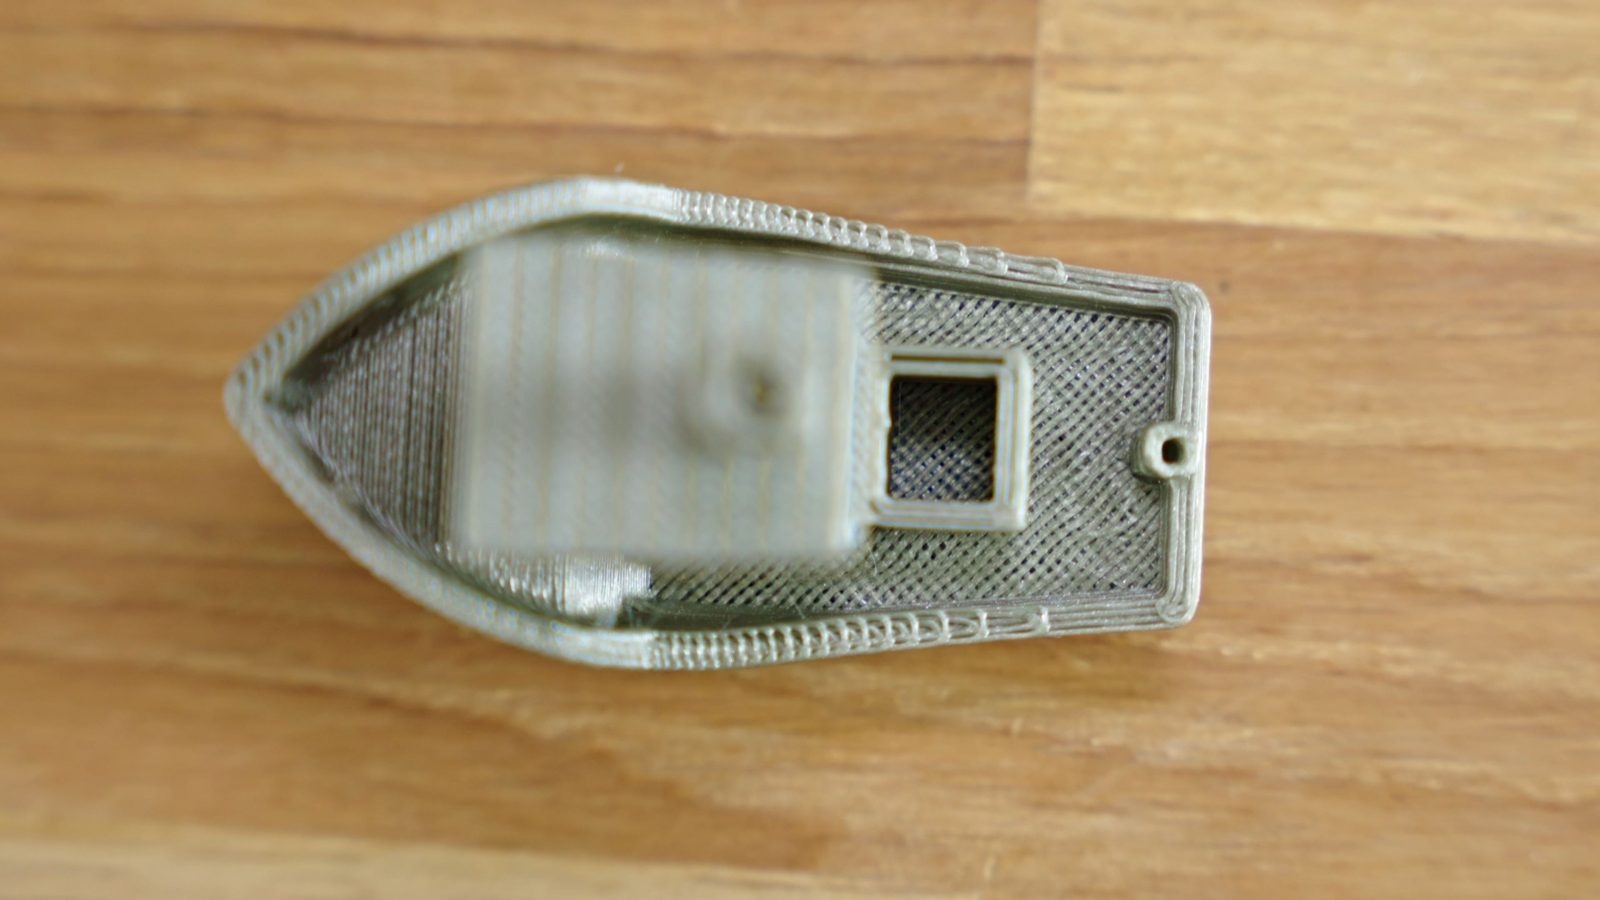
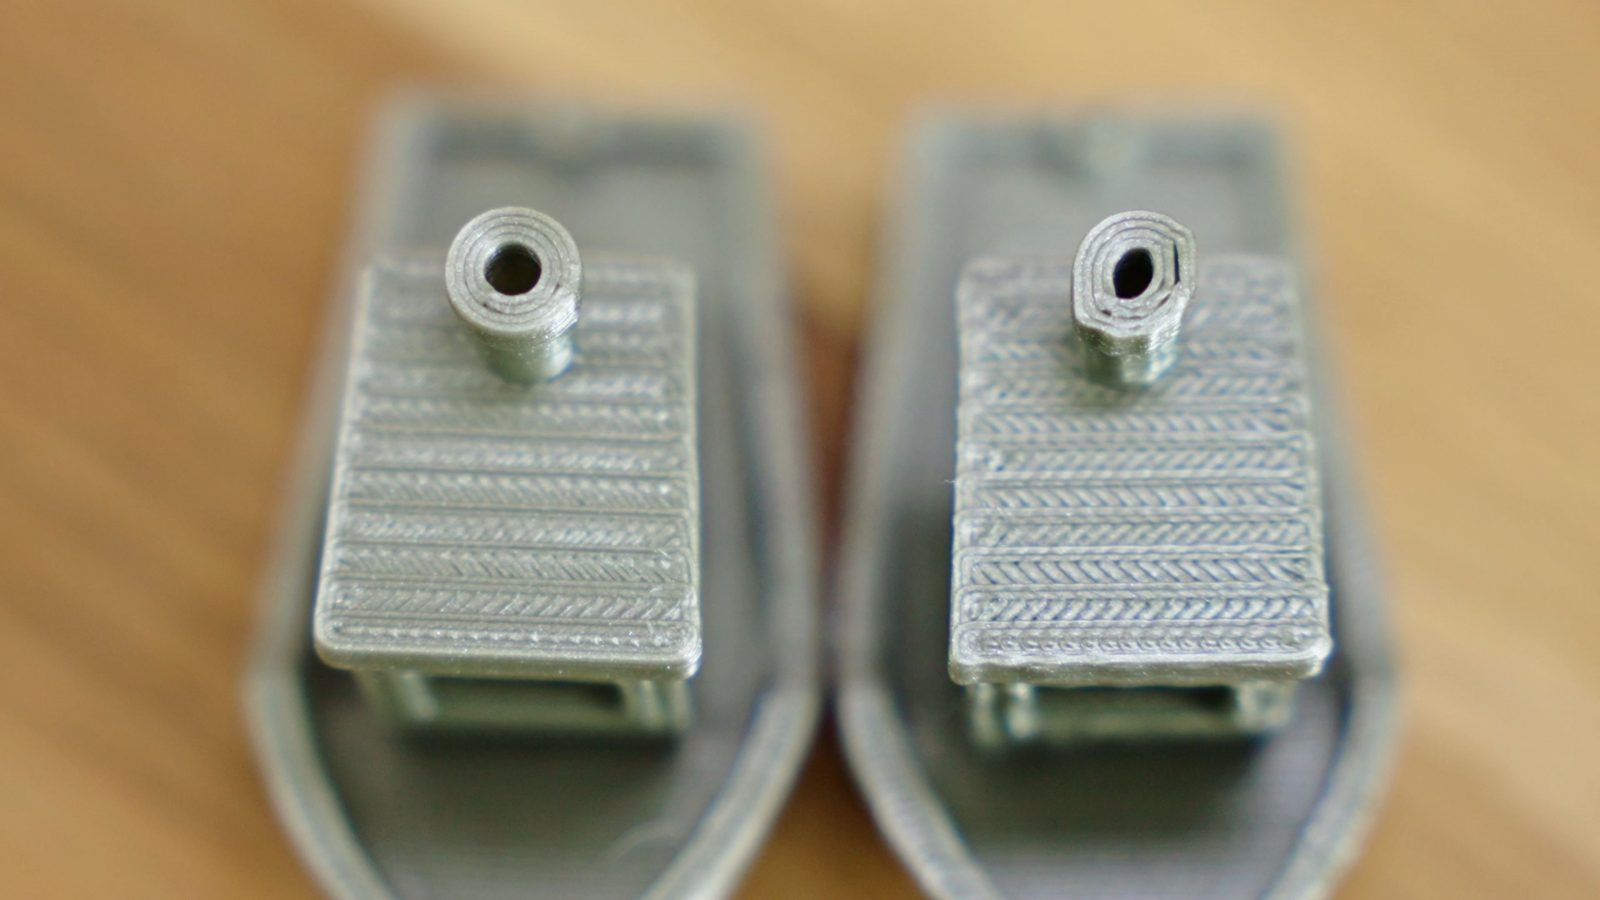
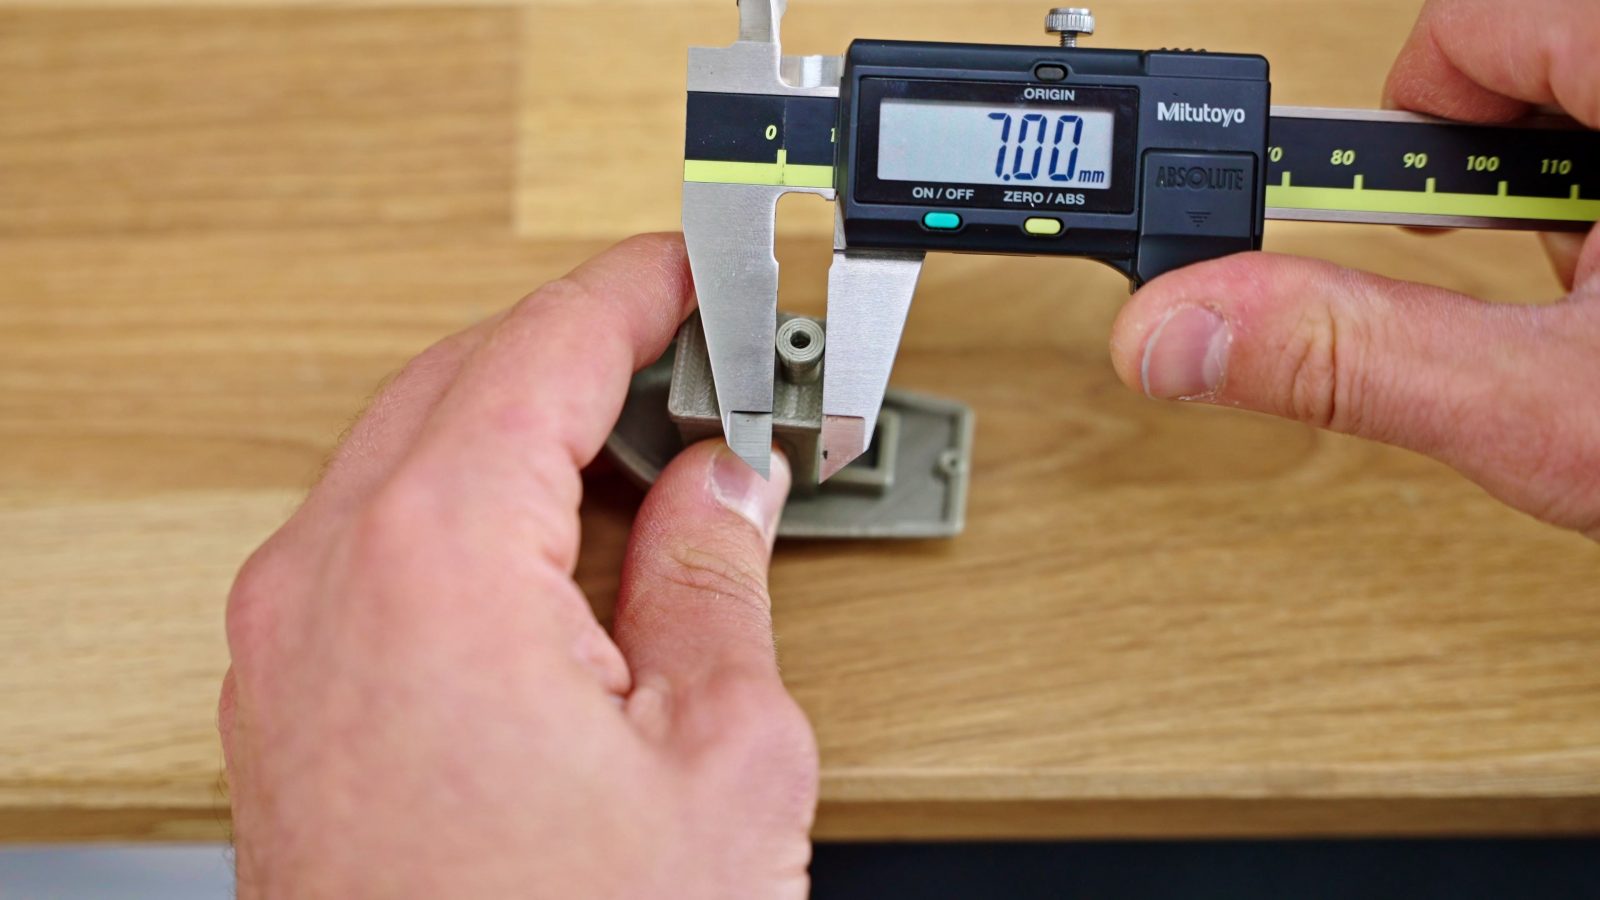
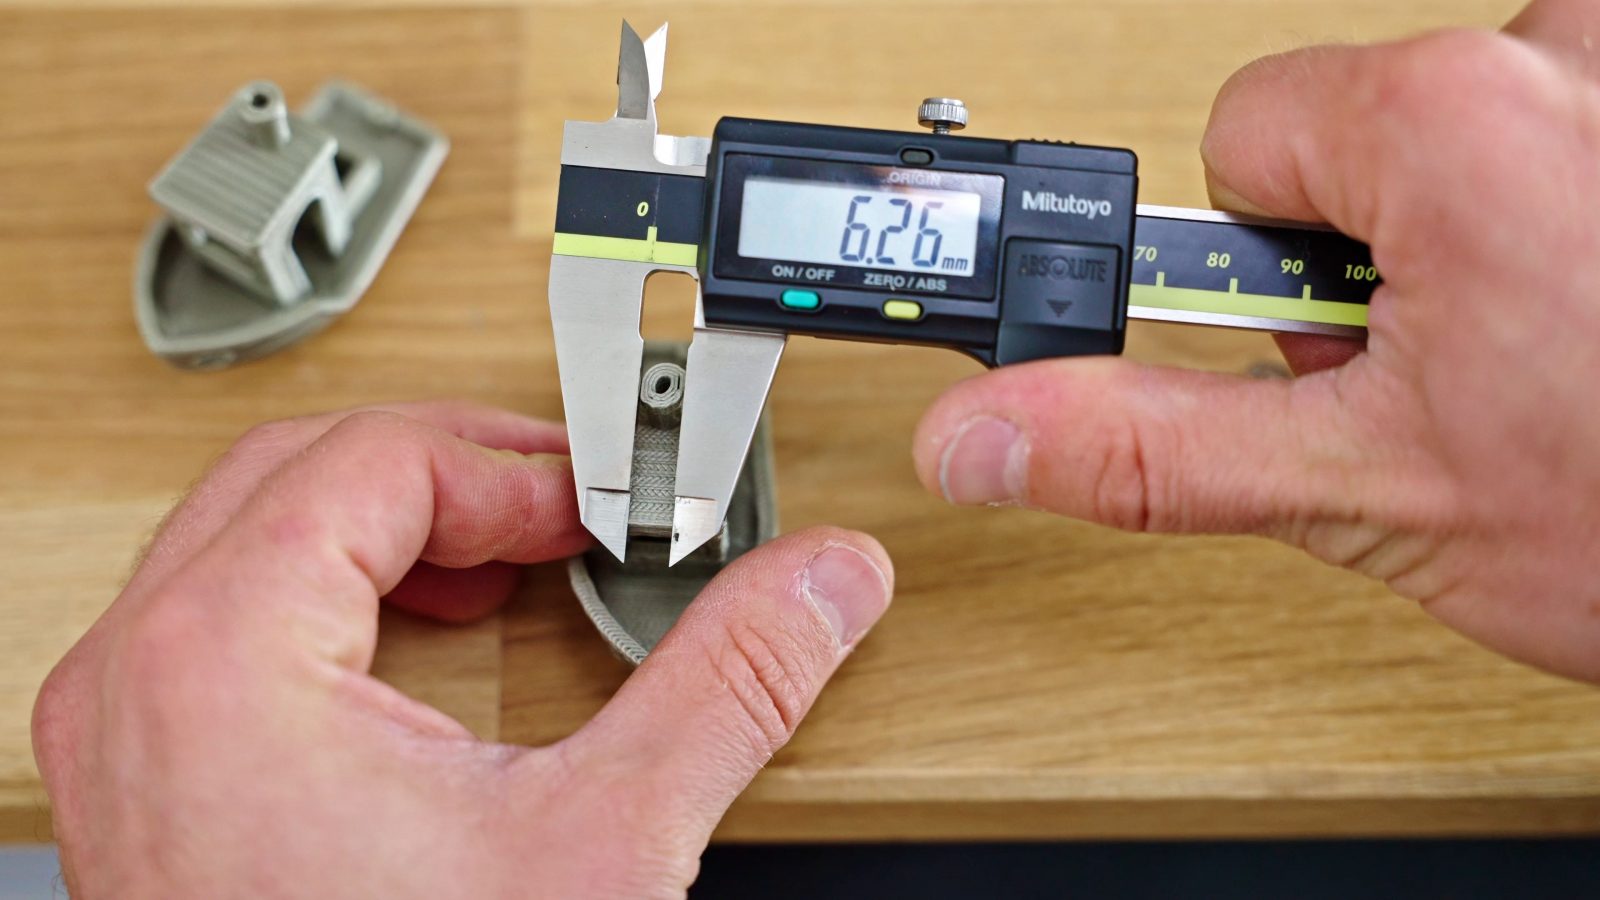
This is supposed to be perfectly round, but if you’ve got backlash in one of the axes of your machine, it will start to deform toward looking like a coffee bean. The nominal diameter of the chimney’s top piece is 7mm, if one direction is significantly shorter than the other, that axis most likely has some backlash.
All these print issues so far I’ve reproduced on a simple Prusa Mini by slicing them wrong, this one I’ve gone in and loosened up the Y-axis belt until the bed had noticeable slop.
And the fourth and last visual area is ringing at corners and at the opposite extreme, a loss of detail in those corners. Ringing is super obvious at the bow where the printer has to do fast, small moves to print the ridge, which has a really good chance of exciting any resonances in the motion system, and then it has to print the bow, which is a relatively large, and perfectly smooth surface.
What you’re seeing now is some archive footage from other printers because the Mini has quite reasonable firmware limits when it comes to how high I can push acceleration and jerk settings, so I couldn’t get it to ring much.
Ringing really is a function of how fast and jerky the printer accelerates, how springy the motion system is and how much dampening there is. A printer with long, cheap rubbery belts will most likely show more ringing than one with shorter belt loops and Gates belts. However, go too soft and dampened on your motion system, and you’ll start rounding out corners, but this is usually much less of an obvious issue and perhaps not even relevant to how most of your prints will come out. Then again, unless it’s at the very extreme end of how bad it can get, ringing is also mostly a visual issue.
There are, obviously, also a bunch of other features on the Benchy that will inform you about, say, overhang performance, but this is actually one of the areas where I don’t think it does a particularly good job – which is why the abomination of a test print that I designed a while ago actually uses most of its area for longer overhang tests. Printers just have become really good with these features that a Benchy isn’t much of a challenge here anymore.
Checking Dimensions
So the other aspect to the 3DBenchy is being able to check dimensions of the prints you create – every single feature of the Benchy has a nice and round nominal dimension, and they’re all listed out on the 3DBenchy website, so I’m not going to go through all of them.
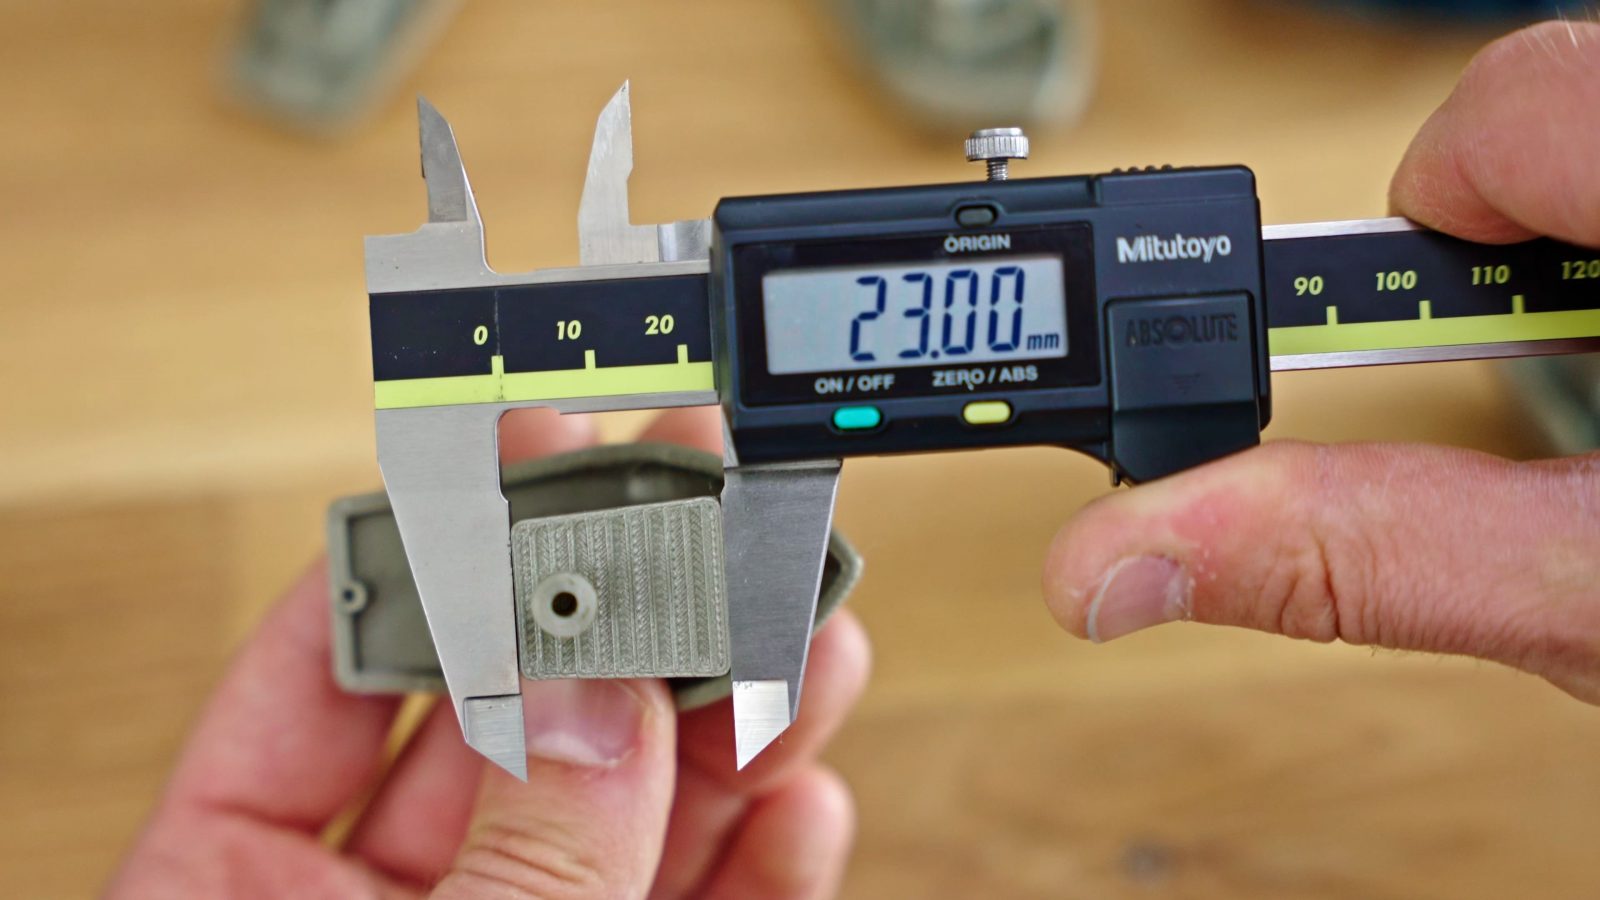
But there is a key problem with trying to make sense of dimensions you’re measuring off of any printed model: You’re measuring two things at once. The first one is the one that is more intuitive, and that would be that when you tell your printer to move, say 70mm, it actually moved for example just 69mm. This is the way a lot of guides talk about so-called calibration, that you would then need to go in and increase the amount the printer moves to make sure your part ends up at exactly 70mm. But, for the most part, that approach is wrong. While there are certainly deviations from the printer moving the wrong amount, when you measure comparatively small lengths, like a 10mm cube of any of the smaller features on the Benchy, you’re mostly measuring how much your part has sort of swollen up or shrunken down along the XY plane because of inherent inaccuracies of the filament printing process. And that is a fundamentally different calibration step than changing the scaling of your parts. What you will find if you follow that approach is that while that exact 10mm dimension will now be accurate, as soon as you print smaller or especially larger parts, the overall scale of those will be wrong.
So the approach to checking scaling and contour correction that I’d recommend would be to print the largest possible scale checker you can – I did a video using calibration sticks a while ago, and that is still valid – and once you have the overall step per millimeter figured out, then go in and fine-tune the “bloat” of your parts with the XY offset option. Though both of these tuning steps usually don’t need much adjusting at all – if you find yourself making drastic changes here, I would first start looking for other mechanical issues on your machine and fixing those.
One more tip about taking dimensions: If you need to take scale measurements from a part like the 3DBenchy, always try to measure between two surfaces pointing in the same direction – that way, if there is an issue with “bloat” on your prints, it’s the same amount and the same direction on both surfaces, so effectively it’ll get canceled out. So take a dimension like this where you’re aiming for 32.5mm between the tip of the chimney and the top surface of the box, or try to measure the 10mm from the right side of the left box wall to the right side of the right box wall.

If you just measure the overall 12mm of the box’s width, you are mostly measuring which amount of cont our correction you’d need to get back to zero.
Again, there is a list of all the exact nominal dimensions of the 3DBenchy on their website, so if you want all the details, you can find them there.
The Limits of a 3DBenchy
Now, to close this out, maybe some things that the Benchy doesn’t do particularly well and that you will still need to check for with other tests if you want a full report on a printer’s capabilities:
I’ve just talked about it not being the greatest model for checking dimensional accuracy – it’s certainly better than a calibration cube because it shows you how you might be messing up other dimensions when you just “calibrate” for one single 10mm length to be perfect, but to hone in dimensional accuracy, you really need something larger than the Benchy.
It’s a similar story with its height – when a printer is not built particularly well, it can show wobble issues either at the halfway point of its Z-axis travel or further up, and the 3DBenchy simply isn’t large enough to expose those problems.
On the other hand, the 3DBenchy also doesn’t have any particularly small features, like you would want to test resin printers or, you know, even in the size range where you would see a difference between a 0.4 and a 0.6mm nozzle or between the old Slic3r slicing and the Ultimaker Arachne engine.

The 0.1mm tall text on the back is a nice try, but because it’s part of the perimeter and not a separated, free-standing feature, it’s not a particularly challenging area to print.
But I think the biggest flaw of them all:
It. Doesn’t. Float.

That’s unacceptable!
Thanks to my supporters on Patreon on YouTube memberships – I know it’s been a rough couple of months, but we’re getting back on track. If you think what I’m doing is worth supporting, consider joining, too.
In any case, thank you for watching, keep on making and I’ll see you all in the next one.
Models shown:
Low-poly Pokemon by Flowalistik
Prusament PLA Pearl Mouse and Gentlemen’s Grey
Sources for CO2 emission data:
💙 Enjoying the videos? Support my work on Patreon!
Product links are affiliate links – I may earn a commission on qualifying purchases (at no extra cost to you)

Check out my second channel “More Layers” on YouTube for livestreams