
My “0.4mm nozzles are obsolete” video apparently left quite a few questions in need of answering, at least going by the comments on the video. So today, we’re going to look at whether you can maybe just stick with a 0.4mm nozzle and tell your slicer to pretend it’s a 0.6, how strength compares between nozzle sizes, and whether comparing 0.4 with an old slicer to 0.6 with a new one was even fair in the first place. I hope I didn’t hurt the nozzles’ feelings.
So let’s start out with whether the comparison was “fair” or whether it even made sense to compare things where I was changing two variables at once.
Well, here’s the thing: Changing two variables at once was the entire point of the video – my argument was that the detail gain from the new Arachne slicing would at least cancel out the amount of detail you’d lose from more than doubling the nozzle orifice area. And I would argue that it does and that a 0.6mm nozzle maybe even should be the new standard. And in the end, comparing 0.4 to 0.6 and then Arachne vs. non-Arachne would be pretty one-sided – of course, Arachne is going to print better than the classic slicing, and 0.6 is going to print (slightly) worse than a 0.4, but the combination of both changes is what I was interested in. As a German, we like car analogies, so, I mean, changing only one variable at a time would be like filling up your Yaris with E85, noticing it actually makes less power than before and concluding that any drag racer who doesn’t run premium unleaded must be completely out of their mind. But there’s more than just one variable you have to change at the same time to get a benefit out of E85, you have to do the same here to find a compromise that’s overall better than what you started with.
So what about strength? Well, this one actually is hard to compare, because, well, you’re changing many variables at once. I know, I just argued against that being a problem, but the question of whether the nozzle itself is the cause of strength changes you’ll be seeing is nearly impossible to answer. First of all 0.6 has a wider extrusion width, so by default, when you set the slicer to print two perimeters, you’ll actually get a thicker shell and more material with the 0.6.
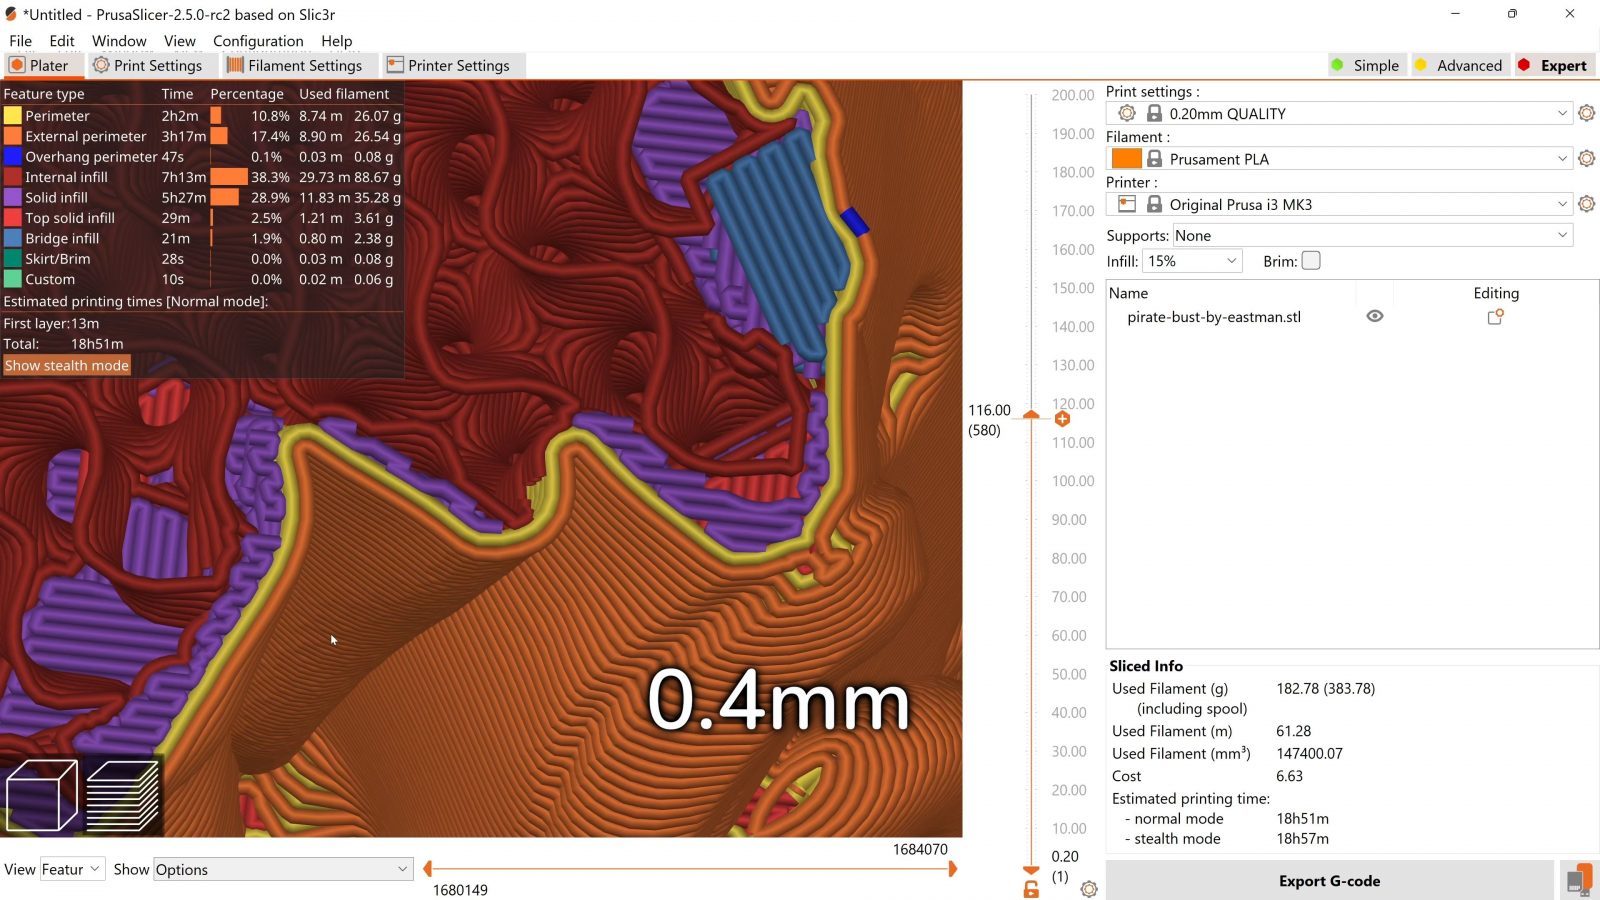
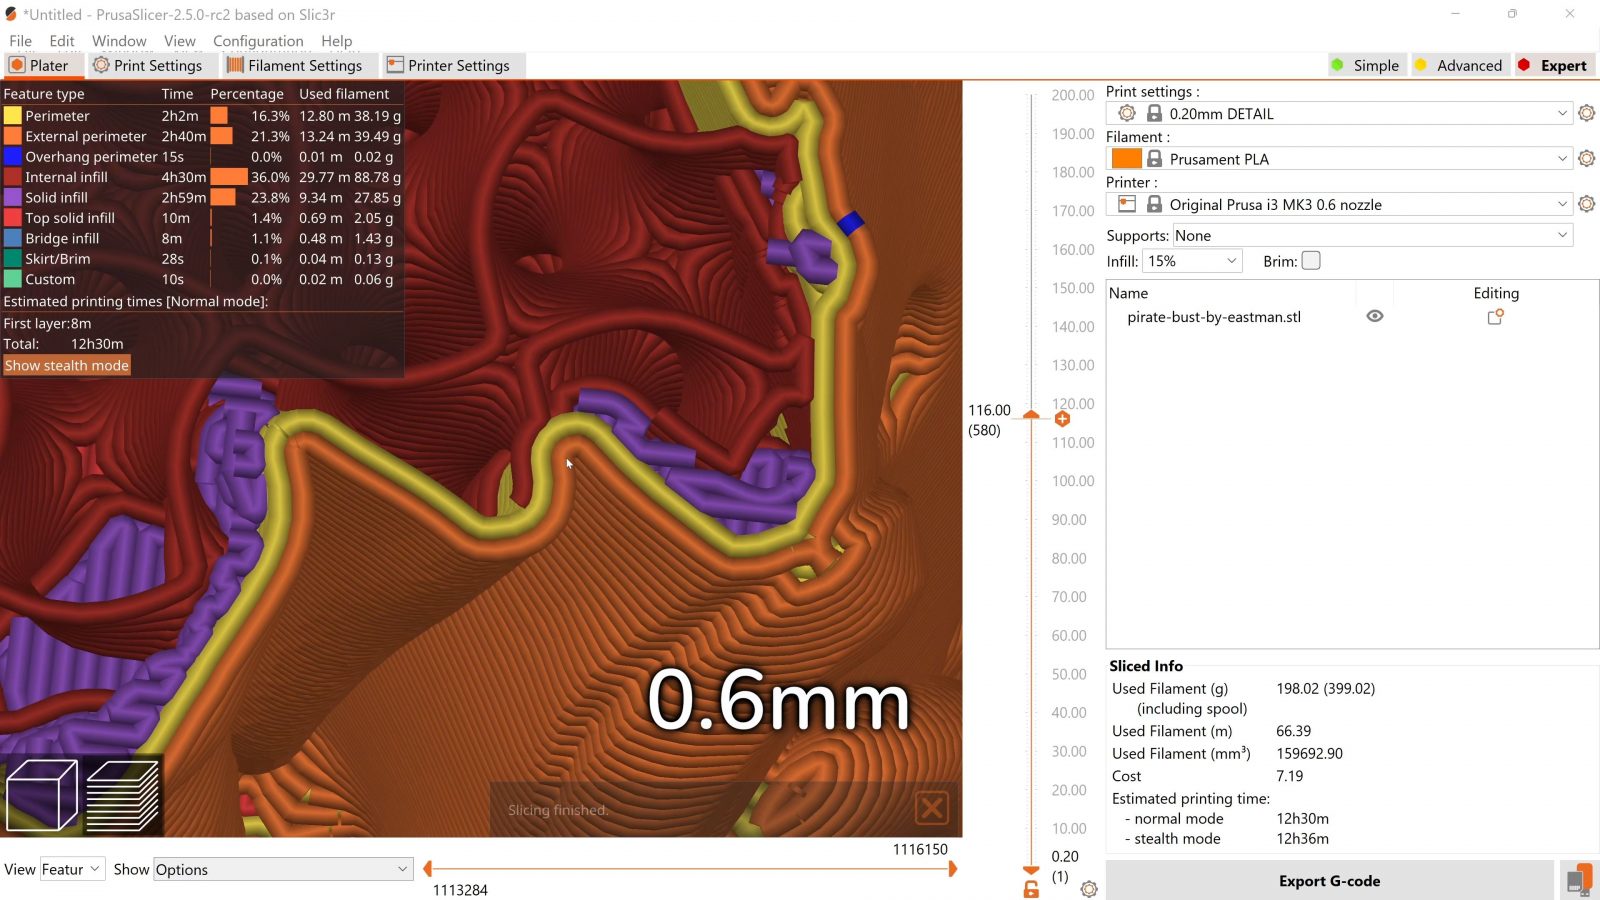


So with these sample prints, both done at 0.2mm layer height, two shells, 15% infill, the 0.4mm nozzle print is 79g, and the 0.6mm nozzle print is 86g. Quite the difference. With infill, the wider extrusion width isn’t going to result in more material being laid down, because the slicer will just stretch out the infill pattern to make up for the thicker lines, and overall, it’s going to end up with the same amount of material. Roughly. But since the pattern is wider, it’s still going to perform differently to the finer one done with a 0.4mm nozzle. I’d think that a finer pattern would be a more homogenous structure and therefore stronger overall, but I haven’t tested this. So with all these things changed at the same time, I don’t think differences in strength would be down to just the different nozzle size – they’d almost exclusively be caused by all the supporting changes that come along with that. I’d assume that part strength for the same amount of material wouldn’t change much, and if anything, since I mostly print mechanical and functional parts that do need a fair bit of strength, I appreciate the little bit of extra material being laid down.
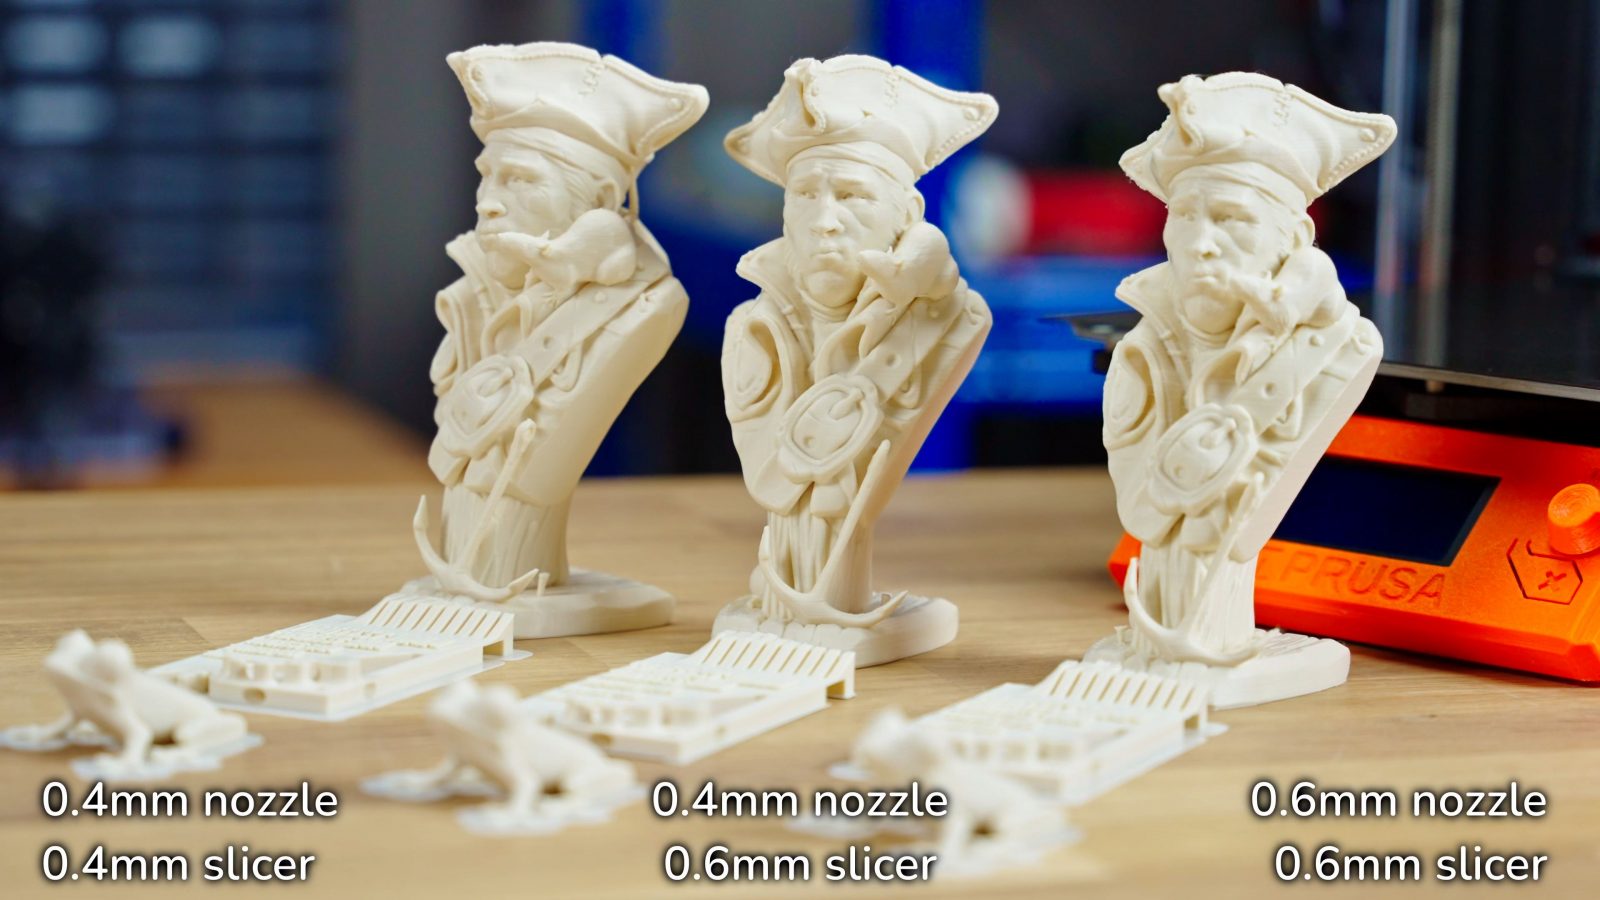
So do you actually need to swap your nozzle or can you just pretend your 0.4 is a 0.6? Well, kinda. I did my test plates with a 0.4 sliced for 0.4, a 0.6 sliced for 0.6, and a 0.4 printing the gcode sliced for 0.6.
Why would you want to do that? Well, maybe you don’t want to buy another nozzle or just prefer to keep the smaller nozzle installed in case you do want to print some finer-detail models at some point. Or maybe you don’t know you do have to physically change the nozzle instead of just changing the slicer settings – I’ve had one person reach out to me who ran into that issue. But I mean, we all started somewhere, and it’s a long learning journey all along.
Sidenote: What I’m doing here is changing between the presets Prusa has created for the different nozzle sizes, and those are full profiles that change all the necessary options. But if you’ve got a profile that you’d like to convert to 0.6, the best case is that you just change the nozzle size in the printer settings and most slicers do a really good job of calculating all the detail settings automatically from that. But if you have overrides set up for those detail settings, especially the extrusion width settings, the nozzle size setting for the printer will actually make almost no difference in the gcode that’s being output – so if you have the overrides set up for 0.4, you’ll essentially still be slicing for a 0.4mm nozzle, even if you set 0.6 or 0.8 for the printer. So check those settings in “Print Settings” -> “Advanced”, and if in doubt, just set all the extrusion width settings to 0 and PrusaSlicer will automatically figure them out.
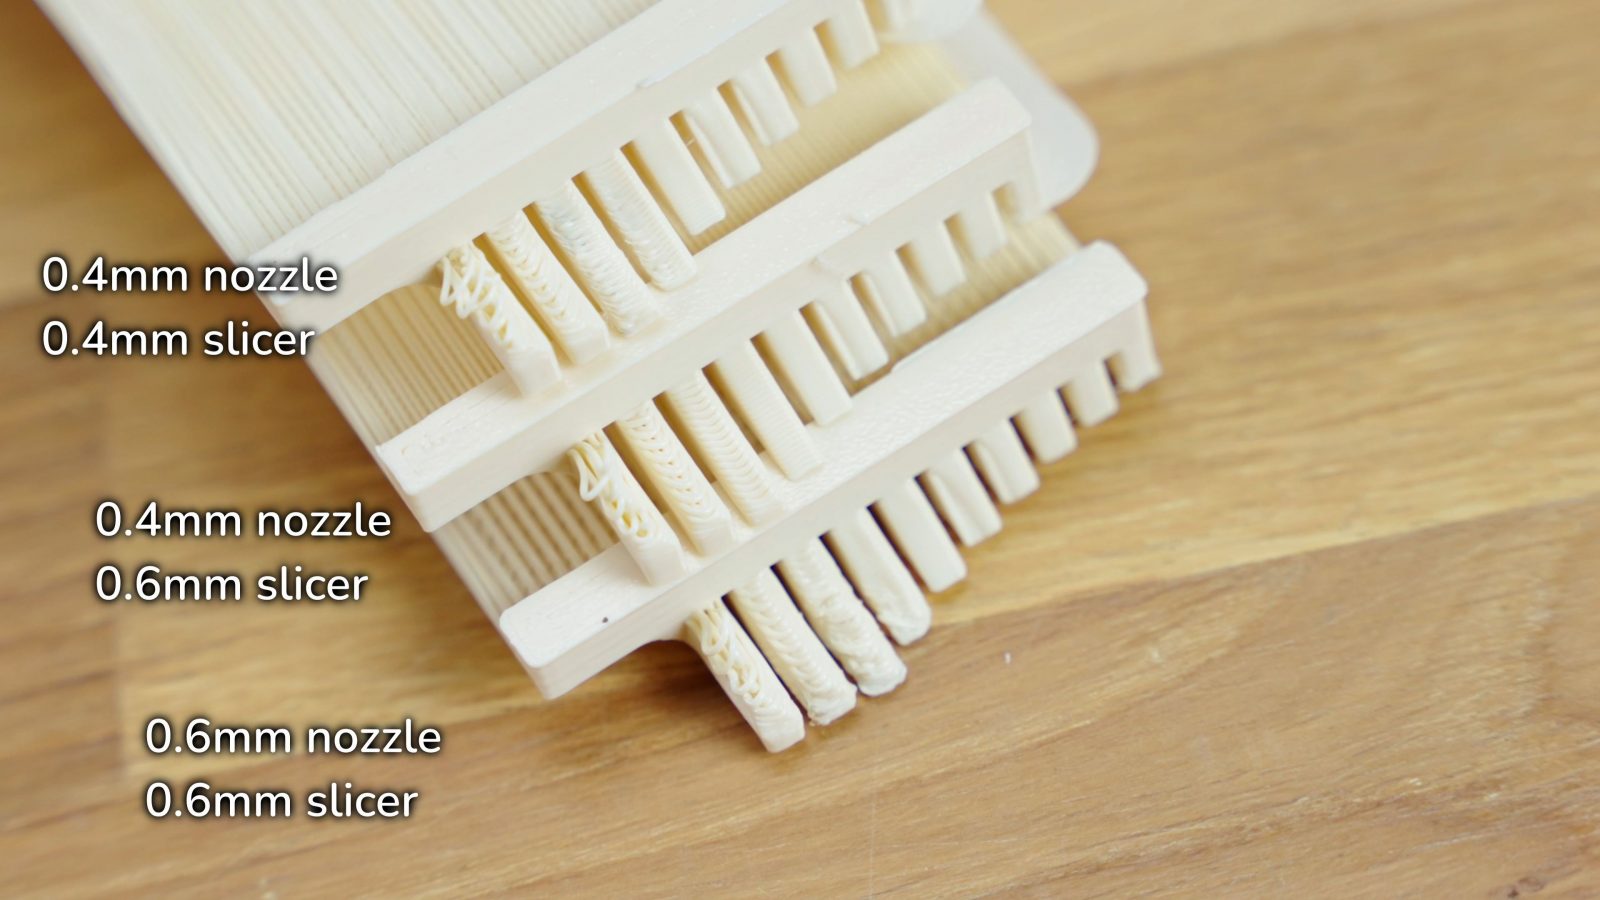
So what happens when you print at 0.6mm settings with a 0.4? Well, certainly your printer isn’t going to explode or anything, and in fact, all three sets of parts look totally… fine.
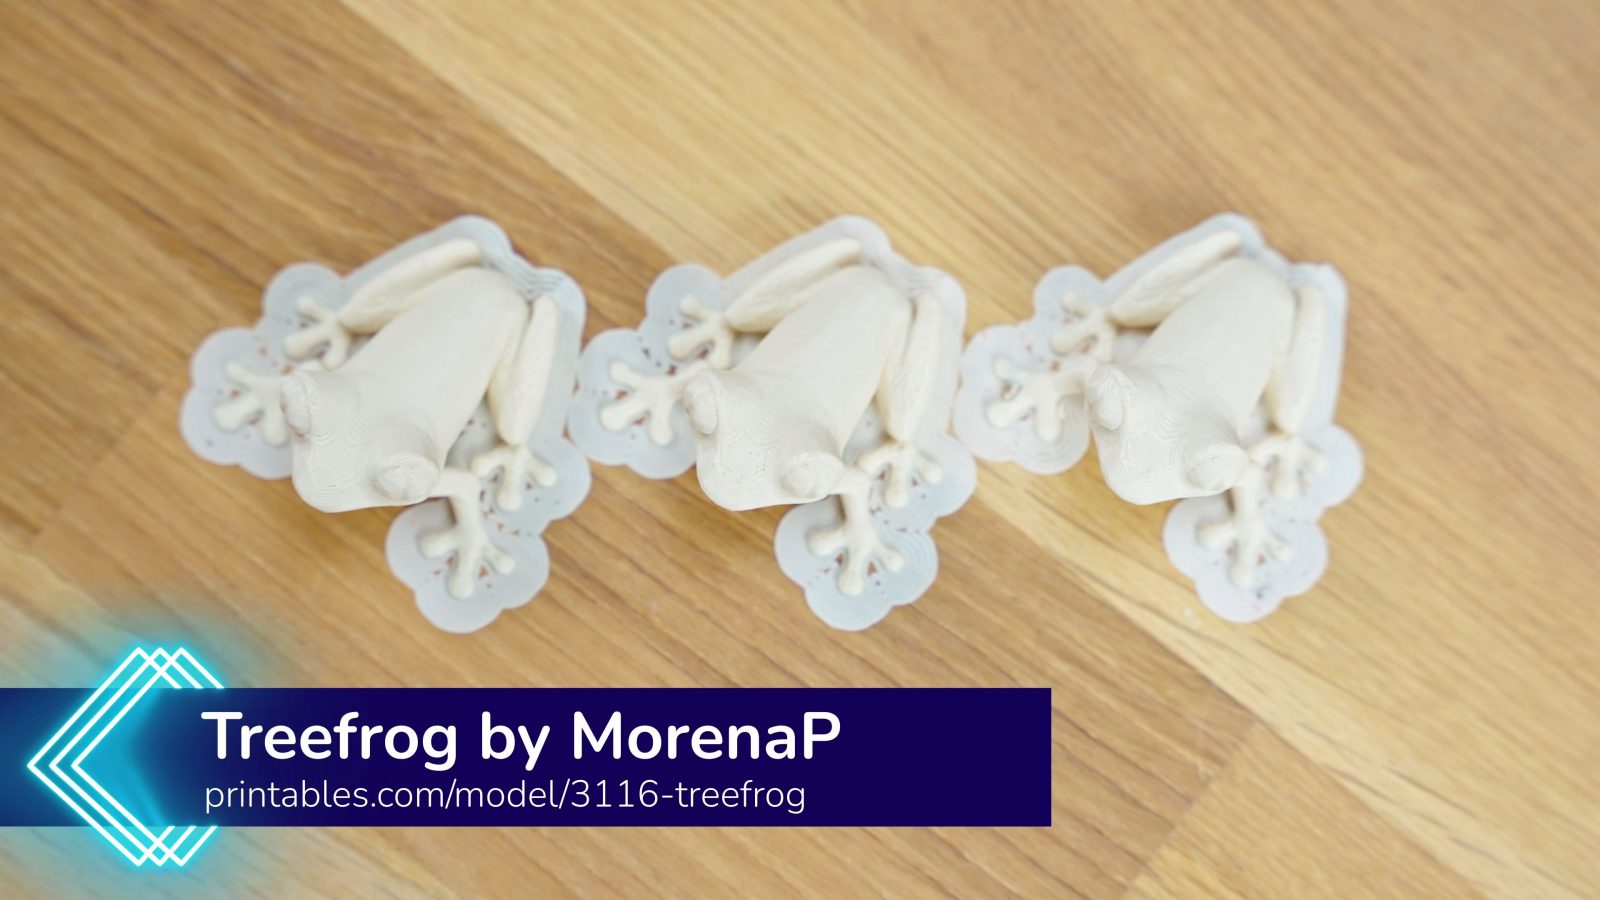

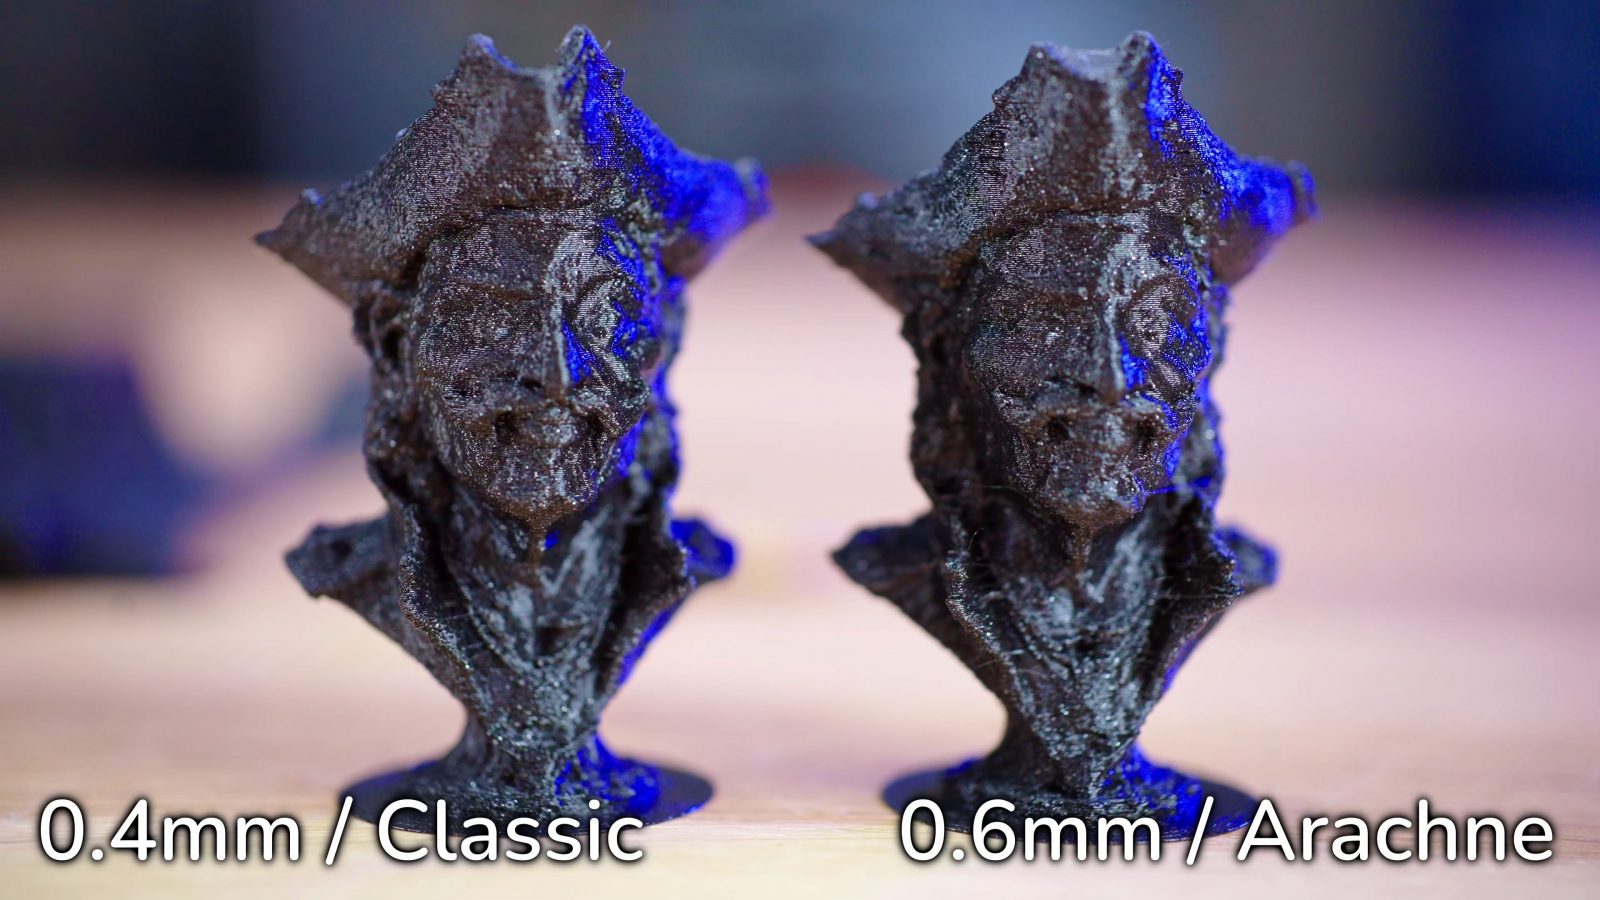
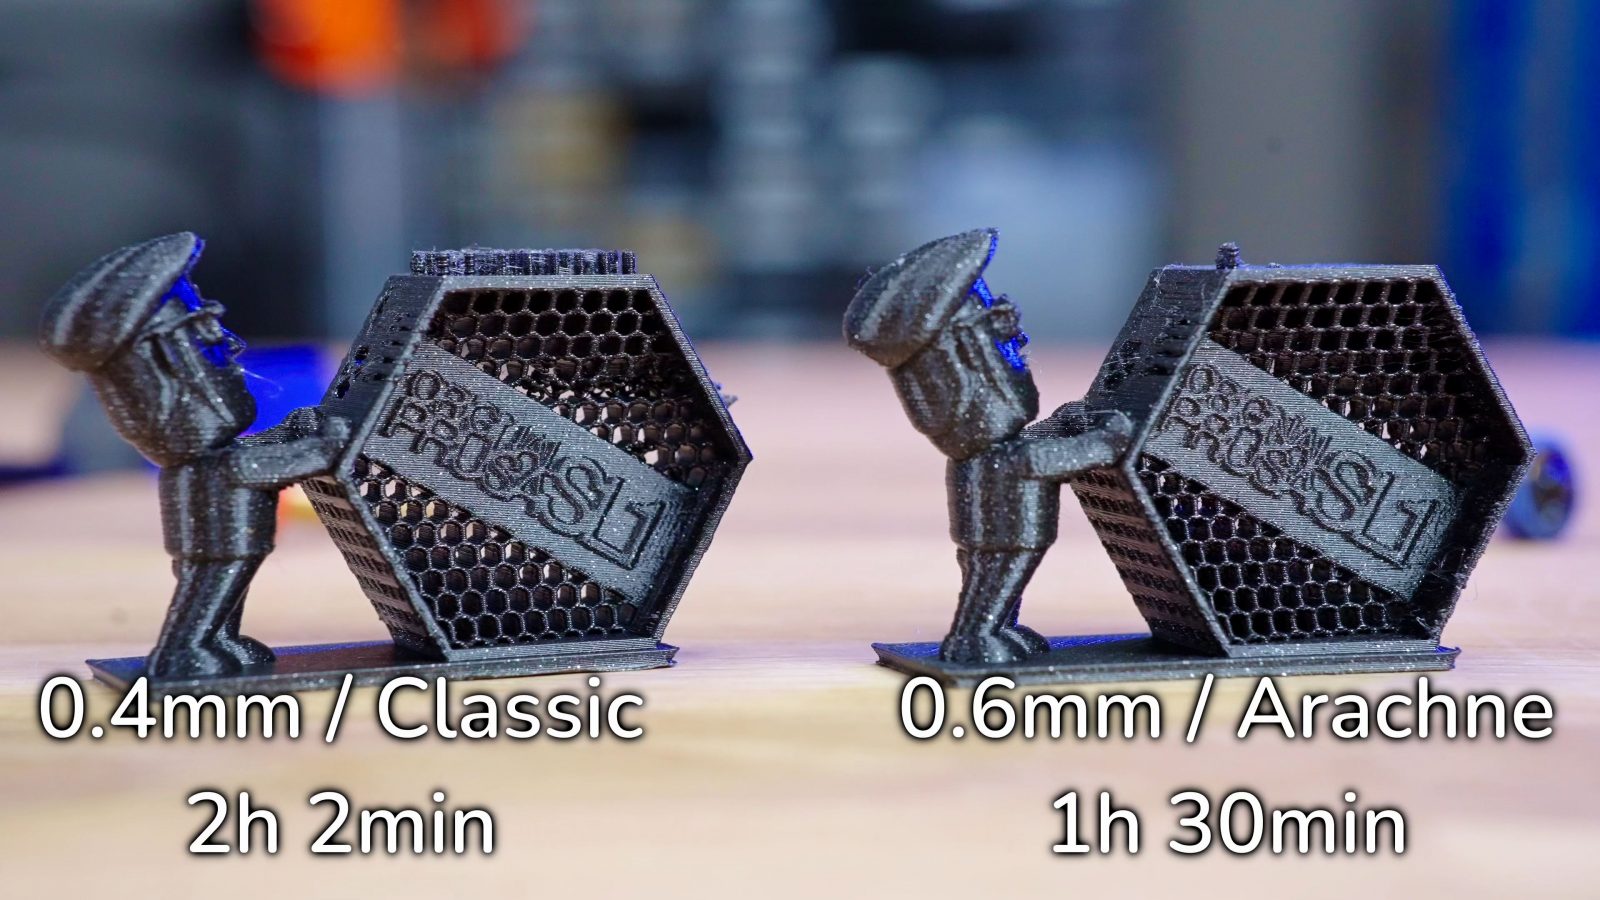
On the simple low-ish-poly Treefrog by MorenaP, there is practically no difference to be seen. The Pirate and his rat by Eastman also looks perfectly fine on all three settings, and as expected, the 0.4 sliced for 0.6 overall actually looks more like the 0.6 than the 0.4, but it actually looks better in a couple of spots.
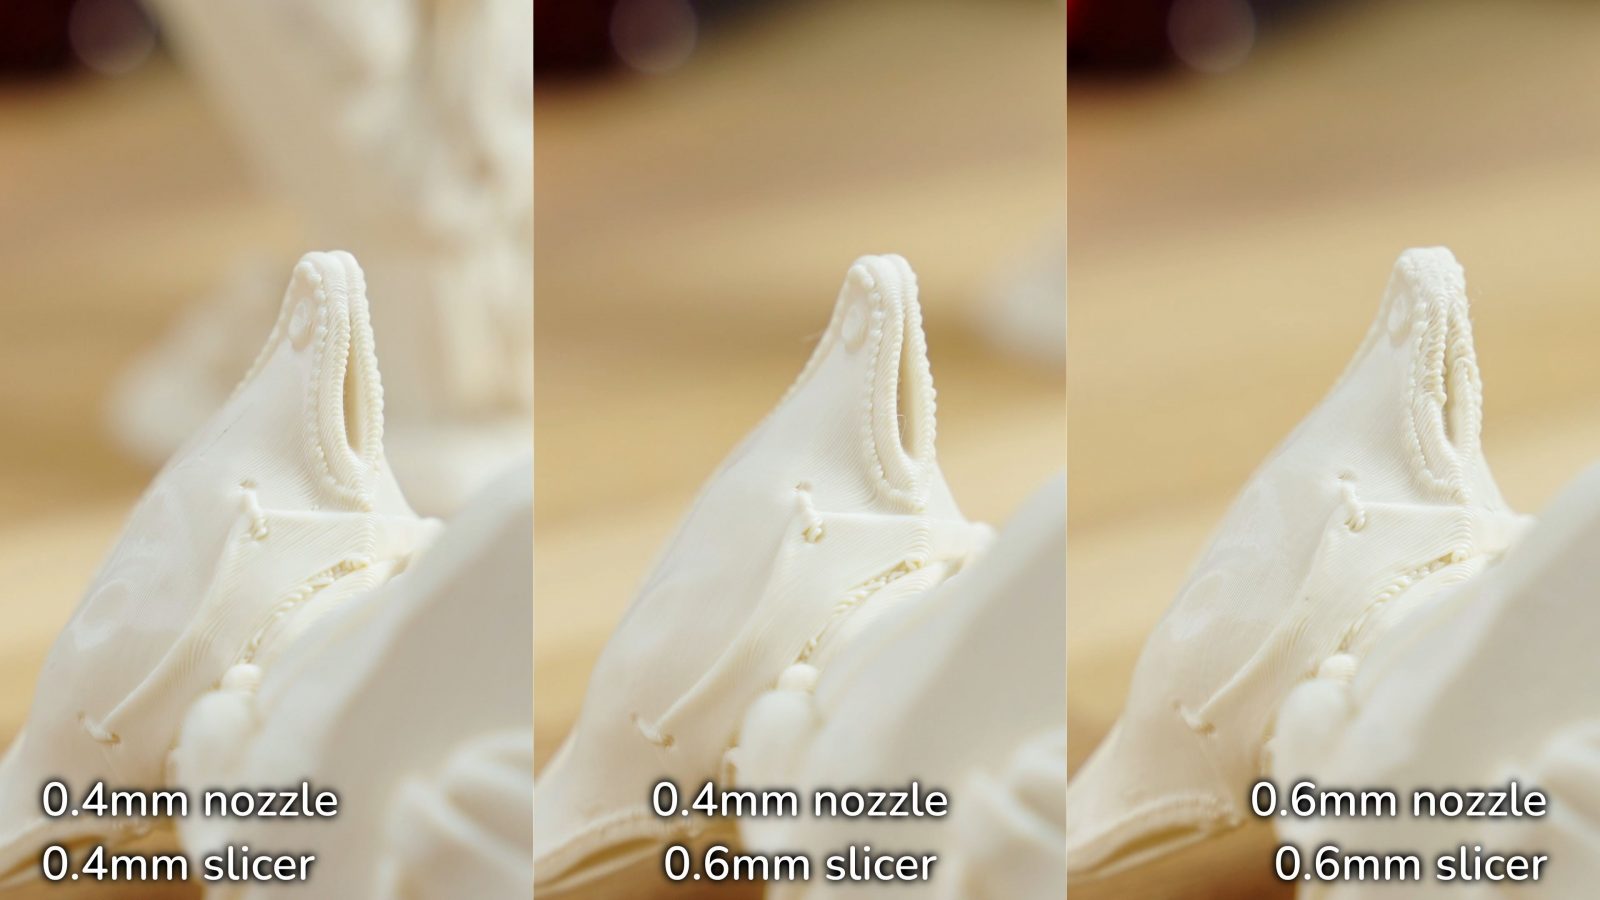
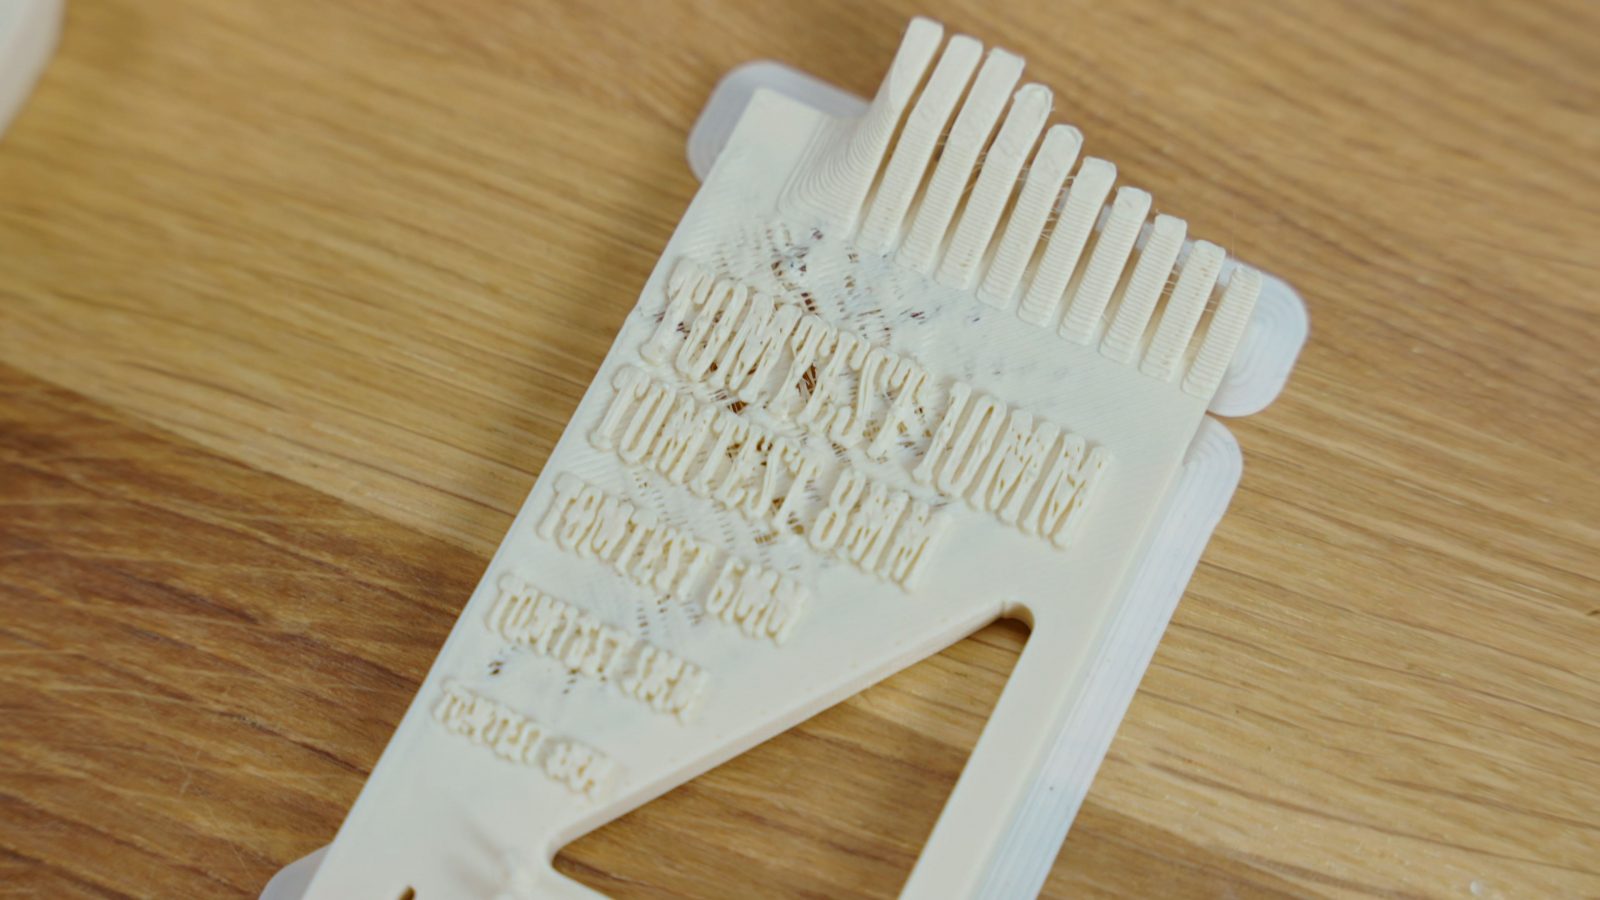
This overhang on the hat is pretty extreme, and both the 0.4 and the 0.6 are struggling with it. However, the 0.4 nozzle with 0.6 gcode does look the cleanest out of the bunch.
Here is what I thought was going to happen: The way that overhangs get printed is that you have a limited amount of overlap between the current extrusion line and the one below it on the previous layer.
Now, if you use a 0.4mm nozzle, but slice for 0.6, my thinking was that the material that actually gets extruded would be thinner than what the slicer expected and as a result would just squirt past the previous layer instead of catching it with its edge, and you’d get super droopy loops as a result. But it looks like there’s something else going on that has the opposite effect, and I can’t quite explain it.
Where this whacky combination of slicer settings and nozzle size does fall a little short, though, is with bridges and the subsequent solid infill over it, and the same with solidly infilling top layers – it’s more prone to have some holes in it. But I mean, that’s something that can be tweaked out with the extrusion width settings I mentioned earlier. The TomTest shows the same effect where our Frankenstein prints are better at overhangs than both the “correct” 0.4 or the 0.6 prints, and overall the print does look cleaner and more detailed than the one done with a 0.6mm nozzle and the “correct” settings for that.
I went into this thinking there’s no way this would be a good idea, but it looks like actually sticking with a 0.4mm nozzle and using a 0.6mm profile or even just slightly wider extrusion widths could be a pretty good idea overall – and with Arachne, the slicer can now dynamically scale down extrusion width if it needs to.
One thing that still needs more investigation is why the Frankie print is so matte – matte PLA prints typically indicate a print temperature that is too low. Perhaps because the filament moves more quickly through the 0.4mm bore, it has less time to pick up heat, but that should be compensated by the shorter distance the heat would need to travel – I can’t explain it, but it might be a pointer that the hybrid prints might have some disadvantages when it comes to part strength.
So having done these comparisons, one thing I wanted to know is what would happen when you did the reverse: Use a 0.6mm nozzle and print gcode sliced for 0.4. This doesn’t work. I mean, yes, it still prints, but the parts and especially overhangs and bridges look worse than any of the other parts.

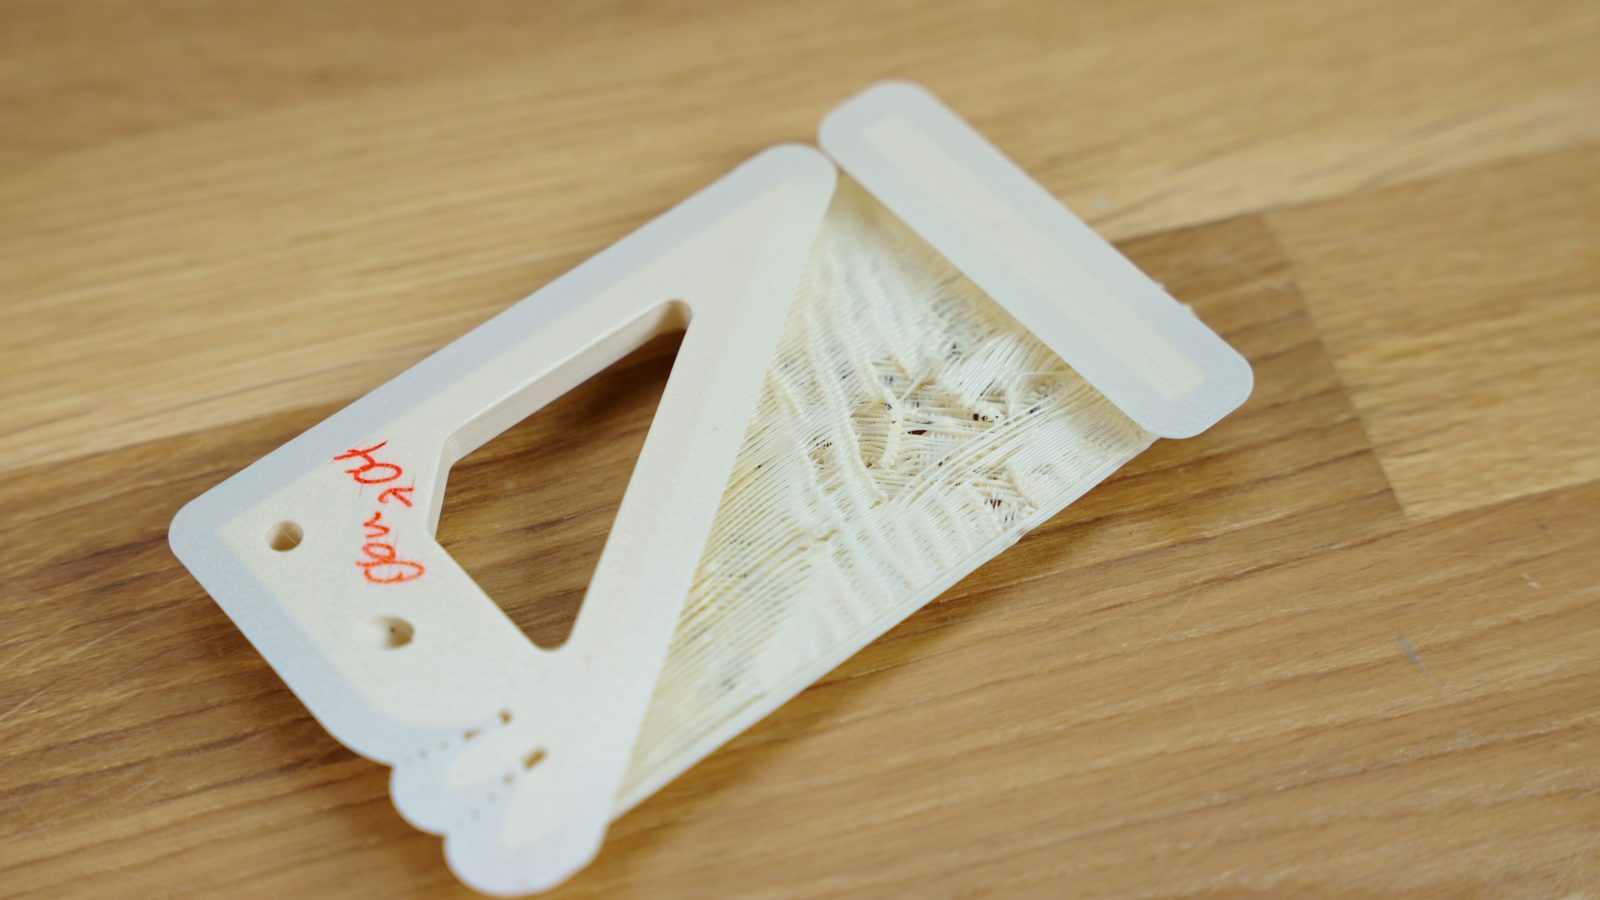
So if you’re thinking about using a 0.6mm nozzle and switching to a 0.4mm print profile for more detailed parts – don’t. Not a good idea, won’t work.
But the other way around – totally viable, I think! At the very least, it’s a good preview of what you can get with a 0.6mm nozzle, but it might even be good enough as a permanent solution. Though keep in mind that this was done at 0.2mm layers, and the story might look completely different at lower or higher layer heights. I wish I had more time to investigate, but I’m having to move back out of the new studio space, and that is taking up all of the time I currently have. In any case, thanks for watching, and thanks to all the supporters that support my journey, keep on making, and I’ll see you in the next one!
Models shown:
Relevant products
💙 Enjoying the videos? Support my work on Patreon!
Product links are affiliate links – I may earn a commission on qualifying purchases (at no extra cost to you)

Check out my second channel “More Layers” on YouTube for livestreams