
I´ve used dozens of different 3D printers over the years. They look like they’re machines that are made for vastly different jobs, based on how they’re built and what they’re capable of. But they all share one thing in common: A 0.4mm nozzle. And the nozzle is one of the core things that make a 3D printer work. But why is it always a 0.4mm bore? Surely with all the different applications these printers are made for, it can’t just be a one-size-fits-all choice. And you’re right, it’s not. Honestly, I think it’s the wrong choice for pretty much every application that it’s being used in and you would be better off using a 0.6. And to put my money where my mouth is, I switched to a 0.6 on the printer I use the most and tried to see how it stacked up. And, spoiler, with the newest generation of slicers, a 0.6mm nozzle can now print details at least as good if not better than what the default 0.4 used to be capable of. And of course, it’s still much faster at it. So get ready to replace your nozzle, I’m going to show you how this new slicer tech works and how much better and faster it prints.
So to understand why we’re all using 0.4mm nozzles, maybe a little history, because it wasn’t always this way.
Back in the early days of RepRap, the default was actually 0.5mm, which I guess was a result of the hotends from back then, which had a fixed, built-in nozzle, being mostly DIY jobs and .5 kinda worked out. As a finer option, you had 0.35mm, but looking at the print time increase that came with and the generally lower print quality the machines used to be capable of, it was a far less popular option.
But when E3D released their first commercial hotend, they chose a 0.4mm nozzle as a happy medium – and because their v4 hotend was so far ahead of everything else, it quickly became the new, unchallenged standard. It allowed you to print finer details than a .5, while still printing faster than a .35.
With any smaller nozzle, your parts generally take longer to finish, but much more than the pure diameter change might suggest. First of all, your extrusion track is less wide, so to fill out the same area on each 3D printed layer, it needs to cover a lot more distance than a larger one.
Then, because a smaller bore is also more restrictive, in some cases you might also have to slow down the linear print speed to get good control of the extruded filament.
And lastly, a smaller nozzle also means lower optimum layer heights. You’re usually going to see layer heights between ¼ and ¾ of the nozzle diameter, and in that range, details like overhangs and bridges have the best chance of printing cleanly. So in addition to laying down a thinner track, and having to run more lines back and forth, as well as moving slower, you also need to do more layers to get the same part printed.
0.4 was a massive step back in print speed, compared to .5, but I guess everyone just agreed that it’s still fast enough, so nobody really questioned it.
Until now…
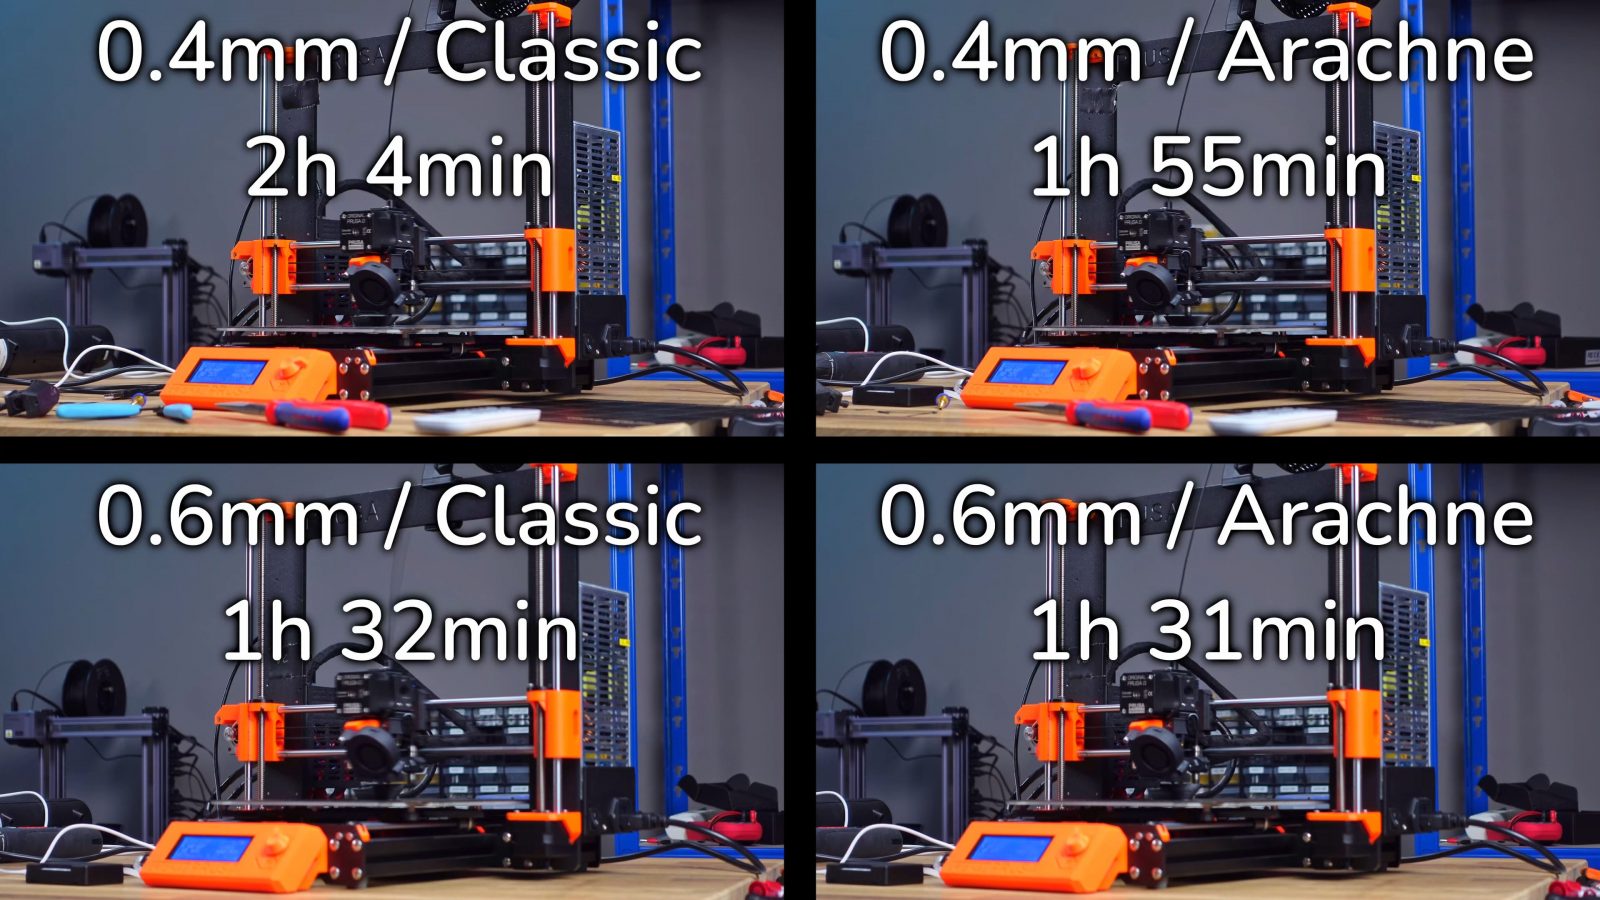
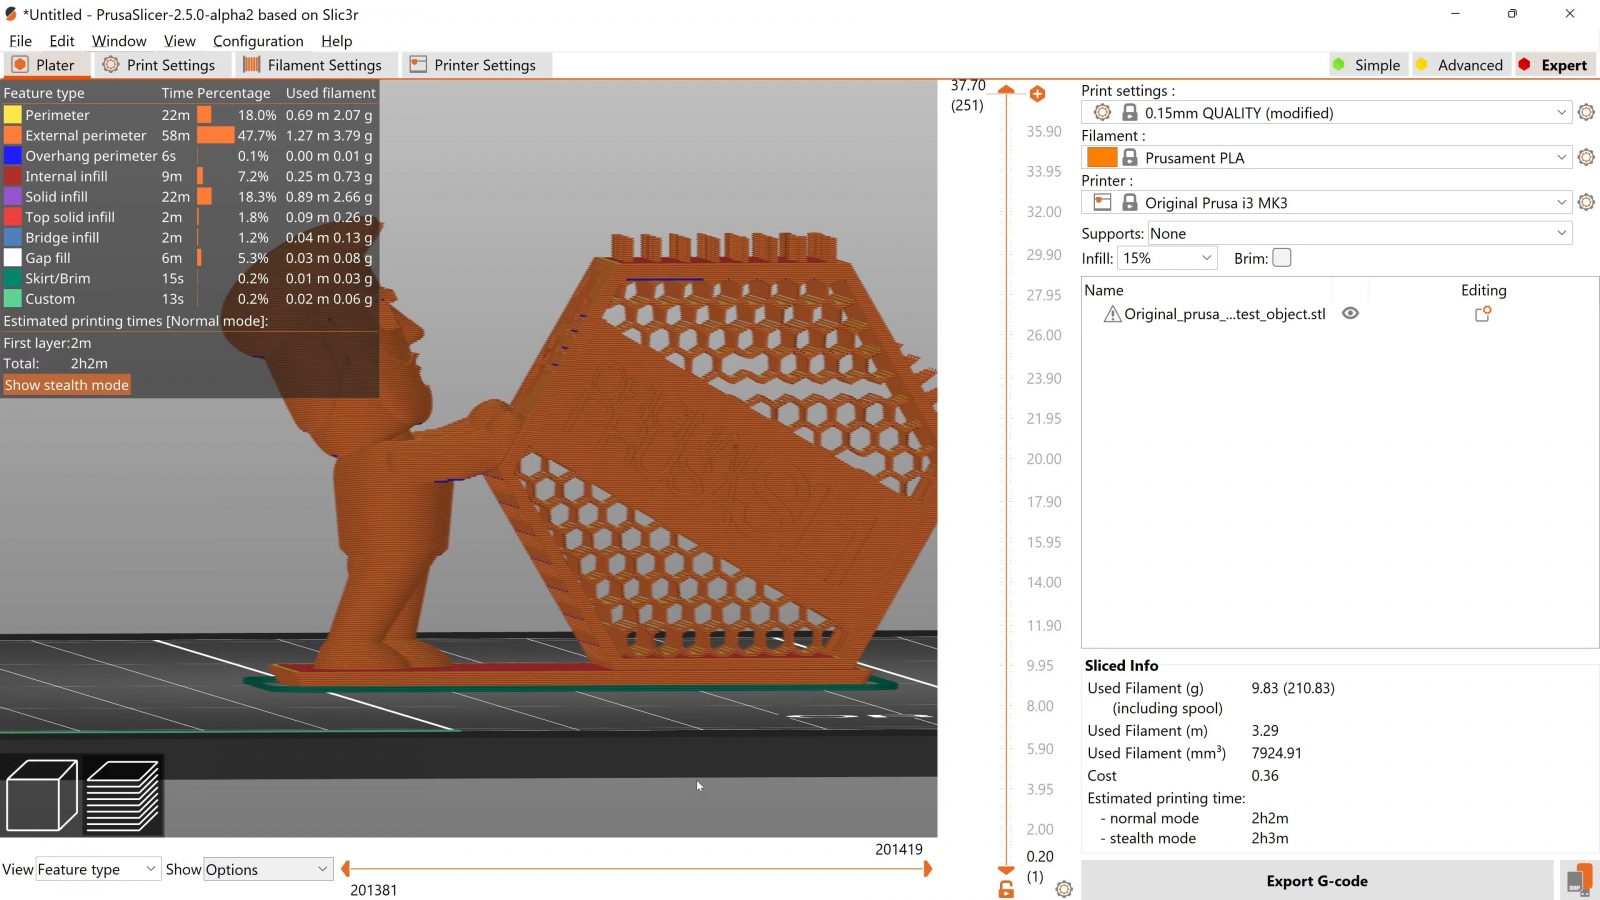
So if we have a look at these 3D Benchies, can you tell which ones were done with a 0.4 and which were done with a .6? You can’t. I can’t. The only way to tell them apart is by the label on the bottom because these look identical. Now, I know, the Benchy is not a super-fine detail print, but it’s pretty representative of what you’re usually going to be printing. But there are four Benchies, which means I changed another parameter between these, in addition to printing with a different nozzle, and that is enabling the new Arachne engine in PrusaSlicer.
I wanted to see the print time differences the new engine made, but with the Benchies it didn’t change much, there are other cases where there’s maybe a 5 to 10% improvement just by updating your slicer.
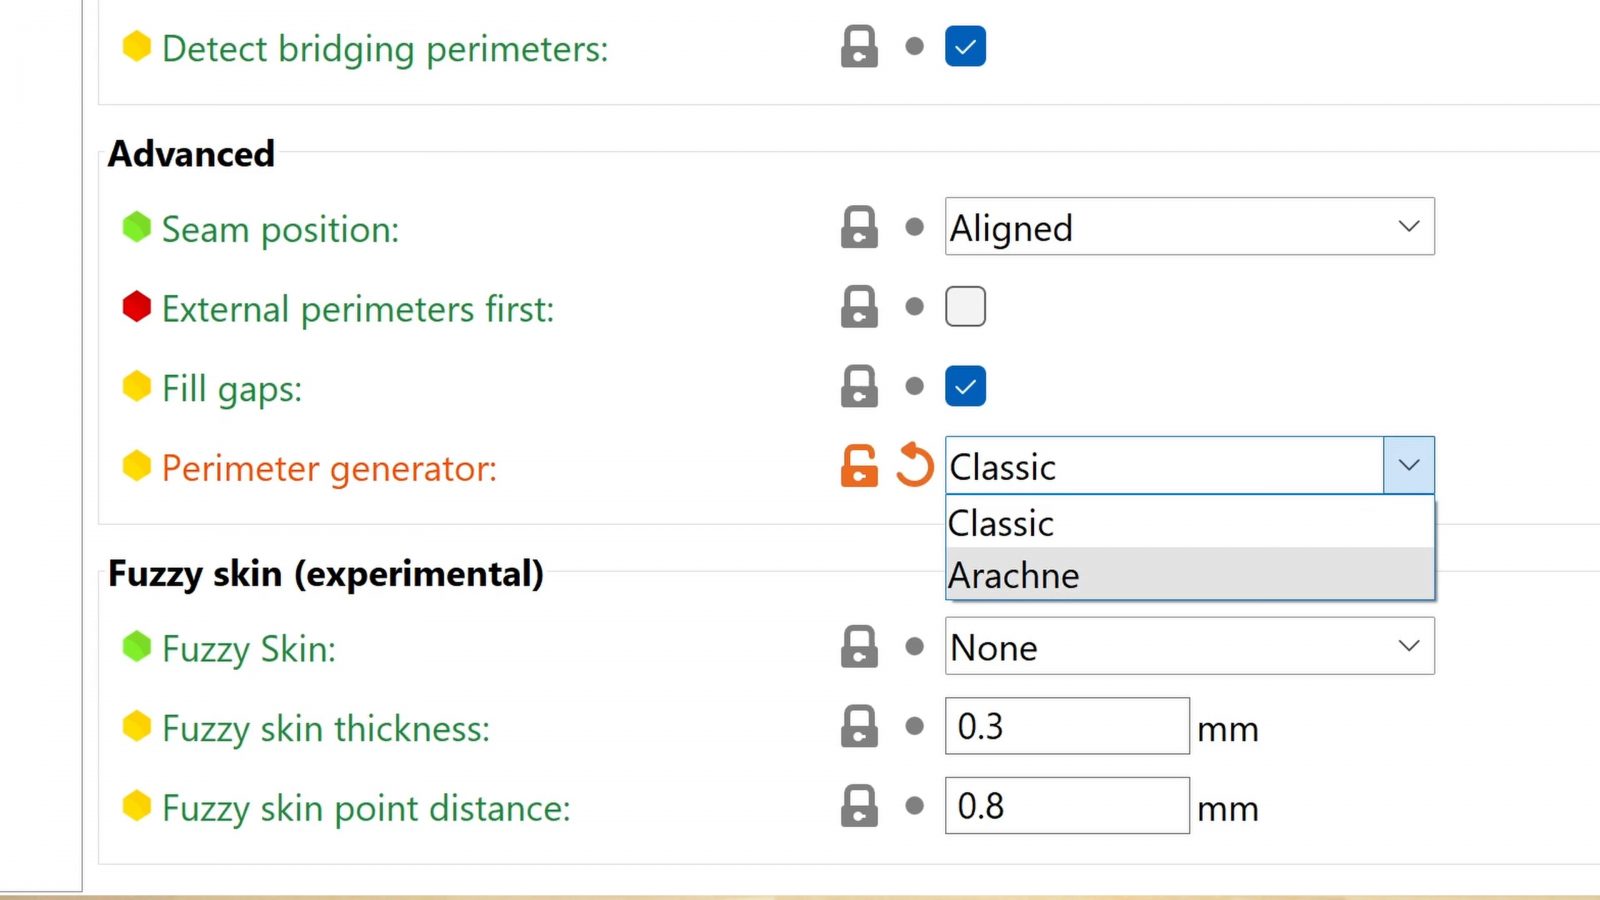
Arachne was originally developed by Ultimaker for Cura, and it’s been in there for a while, but thanks to Cura being open-source, it’s also going to be in PrusaSlicer. Currently, it’s in the 2.5 Alpha, but it’s going to be rolled out for everyone pretty soon. Basically, it changes how the Slicer generates perimeters for fine details. In PrusaSlicer and I think even in Slic3r before that, you used to be able to choose between two approaches: By default, it would always try to fit a full perimeter loop on every detail, so that the start and end of that extrusion line would be connected. This resulted in a lot of details simply being ignored that were smaller than two full extrusion lines. The alternative would be to enable the “detect thin lines” feature, and that would allow the printer to do lines that were not full loops. Most of the time, though, that just resulted in pretty rough-looking parts with tons of artifacts, because the printer would constantly transition between doing the full two-line loops and the single thin lines, so by default, that option was turned off to get cleaner prints.
Both of the “classic” approaches also meant that when your details were slightly larger than two full perimeters, you’d now need an extra fill line to squeeze into that gap that is going to be smaller than your nozzle size. Or sometimes, you’d get these short-line squigglies that would take forever to print. Not optimal, but it worked.
So what Arachne now does is that instead of printing perimeters at a fixed extrusion width, it continuously varies that width while it’s printing, and that is especially visible on features that are between 1 and 3x the extrusion width. There’s no more option to enable “detect thin lines” because it’s always sort of doing that – but cleaner.
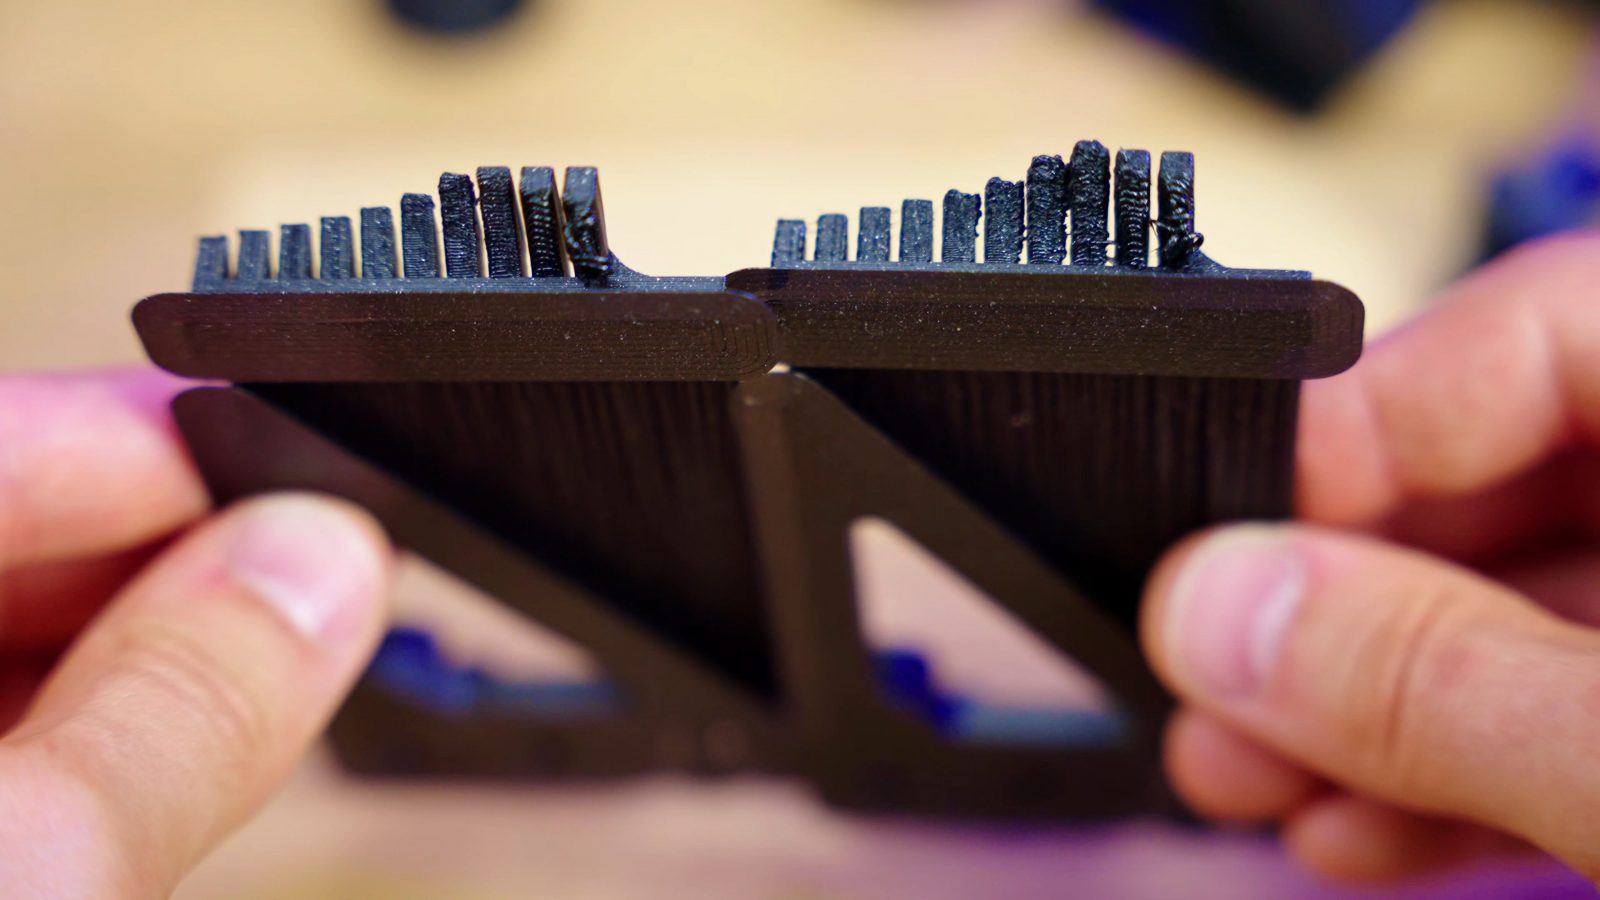
What it means in practice is that a lot of details that previously wouldn’t print at all or wouldn’t print nicely are now just an absolute non-issue. The best example is raised text, and it’s super visible on a test part that I designed, probably 5 or 6 years ago, so please don’t judge me for it. With the classic Slic3r perimeter generation and a 0.6mm nozzle, it would completely butcher every font up until the tallest 10mm one. Detect thin walls tries to print some of the smaller texts that just use a single line, but still has issues with the ones that are close to that magic 2x perimeter size, but if we switch to Arachne, we get instantly much cleaner results.
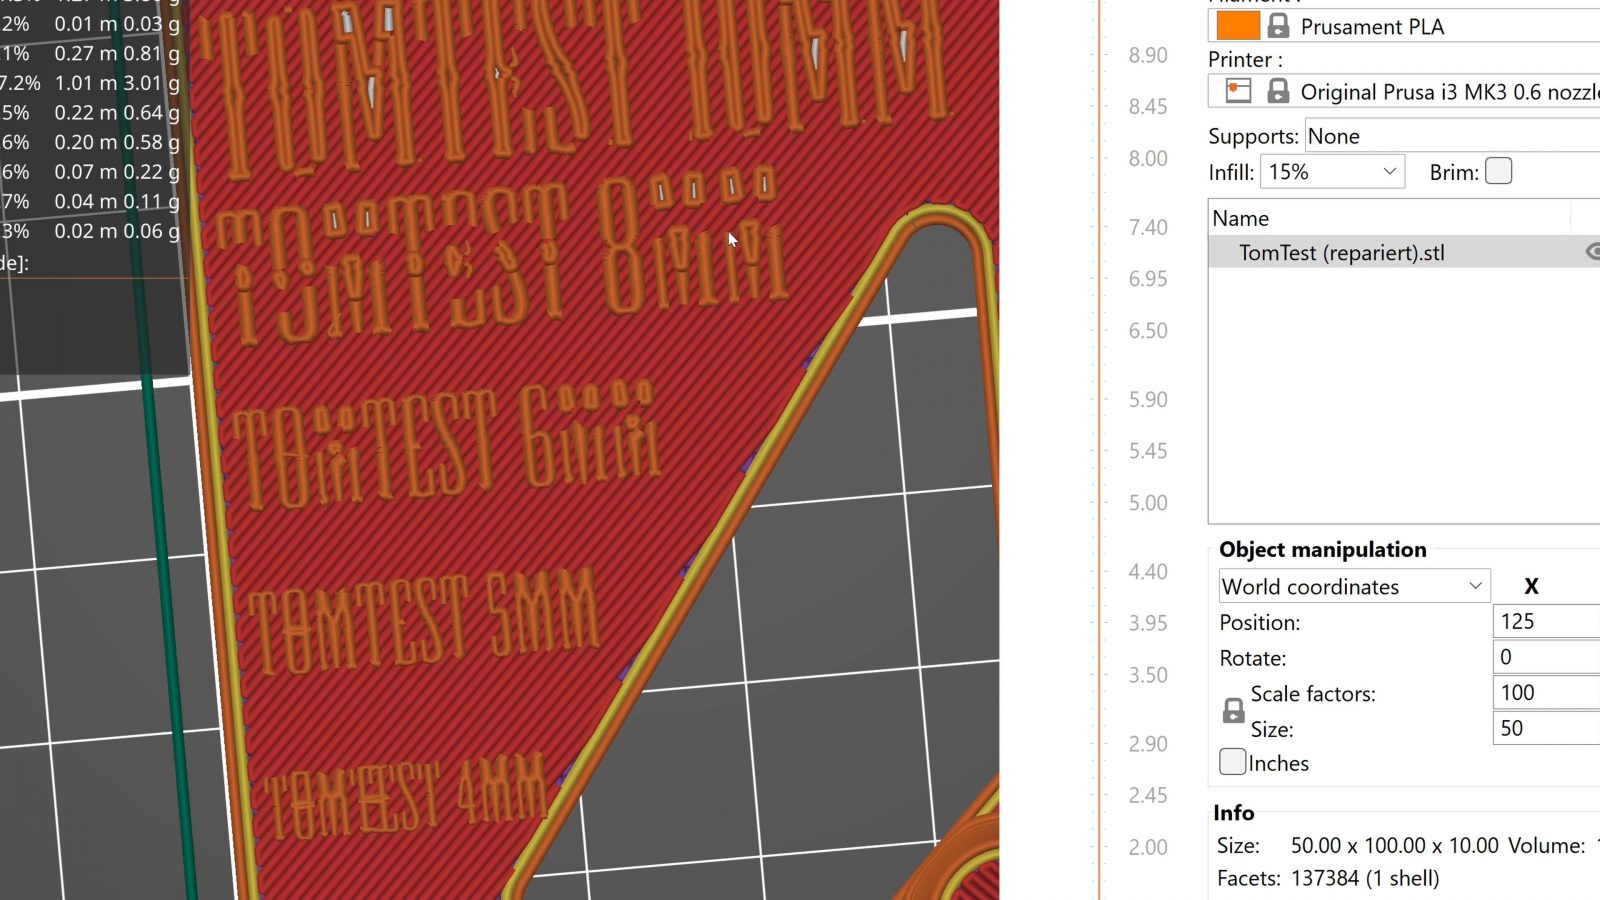
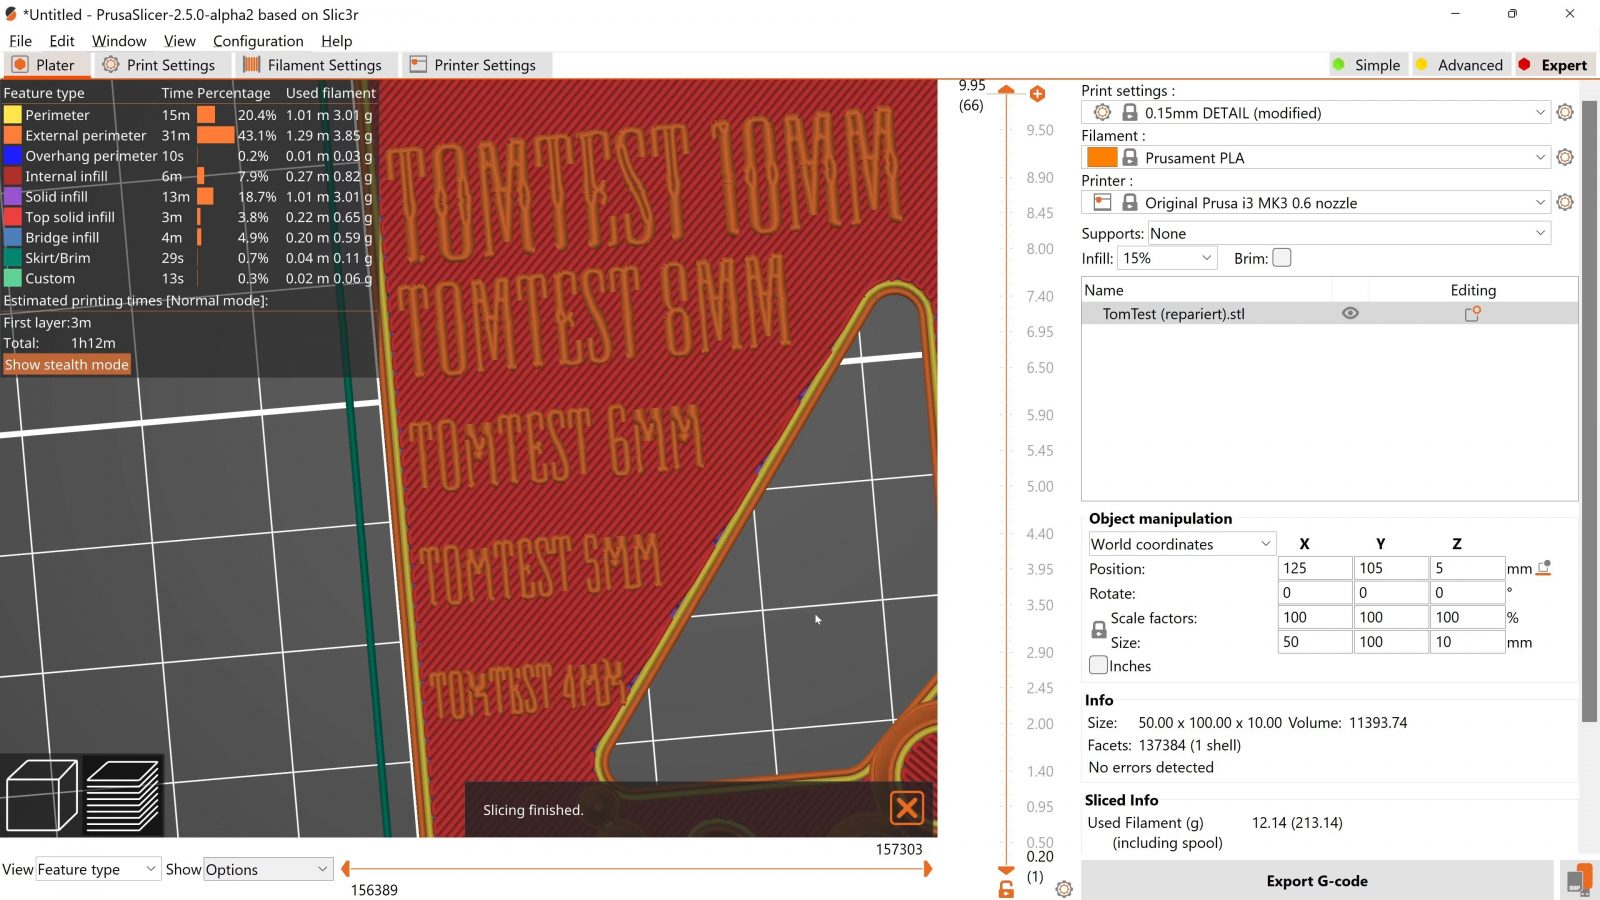
And honestly, this is cleaner than what you used to get with a .4, with or without detect thin walls enabled.

And even though I’m using 0.15mm layers on both the 0.6mm nozzle with Arachne and the 0.4mm without it for all the prints and comparisons in this video, the 0.4mm nozzle and classic slicing take 1h43m, while the .6 with Arachne only takes 1h12m. That’s almost a 30% improvement, and to get that same improvement with the .4, you’d need to drop the layer height to .2, and use the “Speed” profile. Which, of course, you could do, but we can do that with a .6 as well and then we’re faster again. And if you want to play that game, a .6 nozzle allows you to use even coarser layers, all the way down to 0.4mm thick, and at that point, this print is going to finish in just 33 minutes. You probably don’t want to print everything that coarse, but with .6, that’s now an option if you want to.
But really, I want to keep this a comparison between what you’re used to with a 0.4mm nozzle and what’s now possible with Arachne and a .6.
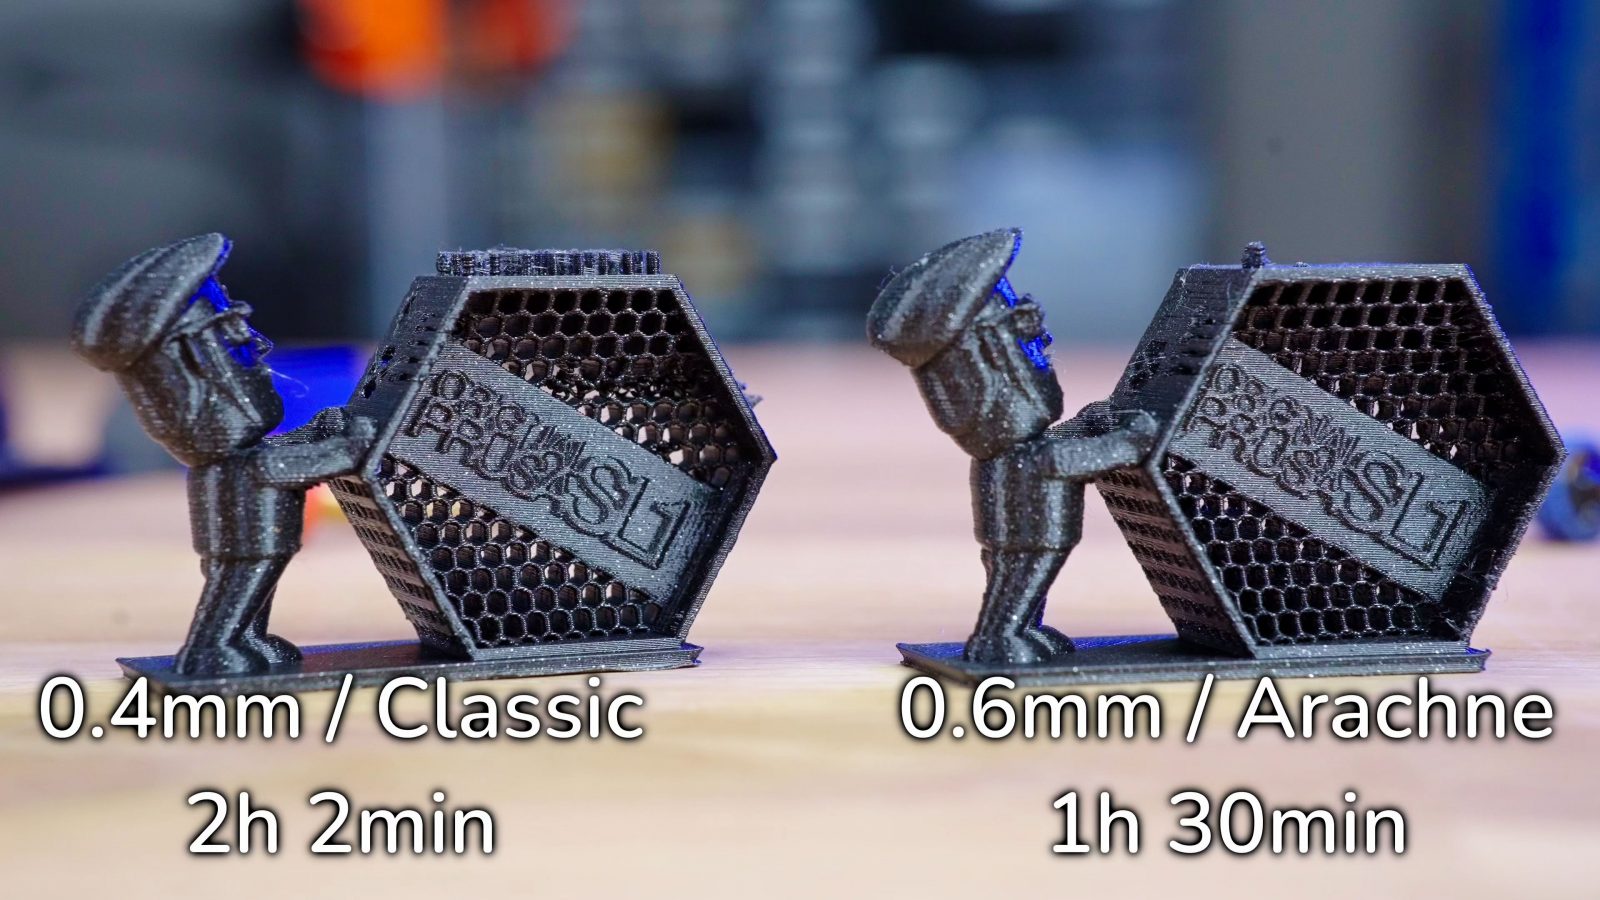
I tried to find parts that really had the 0.6mm nozzle struggling, and I found that with the Prusa SLA test part that’s intended to be printed on a resin printer. The 0.4mm with the classic slicing actually is better here, at least when we look at the super-fine details at the edge of the part.
These are simply sized just small enough so that a .4 nozzle will just fit, but a .6 lays down just a bit too much material at once to print them. But when we look closer, down here in the hex structure, the .4 with the classic slicing actually skipped a row – I guess that’s a rounding error that that one row is just a bit too small for it to get picked up.
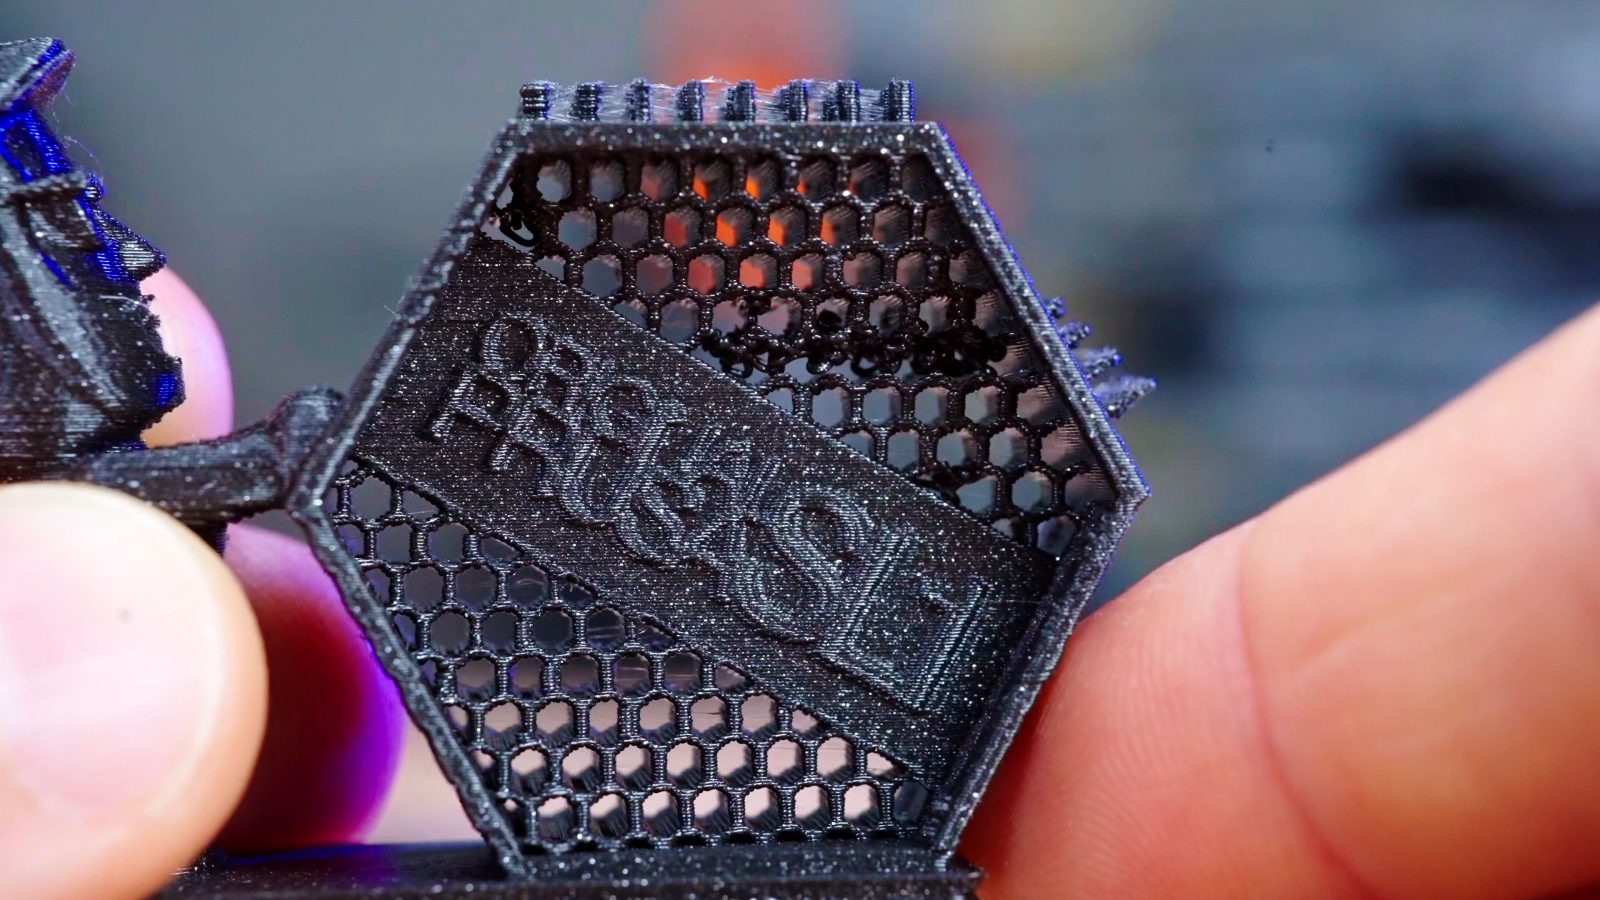
But, over on the .6 print done with Arachne, it’s all there. And if we look closer, there are a couple more issues with the .4 and classic slicing: On the back here, there’s this pattern with X through it, and it’s not supposed to go all the way through, it’s supposed to be closed off, and it’s the same with this detail width test pattern in the front here, that’s supposed to be blocked off in the back, too. On the .6 with Arachne, those bits print as intended. I mean, it’s impressive that the .4 print was able to print these columns like that, but it’s not accurate to the model. “Detect thin lines” would try to print those bits correctly, but it wouldn’t be pretty, not any prettier than what the .6 can do with Arachne, at the very least. But of course, the .6 still has the speed advantage, with 1h30m vs. 2h2m.
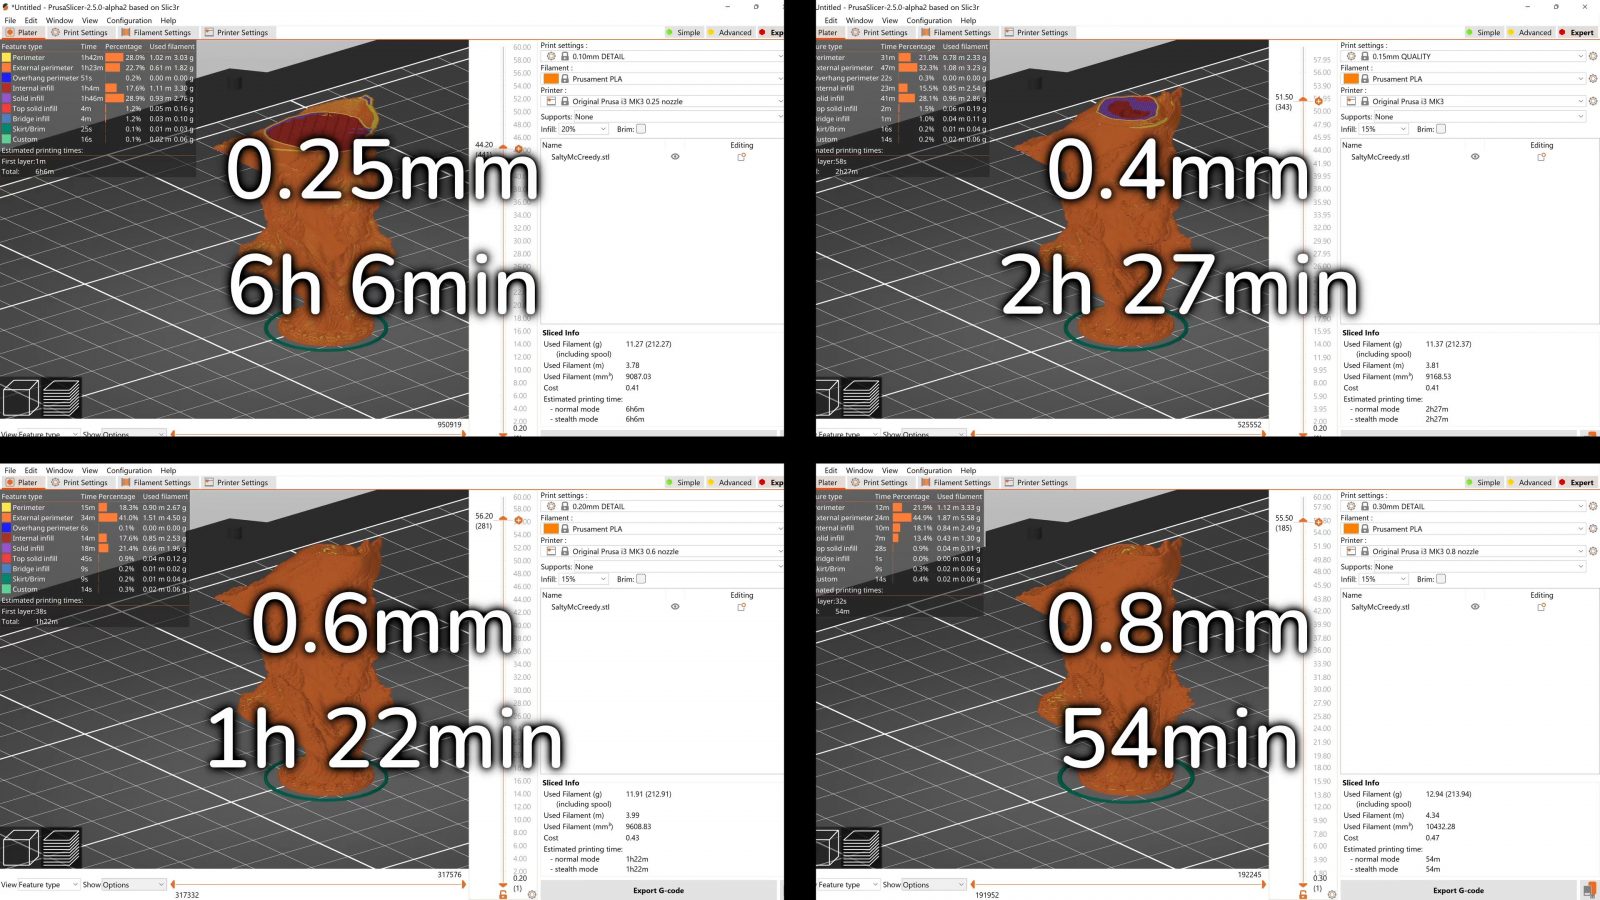
The 50% scale Salty McCreedy is an interesting one because that model isn’t made of edge cases, it’s just very organic and, actually kind of noisy in how it does details. And with these sorts of prints, this is what I mean with .6 with Arachne being able to do what .4 was capable of with the classic slicing. You’re just not going to see much of a difference. The only differences I was able to notice were that the medallion on his chest doesn’t quite have the same definition in the pattern on it, and the eye sockets look slightly less sharp with the .6mm nozzle. Those are things you’re only going to notice with these two parts side by side, and the light hitting them just right, but if you just had the .6 done with Arachne by itself, you’d never second-guess it. And you’d never think that it took just 1h49m instead of 3h17m.
So having looked at all these parts that really highlight the differences, here’s the thing: Even without Arachne, a 0.6mm nozzle has been the smarter choice for a while. Because these super-tiny models probably aren’t what you’re normally going to print.
For me, this is the sort of stuff that I usually print, and it’s nowhere near being fine enough to require a 0.4mm nozzle.
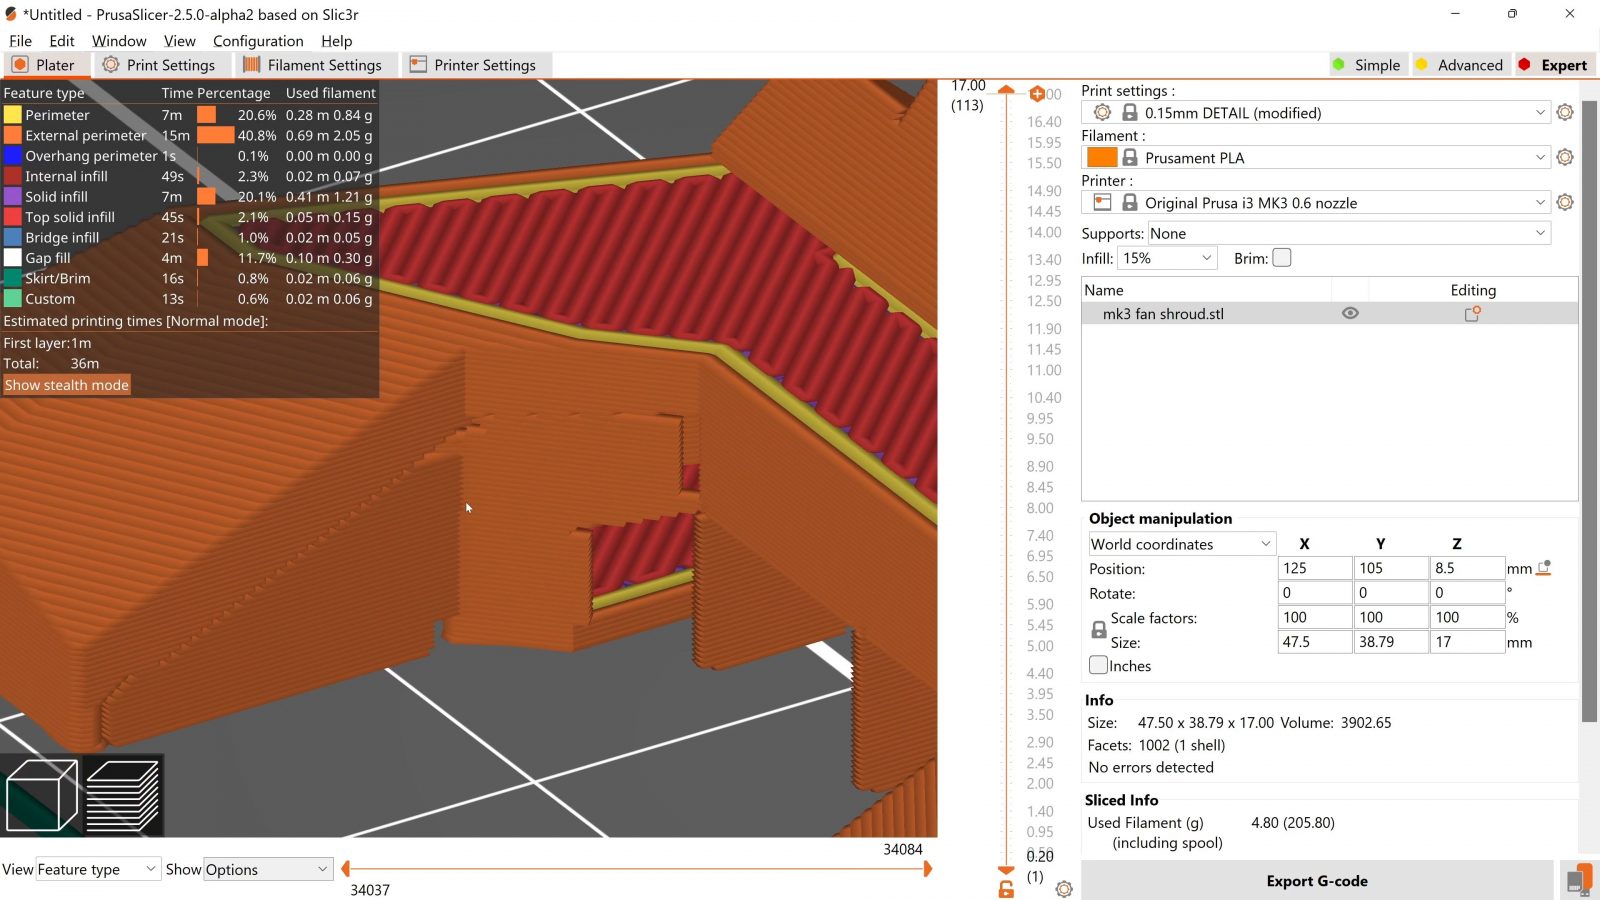
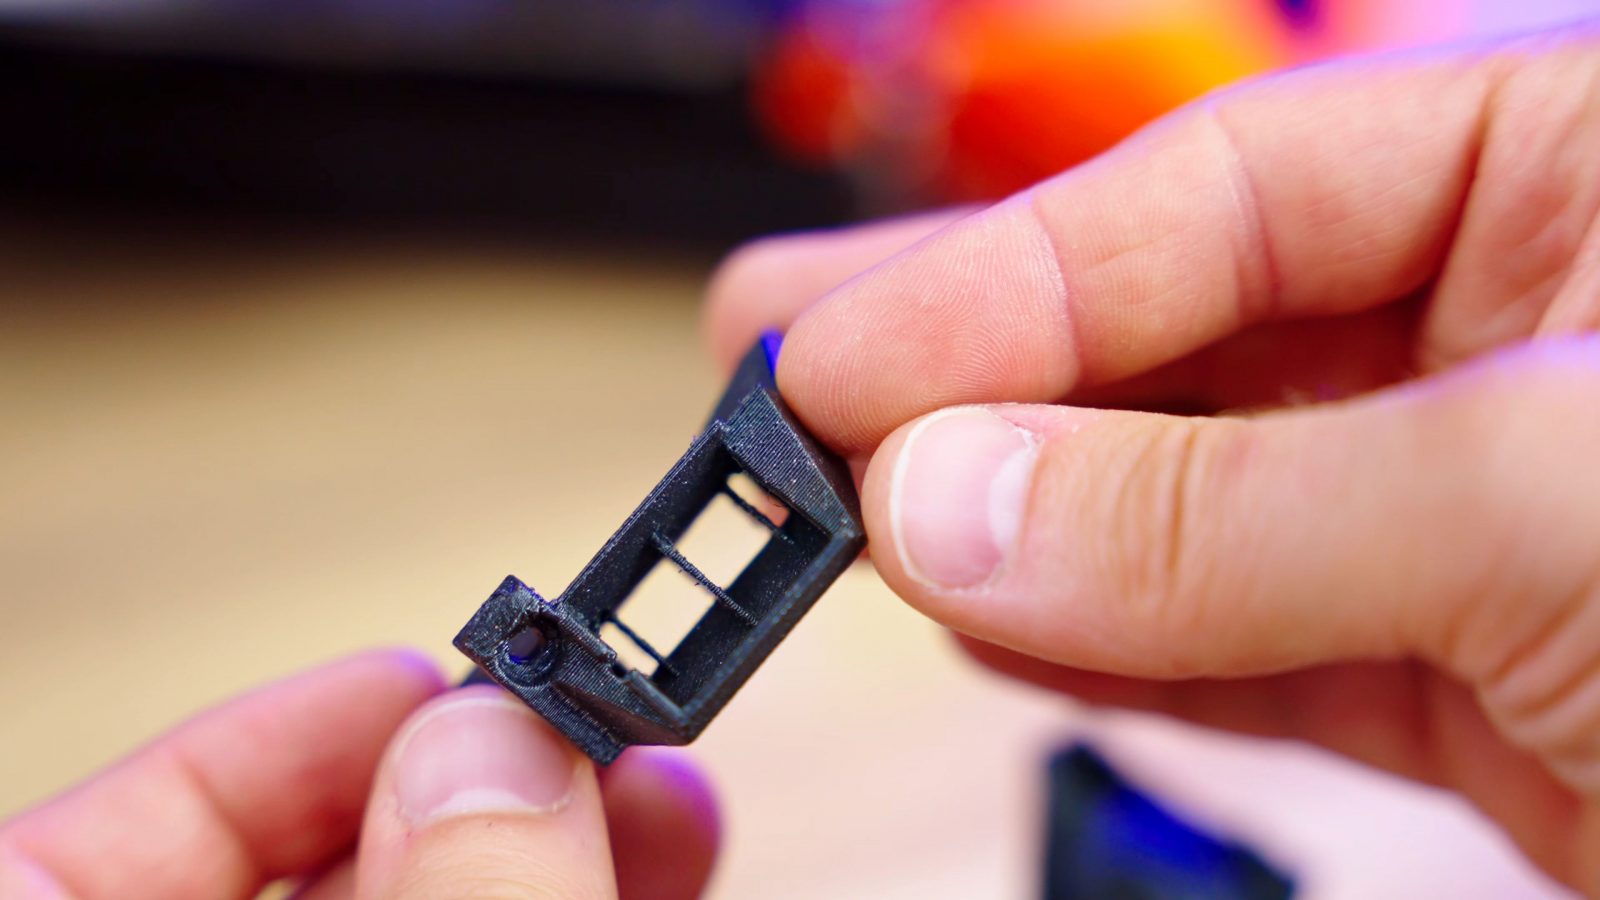
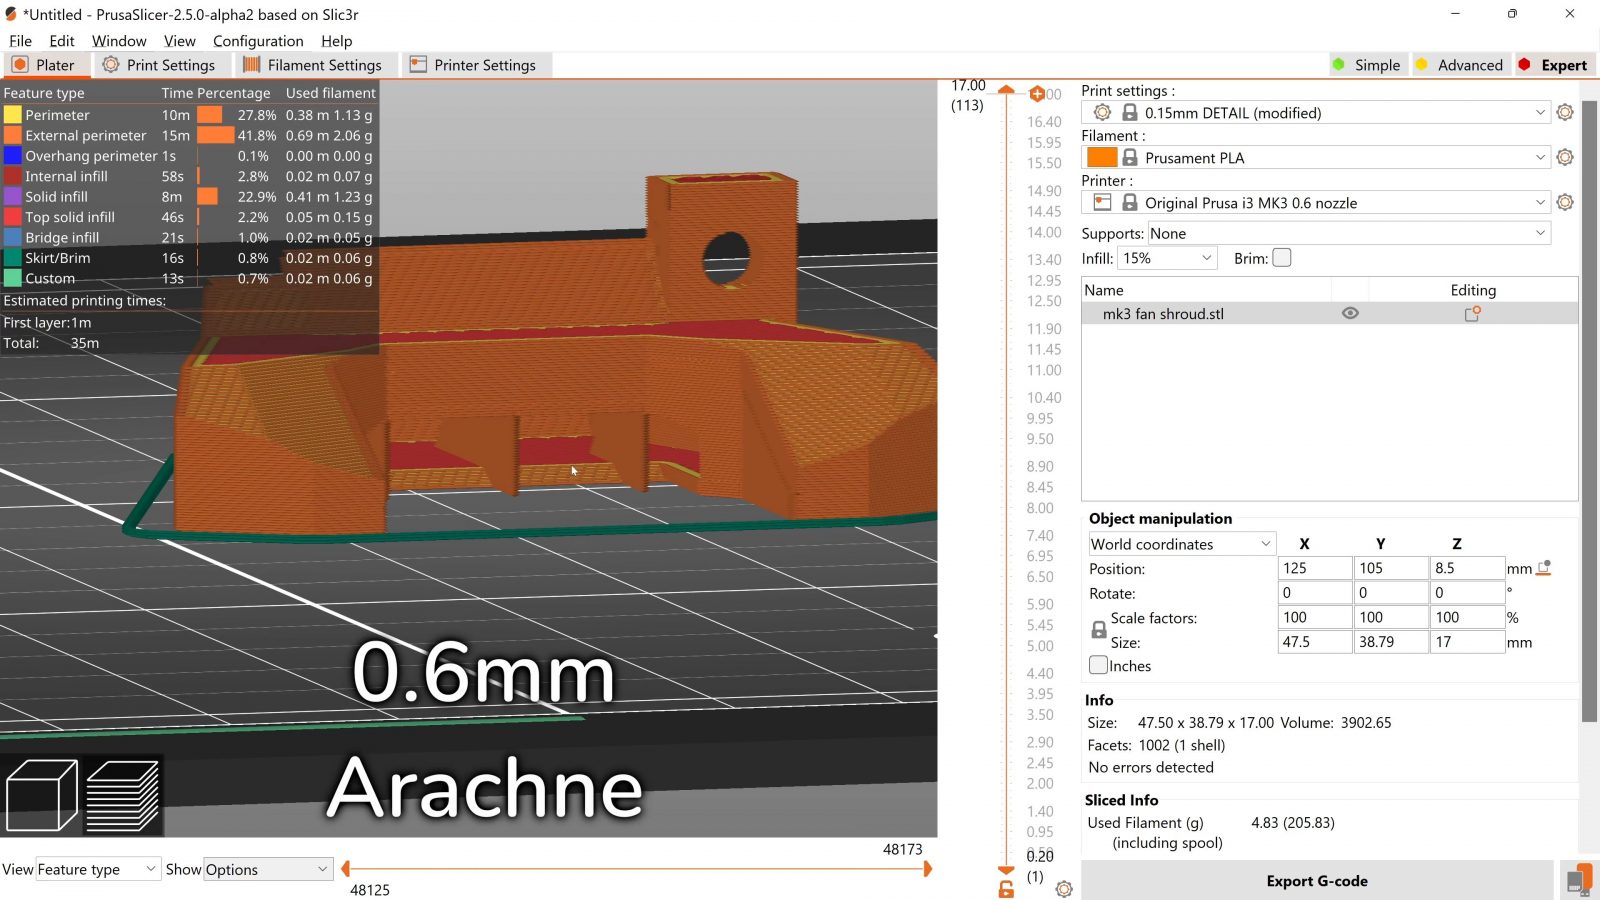
But even if it was, with Arachne, you can now just use a .6. Point in case: This fan shroud got me onto Arachne in the first place. It’s actually designed to be printed with a 0.4mm nozzle, and up until now, you just couldn’t print it with .6. Turn on Arachne, there you go, that’s no longer an issue.
In practice, if you were happy with what you were getting with a .4 and the old slicing algorithms, you will get exactly those results with .6 and Arachne, maybe even slightly better ones – but always significantly faster. Of course, the other choice you now have is to just stick with 0.4 and, with Arachne, you’ll get even cleaner and finer prints than before – and that in turn kinda makes 0.25mm nozzles redundant if you want to look at it from that angle.
But there is one drawback to these larger nozzles: Overhangs. Specifically overhangs at the same layer height. So all these parts were done at a 0.15mm layer height, no matter if it was a 0.4 or a 0.6mm nozzle. But remember how I said that there’s an optimum layer height range for each nozzle size? Well, with larger nozzles, their comfort zone also shifts to larger layer heights, and 0.15 is what I’d consider just at the lower limit for a 0.6mm nozzle. It’s really visible at the overhang test section back here – both the 0.4 and the 0.6 print every overhang up until 80° from vertical, but the 0.4 does so much more cleanly.
It’s less noticeable on “real” prints, but the difference is still there. A 0.6mm nozzle is going to be much happier at a 0.2mm layer height, but going for a different layer height was not the goal of today’s experiments.
By the way, this was also part of the reason why I didn’t go straight for the 0.8mm nozzle. With that, you need even thicker layers for consistent results, plus, you’re now pushing material so quickly that your extruder and heater are going to start running out of steam, meaning the printer would actually need to slow down its linear speed. So you don’t even get the same speed boost going from 0.6 to 0.8 as you do when going from 0.4 to 0.6, plus you’re definitely not going to get the same print quality as you would with a 0.6 and the benefit from Arachne.
So with Arachne, should you switch to a 0.6mm nozzle on your main printer? Yes. Absolutely. Well, at least give it a try and see if you start running into bottlenecks. For me, the speed gain alone is something that makes filament 3D printing a lot more fun because it’s more immediate – on some prints, Arachne with a 0.6mm nozzle basically cut print times in half, but if you really need some parts even fast, you now have the option to also use thicker layers than before, and all that without having to upgrade or mod anything except for the nozzle itself. Arachne is amazing for boosting print quality, and overall, I absolutely think that Arachne with a 0.6 is overall perfectly on par with what we used to have with 0.4. Bravo to Ultimaker for developing it.
So if you’re getting one of those fancy Obxidian nozzles, you probably want to go straight for the 0.6mm. Or if you just want to switch to 0.6 and stick with brass, I’ve linked some of the genuine ones down below – I would recommend against going for the 50ct Amazon special, as they’re sometimes pretty poorly made. As for slicers, of course, you can use PrusaSlicer with any printer, just like Ultimaker’s Cura, just keep in mind that Arachne is currently not in the stable builds of PrusaSlicer, only in the potentially buggy 2.5.0 Alpha. It did work absolutely fine for me, though.
Products shown:
Genuine E3D Nozzles & Obxidian
Genuine E3D Nozzles & Obxidian on Amazon
Genuine Slice Engineering Nozzles
Filament is Prusament Galaxy Black PLA
Models shown:
💙 Enjoying the videos? Support my work on Patreon!
Product links are affiliate links – I may earn a commission on qualifying purchases (at no extra cost to you)

Check out my second channel “More Layers” on YouTube for livestreams