
We’ve already looked at how to mechanically build a digital dashboard based on DAKboard or MagicMirror², but simply installing the software or opening up a browser window on the Raspberry Pi isn’t going to be a great solution in the long run. Here’s the software setup and the modifications that I added to the regular Raspbian install to make it a smooth experience!
Raspbian setup
Make sure to run through the setup wizard and change the password for the default “pi” user. This is an IOT device after all and should at least have basic security features enabled!
I’ve also made sure to connect once to the wifi networks of all my various routers. If one router is down, gets swapped or has its wifi password change, the Pi will then automatically connect to another one and stay functional (and accessible).
Remote access
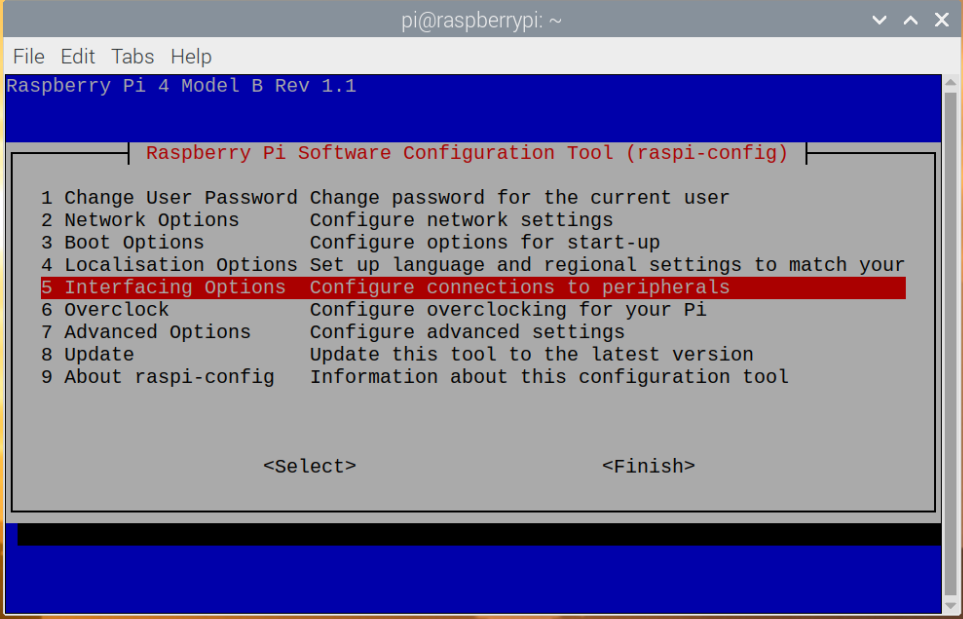
Because the Pi will be stowed away in a frame, plugging in a keyboard is not an easy task (though totally doable with a wireless one). To enable remote access via SSH (remote terminal) or VNC (remote desktop), open up a terminal on the Pi and run
sudo raspi-configThen head into “5 Interfacing Options” and switch both “P2 SSH” and “P3 VNC” on. Exit out with “Finish” and you should be able to connect to “raspberrypi” with an SSH client like Putty or with the RealVNC viewer for remote desktop via VNC.
DAKboard website rotation
To get DAKboard shown in fullscreen, we’re launching a Chromium browser window in kiosk mode. But since the Raspberry Pi 4 is still buggy with a rotated 4K output via HDMI, we’re having to rotate the website itself.
Use the Raspberry Pi’s text editor (from the Accessories menu) and create a new file on the Pi’s desktop – I called it dakrotate.html – with the following content:
<html>
<body style="height: 100%; width: 100%; margin: 0px; padding: 0px; overflow: hidden;">
<iframe src="YOUR-DAKBOARD-URL" style="position: absolute; height: 3840px; width: 2160px; padding: 0px; margin: -1920px 0px 0px -1080px; border: 0px; left: 50%; top: 50%; transform: rotate(90deg);">
</iframe>
</body>
</html>
Replace YOUR-DAKBOARD-URL in the iframe src field with your private URL from the DAKboard screen settings (keep it wrapped in doublequotes).

When you open dakrotate.html, it should open your DAKboard dashboard in Chromium, but not in fullscreen yet. If it’s rotated the wrong way around, simply change
rotate(90deg)to
rotate(270deg)Or, of course, if you’ve got a landscape-orientation setup, we don’t need the iframe trick, but for the sake of consistency, we’re still going to use it. Here’s what dakrotate.html should look like for that:
<html>
<body style="height: 100%; width: 100%; margin: 0px; padding: 0px; overflow: hidden;">
<iframe src="YOUR-DAKBOARD-URL" style="position: absolute; height: 100%; width: 100%;">
</iframe>
</body>
</html>
Autostarting all the things
Hiding the mouse cursor
To hide away the mouse cursor while it’s not moving, we use “unclutter”. Install it by running
sudo apt-get -y install unclutterAutostarting everything in sequence
There are three additions we need to make to the startup sequence: Disabling screen blanking, hiding the cursor and starting Chromium in fullscreen. All these additions happen in the desktop’s autostart file. I’m editing the one for all users, but really, we’re only using the “pi” user – it makes no difference. Run
sudo nano /etc/xdg/lxsession/LXDE-pi/autostartAnd add
@xset s 0 0
@xset s noblank
@xset s noexpose
@xset dpms 0 0 0
to disable screen blanking,
@unclutter -idle 0to hide the cursor and
chromium-browser --kiosk --start-fullscreen /home/pi/Desktop/dakrotate.htmlto start the rotated DAKboard interface in fullscreen.
My final “autostart” file looks like this:
@lxpanel --profile LXDE-pi
@pcmanfm --desktop --profile LXDE-pi
@xscreensaver -no-splash
@xset s 0 0
@xset s noblank
@xset s noexpose
@xset dpms 0 0 0
@unclutter -idle 0
chromium-browser --kiosk --start-fullscreen /home/pi/Desktop/dakrotate.html
Once you’ve made your changes, exit out of the nano text editor by pressing “CTRL + X”, followed by pressing “y” and “return”.
Power saving with HDMI-CEC
Most modern TVs let HDMI devices control them through HDMI-CEC. The Pi also supports this, which lets me turn the screen on and off on a schedule and save power during the night. The tools can be installed with
sudo apt-get -y install cec-utilsAfter which you should be able to turn your TV on and off using
echo 'on 0' | cec-client -s -d 1and
echo 'standby 0' | cec-client -s -d 1To automatically run these commands on a schedule, we can use the “cron” scheduler. Its config is editable by running
crontab -eand confirming that you want to use the “Nano” editor. The formatting in crontab is… weird, to say it mildly. I’ve added
0 18 * * * echo 'standby 0' | cec-client -s -d 1
0 8 * * * echo 'on 0' | cec-client -s -d 1
to turn the screen off at 6PM (24 hour format) and on at 8AM. You can change the hours by changing “18” and “8”, and if you want to turn the screen on or off outside from full hours, for example on at 5:23 AM and off at 8:45 PM, you’d use something like this:
45 20 * * * echo 'standby 0' | cec-client -s -d 1
23 5 * * * echo 'on 0' | cec-client -s -d 1
Again, exit and save using “CTRL + X”, followed by pressing “y” and “return”.
DAKboard customization
If you’re opting for the paid DAKboard packages, you get the option to add custom CSS to the interface – though you can also accomplish that with a Chrome plugin. To change the calendar font size, make the calendar cells more evenly sized, highlight the current day and add a shadow to all text, I’ve used the following CSS in DAKboard’s “Custom styles” field:
.calendar-monthly-big .event-day ul {
    font-size: 1.5em;
}

.calmonth .daybox {
    min-height: 150px;
}

.today{
    background: #ffffff40;
}

body{
text-shadow: 0 0 50px black !important;
}
Backup your SD card
Lastly, once you’ve got everything set up the way you like it, I highly recommend creating an image of your perfectly-working SD card. You can use e.g. Win32DiskImager for this.
And that’s it! My dashboard has been working nicely for a few weeks now and I hope this quick guide has made setting up yours a bit easier.
💙 Enjoying the videos? Support my work on Patreon!
Product links are affiliate links – I may earn a commission on qualifying purchases (at no extra cost to you)

Check out my second channel “More Layers” on YouTube for livestreams