
Today, I’ll take an absolutely boring part and make it interesting – shelf brackets. Using topology optimization with the free version of Autodesk Fusion360.
If you want to have a computer automatically come up with the best geometry for a part that for example will support a given weight, yet use as little material as possible, there are basically two different automated design processes that have become pretty popular these days.
Both generate incredible looking shapes that you can sometimes hog out of a solid block of aluminum with a five-axis CNC or ideally… 3D print them. The brace we´re making here was done with topology optimization, which is actually the more limited, but easier version of the process. You start with a shape, usually pretty blocky, these braces used to have all this material filled in, to give the process some material to work with and then the topology optimization runs a simulation based on the load you put in and it then gives you the option to remove the material that contributes the least to strength and rigidity of the part.
So topology optimization, you start with something and then take away what’s not needed.
Generative design, on the other hand, works the exact opposite way: You start with only the material that you absolutely need, like flanges and mounts, and then the software adds all the connecting geometry by itself.
I think for 3D printing, Topology Optimization is by far the easier one to make use of – if your input geometry is printable when it comes to size, overhangs, all that, usually the output geometry will be printable, too, maybe not perfectly, but printable enough.
And, most importantly, topology optimization is actually included in the free Maker and Startup license of Fusion360. You can only run it on Autodesk’s “cloud” servers, unfortunately, which means my 16-core CPU is bored to death while some server in Autodesk’s farm dedicates two cores and what feels like the bottom spot in a queue to run my simulation. But hey, at least they don’t charge free users cloud credits for it. Generative design is only included in the paid version, and even then running a single generative design costs you 25 cloud credits. Which is 25 bucks. And then, if you actually want to get that design off of Autodesk’s servers, it’s another 100 cloud credits, so yes, another 100 bucks. On top of the subscription you’re already paying for.
Only option for me: Topology optimization
My goal with these was to make them look cool, not necessarily to make them as strong as possible. I mean, sure, they should be able to hold up a few folders and all, but it would be pretty easy to just design something with simpler geometry or, heck, even just throw together a few sticks of hardwood. Or buy the same thing ready-made for 3 bucks from IKEA.
I’m sure these are actually way stronger than anything that you would reasonably throw at them. But they aren’t unique. Says the guy who literally lives in an IKEA catalogue.
I knew the rough shape that I wanted, it should have a bit of a swooping shape on the bottom, two mounting holes out the back and it should fit flat on the bed of a MK3. So that’s what I started with.
Setting up Fusion360
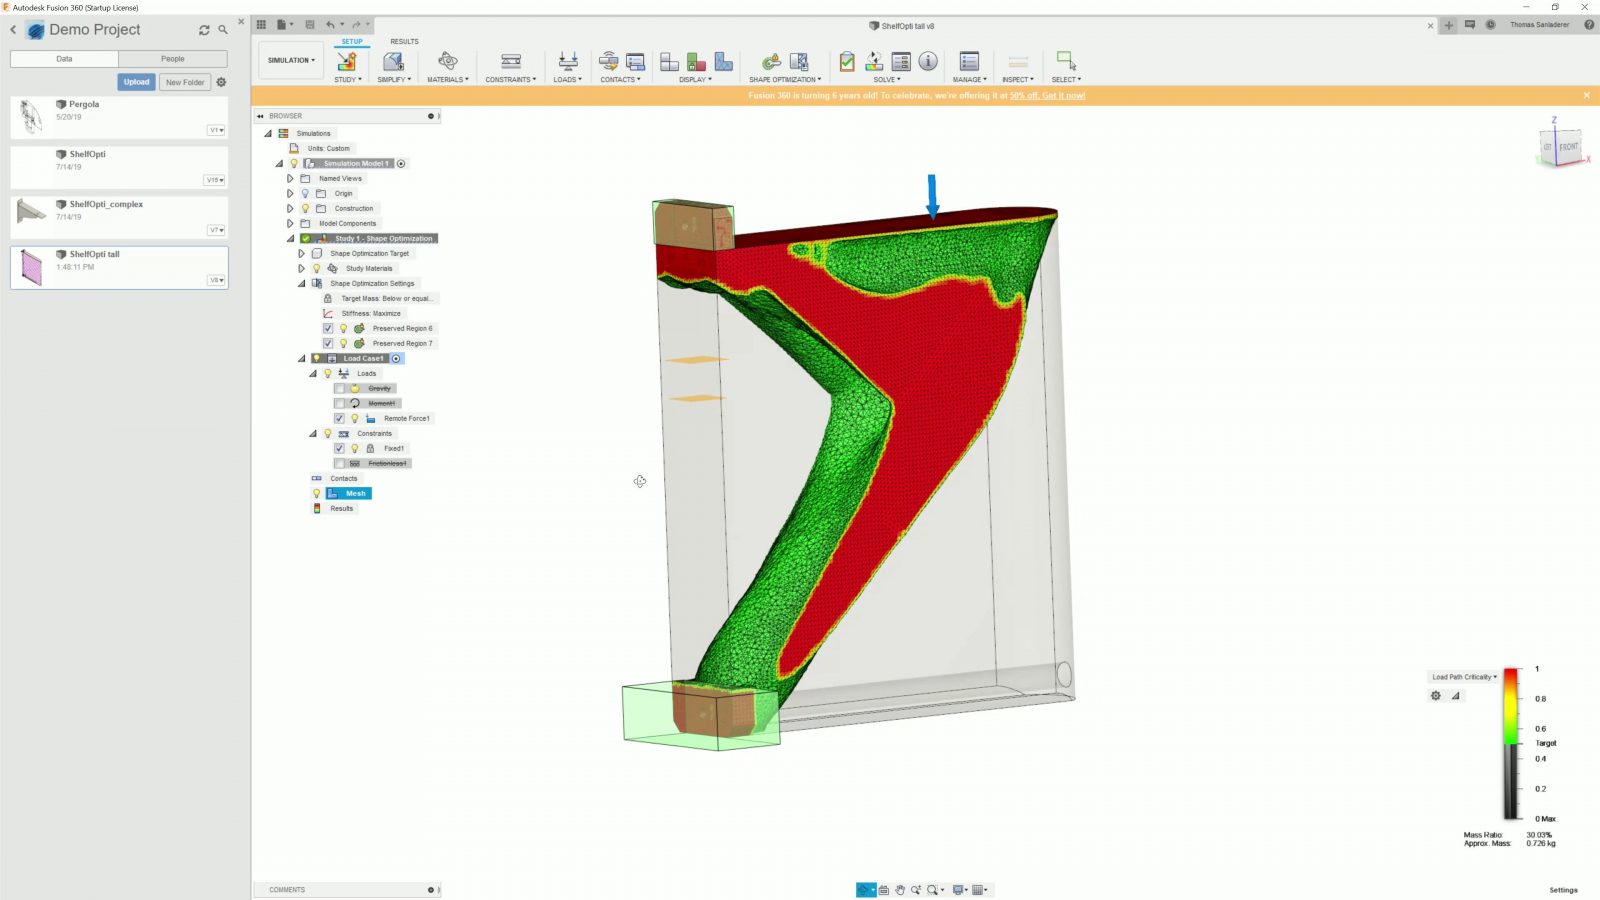
Taking that design to a topology optimized version is actually pretty simple in Fusion. You head over to the Simulation workspace, select your original body, define where it makes contact with “the outside world”, usually that’s just fixing the screw holes in place, then you define where the part will see loads from that outside world, and if you want to, you can also tell Fusion which parts it should definitely keep using these green blocker shapes. After that, all that’s left to do is to create the mesh and to run the simulation.

When that’s done, you get a model that, as I understand it, has all the bits removed that, per volume, contribute less than half as much to rigidity and strength than what the most important bits contribute.
You can then “promote” the results either into a new simulation for checking whether the part is actually strong enough for what you’ve got planned for it or into the model workspace, where you can edit and export the mesh.
So that’s what I did – many, many times. I think if I was paying for cloud credits, this would have been well over 100 bucks just in cloud costs. So the original plan was to print these sideways to get maximum strength as that wouldn’t be pulling the layers apart, but I pretty quickly realized that the parts just wouldn’t be printable that way, at least not without a ton of supports and I didn’t want to go down that route.
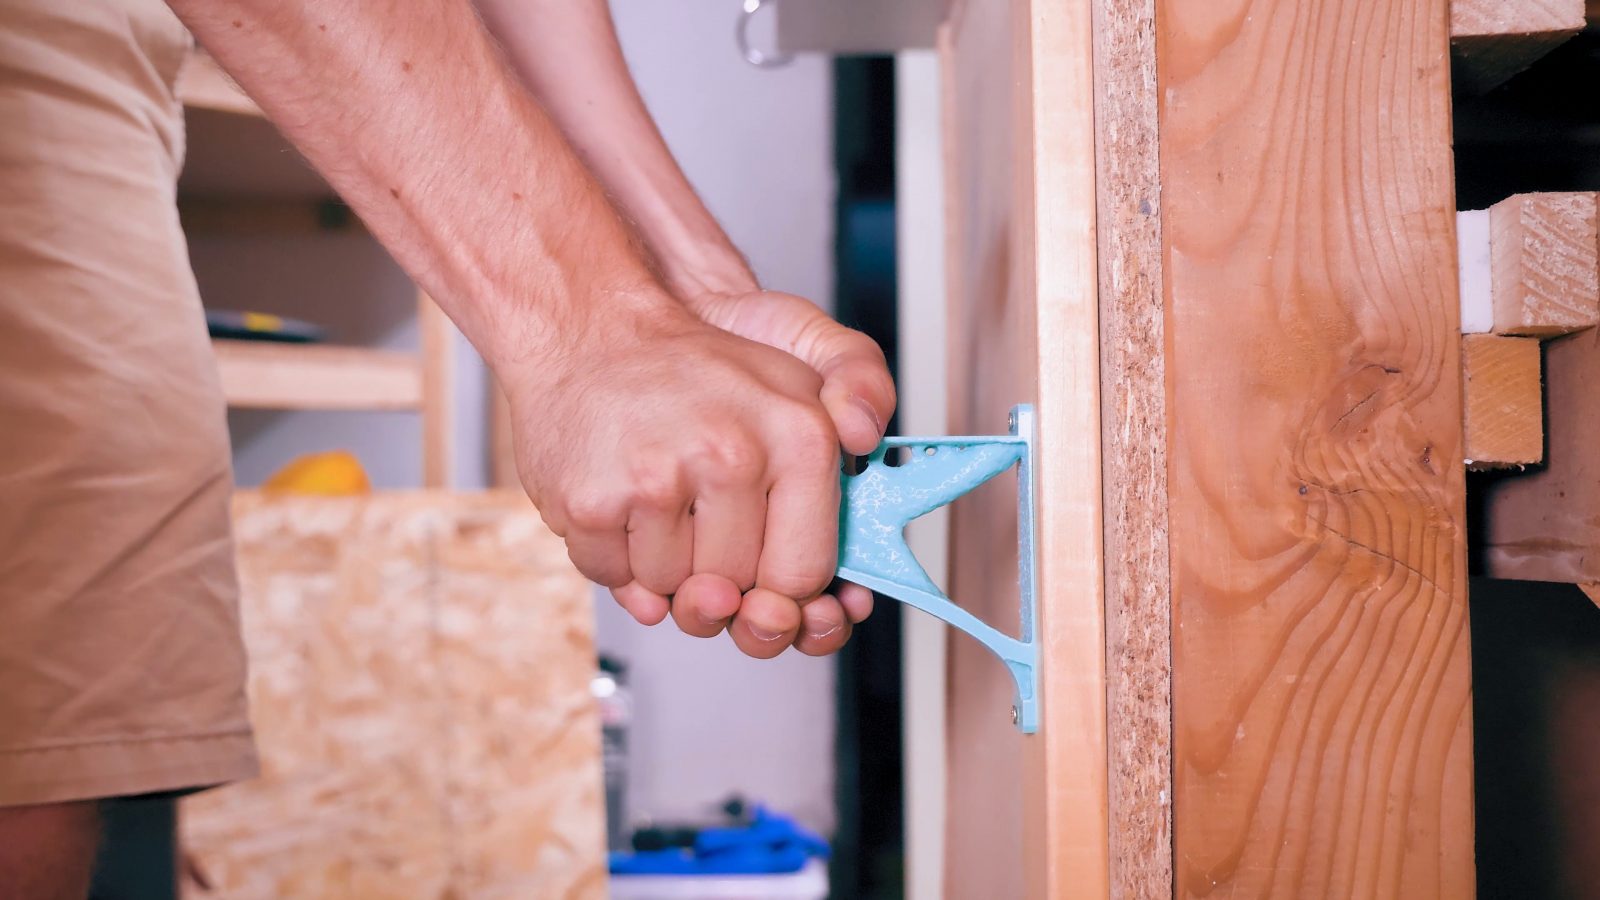
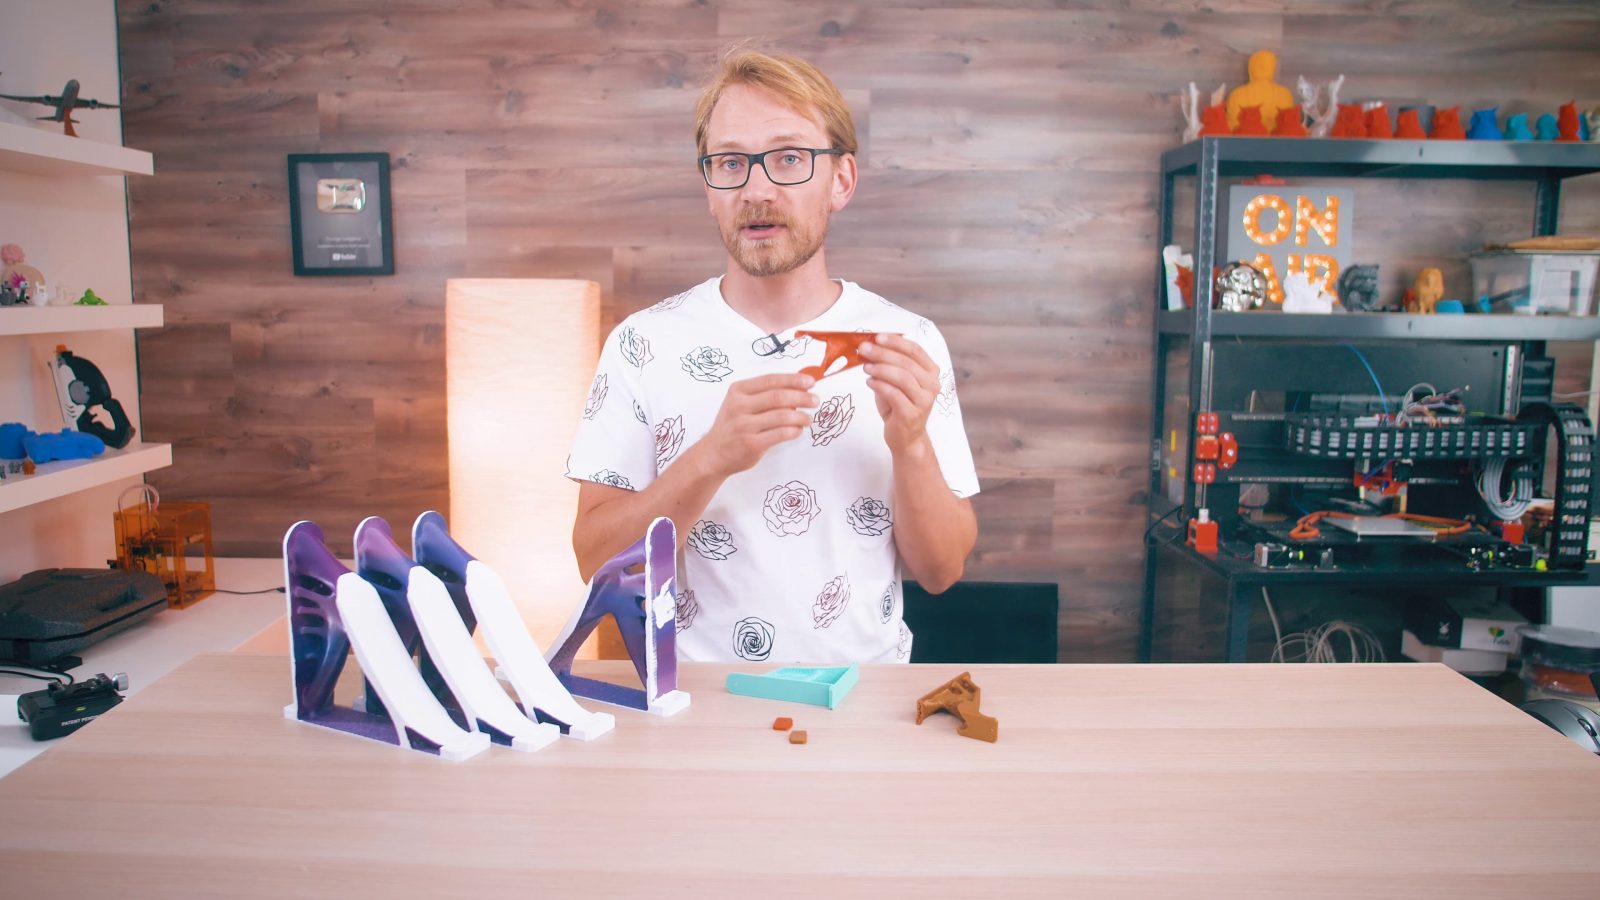
So I decided to try printing them with what was going to be the wall side against the bed, which is quite possibly the worst orientation for strength. So to verify that that was actually viable, I printed three of the designs that way and tested them for strength. You know, the classic way, actually mount them and break them.
Half-scale testing
And they actually turned out pretty darn strong. So I was going for each brace being able to hold the weight of 10 fully loaded folders, like analogue document folders, which was going to be around 30, 35 kilograms. And looking at these 50% scale test prints, I was pretty confident they would hold up, because:
The turquoise one was able to hold 24kg, loaded roughly at the center of gravity where actual folders would sit, the orange one 23kg and the gold one over 30kg. And these weren’t printed with, like super massive print settings or anything.
Learnings
So I went on to design the actual braces that I would use at full scale. First, they needed to fit vertically into the MK3’s print volume, which the older ones did not at their original scale, I still wanted them to look cool, and I also wanted to use a better, more accurate and more detailed simulation setup.
These are the things I changed when designing the final brace:
- I increased the mesh detail by forcing Fusion360 to use smaller elements
- I added a “sliding” constraint against the wall to let the simulation know it would be able to brace the part against that; that adds that back plane, but also gets rid of this cup shape near the bottom mount
- I switched the area load to an offset area load biased towards the front of the brace since the shelf will extend past the front edge of the brace. Basically I get a bit more support towards the front that way
- I realized I had to retain that restriction of having that curve on the bottom, otherwise Fusion would find an even better option to support the shelf that didn’t need the branches and fingers up top. But also, it didn’t look nearly as cool.
- I played with creating protected areas around the top mount where the earlier tests broke, so that I’d get a bit more material there and make the brace stronger
- I also smoothed the branches of the final result right within Fusion360, just for looks. And because that slightly shrinks the branches, I used the criticality slider in the simulation result view to retain a bit more material.
There’s one more thing I did to make absolutely sure that the braces would hold up, and that’s using a modifier mesh in PrusaSlicer that increases infill around that top mount. I also set the extrusion multiplier to 104% just to make sure everything would hold up. Yes, that’s not going to make for perfect-looking prints, but hey, I’d rather see some ridges than having 100 pounds of folders drop down on someone’s head.
For filament, I’m using PLA as that’s one of the consistently strongest materials you can use, and I also needed a simple, low-warp material since, well, the braces are pretty big for a 3D print! Originally I wanted to use the Tangerine Orange Metallic from Proto-Pasta, but I didn’t have enough of it and shipping probably would have taken too long from overseas, but then I saw Das Filament’s Multicolor transition spools, specifically the Galaxy type that is this blue-pink-purple color and that actually fits the organic theme pretty well! They were kind enough to ship out a few spools, and the very next day I could start printing.
Testing
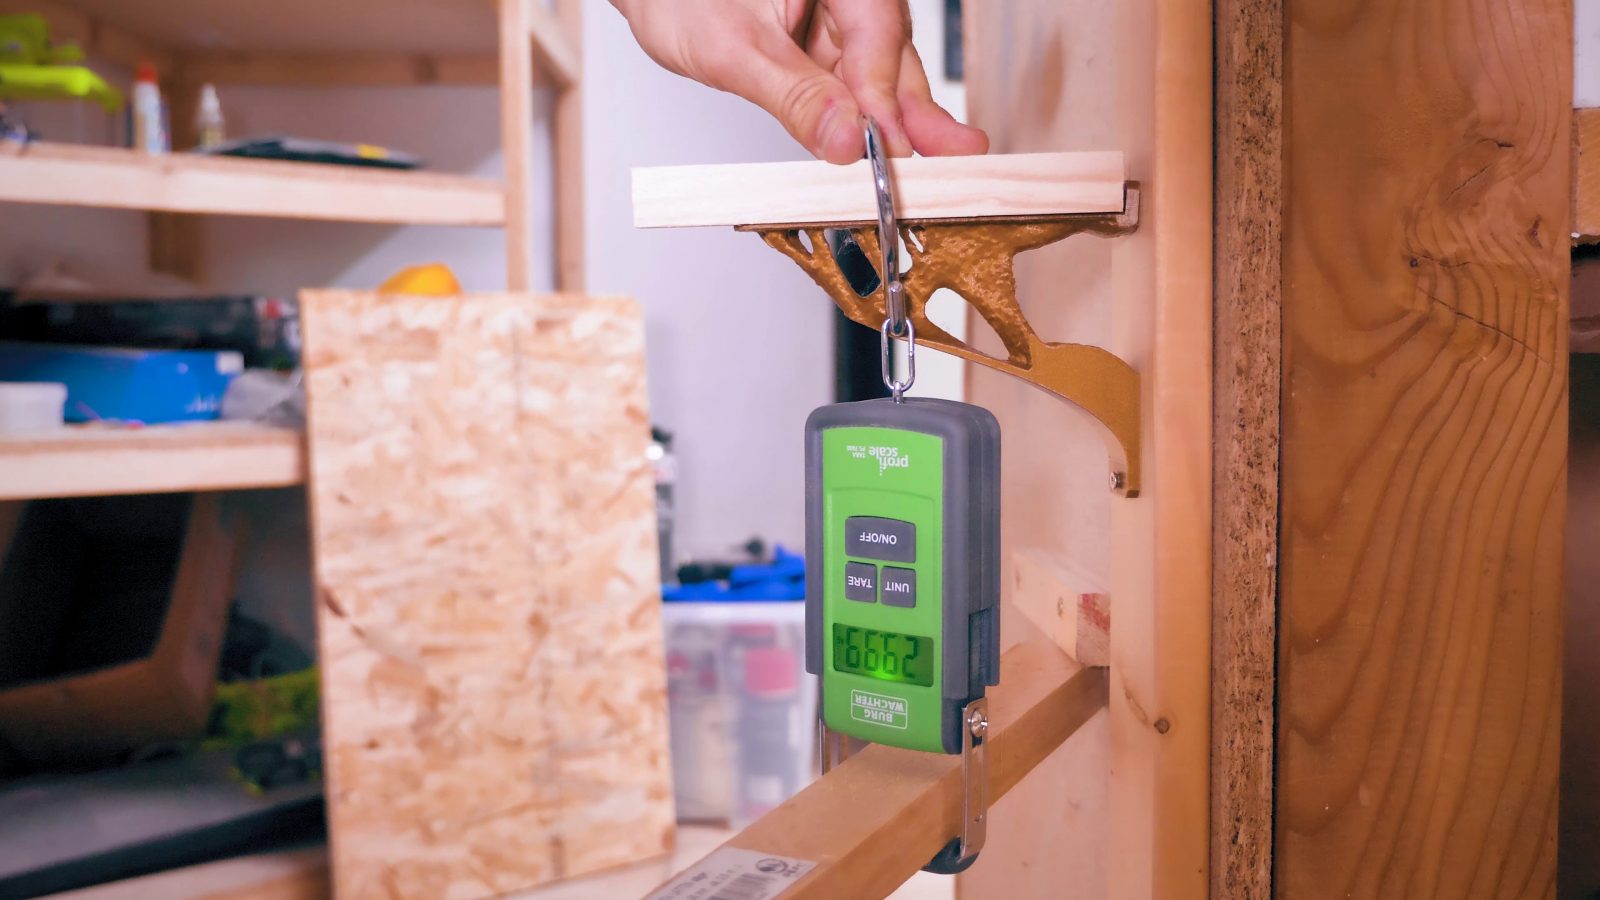
Ok, time to test how strong this brace actually is. Same setup, again loading it in the spot of the center of gravity and…. nothing. Scale overloaded. Well, I mean, that’s a good start. That was probably at last 40kg, 90 pounds, so it’s definitely strong enough, but I wonder…
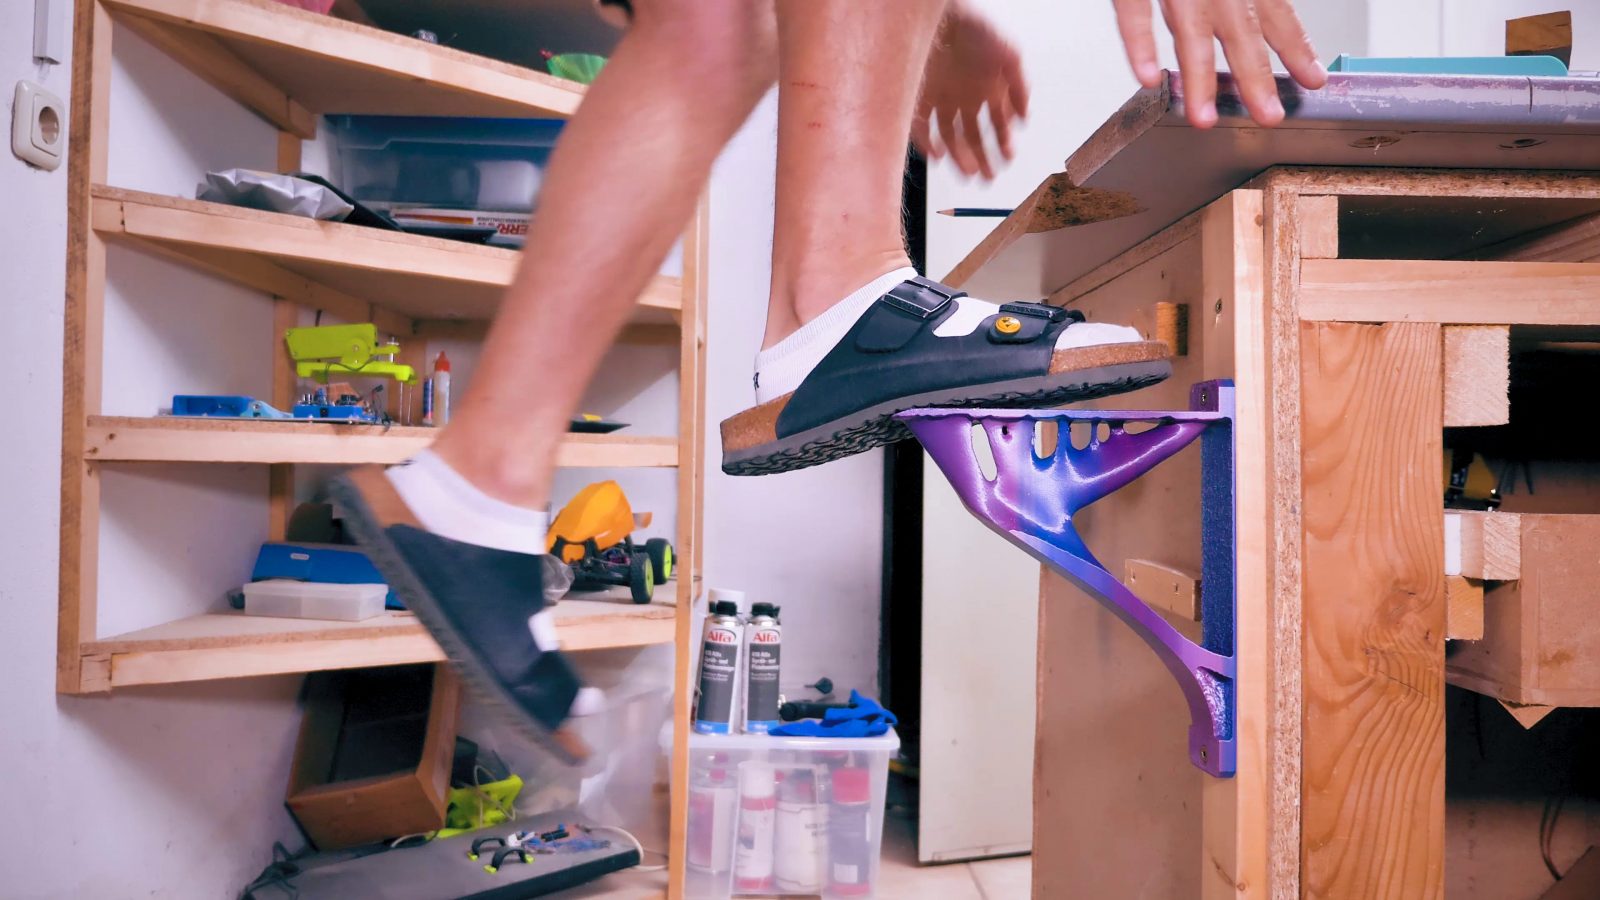
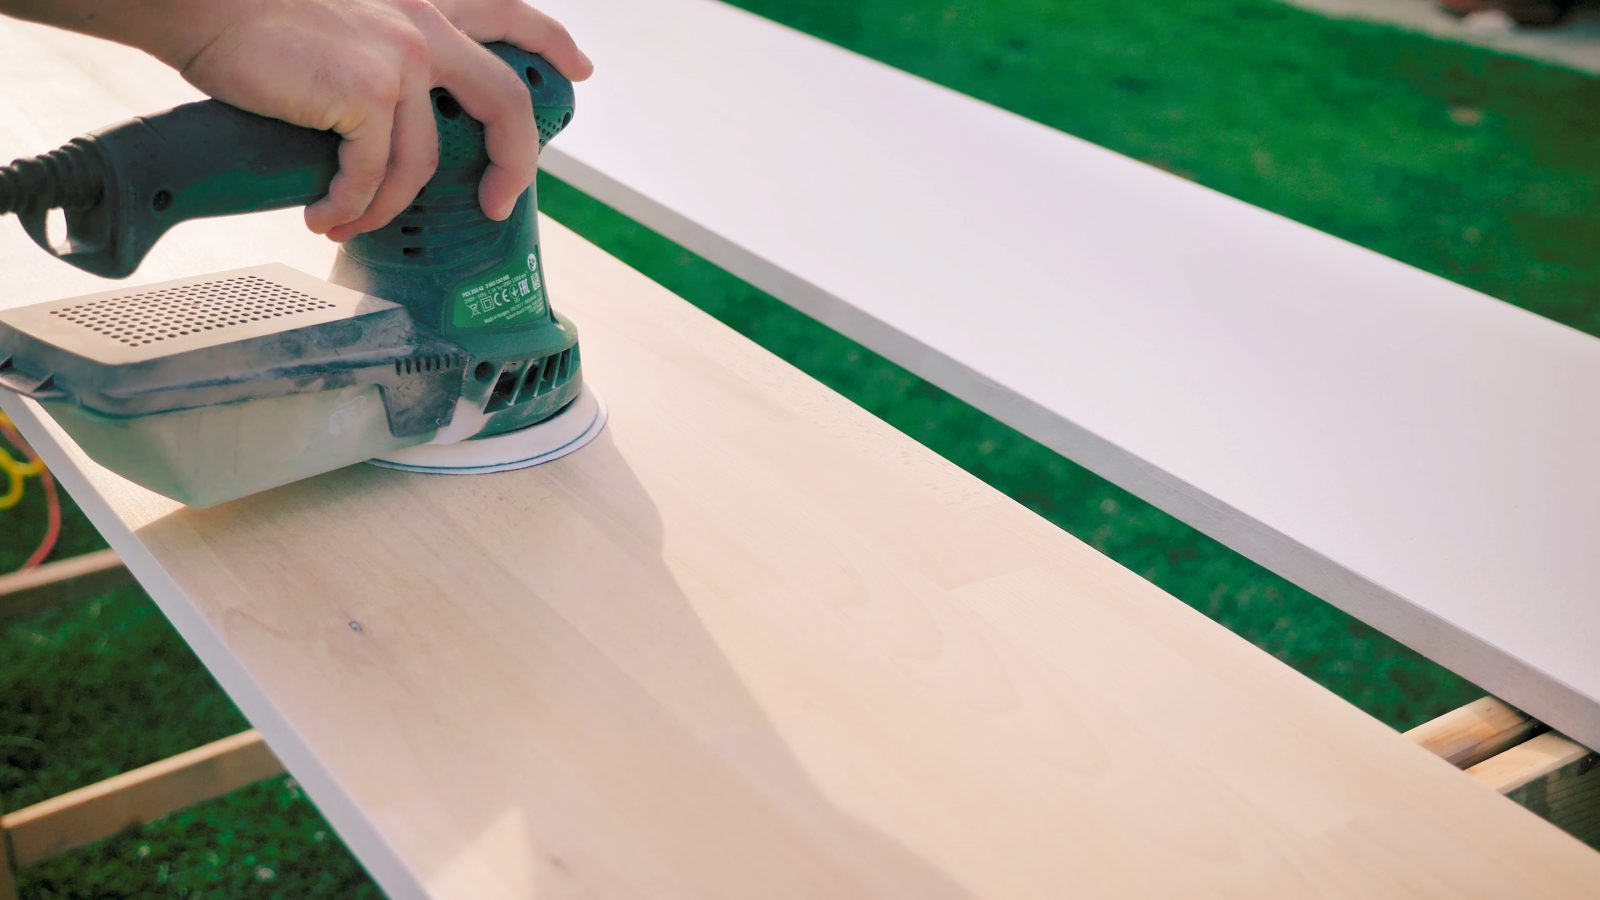
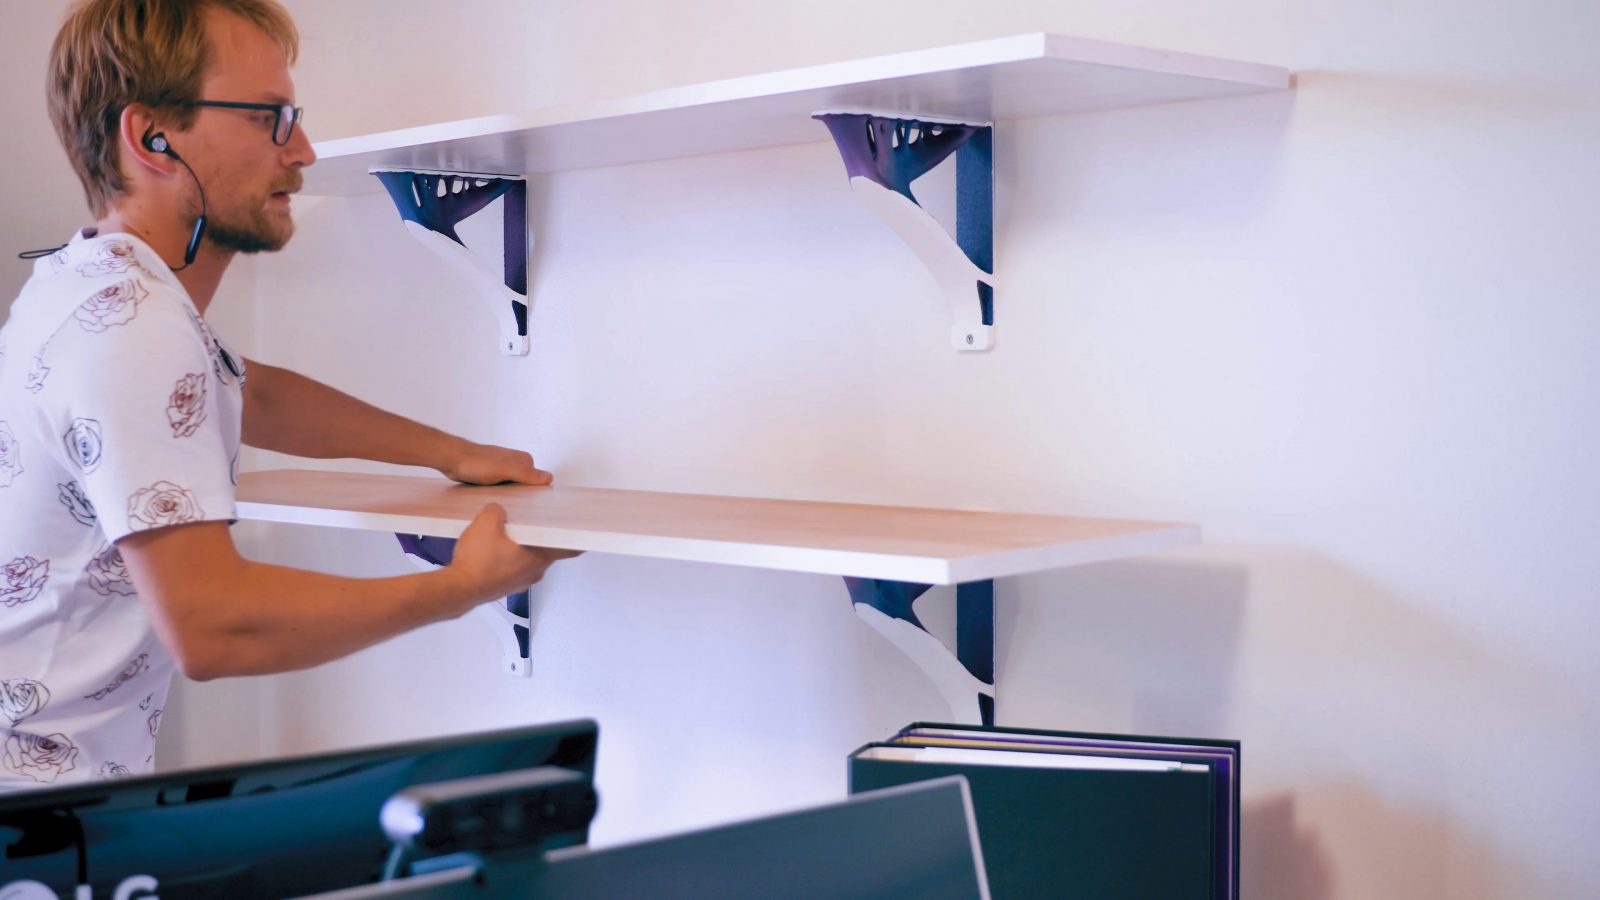
Yeah, it holds my weight. All 66 glorious kilograms of me. So, yeah, definitely strong enough for holding some folders. Time to print 3 more and to prep the shelves themselves, I grabbed some beech hardwood, this is a fantastic local wood, I trimmed it down to 160 cm, gave it a good sanding, chamfered the edges, and I thought I was just going to paint them all white, but after having painted one side and all the edges, I actually really started liking the look of leaving the top side natural.
So the top just got a simple clearcoat, and when I went to lightly sand the first coat of white paint, and again, I just really started liking what I got, which was this worn vintage look, and decided to stick with it, so one more round of clearcoat and the shelves were done.
Now, for the braces, I wanted to highlight that combination of the clean, geometric starting shape and the organic topology optimized branches and fingers, and my first thought was well, obviously, dual extrusion and just have that outer shell printed in matte white, but this is already a 26 hour print, with dual extrusion thrown in, it would probably have been more like 40 hours, and of course, I’d never know whether the dual-extrusion setup would actually be reliable for those 40 hours. One hiccup and you’ve got to start over.
So, simpler solution, white paint for all the smooth surfaces. And they’re done!
Mounting
The braces will be installed on an “aerated autoclaved concrete” wall – also known as Ytong or Aircrete. Since it’s not drywall, I didn’t need to hunt for studs, but instead simply use wallplugs that were suitable for the light bricks.
When tightened correctly, the red Tox Tri hold perfectly, but I did get one to pull out while testing the brackets. Turns out I hadn’t tightened the screw enough, but i also added some construction adhesive just to be safe.
Since I removed the small screw that would hold the shelf board in place for aesthetics, I used a cheap version of 3M’s VHB tape to secure the boards in place.
Learnings
So there we have it! There are certainly easier ways to make shelf braces, but none of them look this cool. Or actually teach you about topology optimization while you’re at it!
Topology optimization is an amazing tool that pretty easily gives you amazing-looking parts. Whether they’re actually still strong after you’ve printed them is another question, but if anything, you can use the results as a guide to what your design should look like. Stefan has done a few great videos on that approach.
The look you get is super depended on your inputs, and most likely, the best looking one is not the one you should actually be using.
One thing I realized is that Topology Optimization does not take the absolute load into account – I could have told it that this shelf would need to hold 35kg or one gram and the results would have been identical. The idea is that you then still run a simulation to see whether or not the part actually holds up, so Topology optimisation is just there to make sure that all the material you’re using actually contributes to the part’s strength.
So I hope you also learned something from this process, if you create something cool with Topology optimization, I’d love to see it, the best way is to tweet it at me @toms3dp. Make sure to be subscribed for more projects and printer reviews coming up, just this Monday I got the Elegoo Mars, which is a super-cheap SLA printer, and I’ll unbox that this weekend, live here on YouTube. Get subscribed and hit the bell so you don’t miss it and I’ll see you then!
Why the topology optimized brackets weren’t screwed to studs (and other questions answered):
Links
MK3
Grab the design from Prusaprinters
Proto-pasta TOM filament
DAS Filament Multicolor Galaxy