
Printrbot is taking risks with the Simple Pro – a new electronics package and all-cloud slicing can definitely polarize. But is it a convincing package or still too green to be useful? And most importantly, how well does it work out in a newbie’s hands?
“To boldly go where no man has gone before”… That feels like what Printrbot is going for with how they’ve set up the Printrbot Simple Pro. In many ways, it’s the best Printrbot that’s ever been made, in others, it’s one step forward, two steps back. So let’s check out what they did right and whether the bold move of going all-cloud-based is paying off.
So, where do we start? Well, I guess at the basics. The Printrbot Simple Pro is a $999 US-made 3D printer, it sports a 150x200mm build area, that is 6×8 inches, the entire machine is build from solid metal, which is either powder-coated steel and aluminum or these massive CNC-machined parts, which I believe Printrbot actually produce themselves. It’s the most solid Printrbot I’ve ever used, and even compared to your standard i3 frames or other common 3D printers, the Simple Pro feels like a much sturdier setup. It’s definitely the most well-built Printrbot I’ve ever used! On the front, you can see the centerpiece of the entire operation, which is a small LCD touchscreen. It is the only way the printer is intended to be used. I mean, ok, they added the functionality to just plug this printer into a USB port on your computer and use it that way, but that’s more of a “if you really have to” backup solution. Instead, you’re supposed to connect the printer to your home WiFi send it print files through the printrbot.cloud web interface. And that’s really the front and center part of the Printrbot Simple Pro experience.

Now, when you get the machine, you are going to get it as a mostly assembled package. It’s only a handful of screws to tighten and a few connectors to plug in to combine the base, vertical axis and the printbed into a finished 3D printer. You plug in the 60W power supply and pick a file from the ones that are preloaded on the machine. Maybe you’ll need to adjust the nozzle height slightly, but since the Simple Pro is using an inductive bed sensor, which Printrbot calibrate before shipping the machine out, it’s only going to be tiny adjustments, maybe.
And you’ve got a 3D printer that prints. Quite well, actually! Print quality is fantastic, the sturdy frame, dual-gear extruder and 0.3mm Ubis 13S hotend really work together well.
Now, I’ve also assembled the Simple Pro as a total kit. Disclaimer, you can not buy it as a kit, I don’t think the assembly is the most enjoyable one in the first place, so you’re not missing out on much.

You might have noticed that there is a slight difference in features from the kit version to the assembled one. And that’s the heated bed upgrade. At the time of this review, that’s an option, but I think if you’re buying the Simple Pro, it’s pretty much a mandatory upgrade. You see, the printer has this nice, large print surface, and what do you get to print onto? Blue tape. Which I don’t think anyone should still be using today. First of all, it’s a throwaway solution that you basically have to swap out after every print, and second of all, because the surface you’re sticking it onto is this textured powdercoat, as soon as you print parts that use more than about a third of the printer’s width, the blue tape starts peeling off and you get parts that aren’t flat on the bottom, and if you try to print even larger parts, there’s a good chance they will just come loose and ruin the print. I would usually suggest 3DLac to get parts to stick, but you’ll have to spray it on the printer itself, by default, there’s nothing you can take out and spray away from the printer, so you’d end up coating the linear rails and display and everything else in that hairspray-like goop.

The other thing is that there are these screw holes in the middle of the print area, so you’d always see those with any sort of spray- or brush-on coating. Your only real options are things like BuildTak to get a reusable, flat surface. And you can’t just put a piece of glass over the bed, either, because of that inductive sensor.
Now, one thing we really, really, need to talk about is the printer’s interface and the web, cloud service. There are some good ideas in there, but overall, it’s still pretty bad.
So you start your setup process of the machine by getting it onto your WiFi. There seem to be two different ways of doing that: Either you do it, sorta manually, by connecting to the WiFi the printer creates, going to the IP address your printer shows, and then punching in your WiFi details there, or going through sort of a mini-assistant on wifisetup.printrbot.cloud. Same result. Now, getting the printer connected usually works fine, it only supports 2.4GHz networks, that’s ok, but what took me quite a while at times is getting the printbot.cloud website to actually see the printer. On a few occasions, I was seeing the printer on my WiFi, was able to ping it and all, but the web interface didn’t actually detect the printer as connected and in that case, there’s just very little that you can do other than trying again until it just happens to work. Once it’s locked in, it works fine, but getting there isn’t super straightforward.

The web interface itself is actually really simple:
You have your overview of projects you’re created, a project is basically just a set of 3D printable parts, and for each of those parts, you can rotate it, you can set the resolution and…. that’s it. There’s no scaling, no moving, nothing else I though at some time I was also able to enable support and set the infill ratio, but that doesn’t seem to be the case anymore. Materials are actually independent of the print files, and while you can configure them on the web interface, you actually select them on the printer itself. You send the project off to the printer, and the rest happens there.
Now, this all sounds fine and dandy, but I do have a few issues with it: First of all, everything is really, slow. You upload a file, then it generates a preview and the gcode, and that can take from a few seconds for really simple parts to 10 or 15 minutes if your model is even remotely complex. Then you send the file to the printer, that’s fairly fast, but that didn’t actually send the print files, that just sent the project overview. Because once you start a print, there’s another download process that, again, can easily take another 10 minutes or so until the actual print starts. I mean, I’d be ok with that, but overall printing something requires attention from you here to upload, here to send to the printer and start the print, and then here again when the actual print starts to check the first layer. In a fraction of the time, I could slice a file on my computer, grab an SD card and physically walk that to a 3D printer. But there’s no SD card slot on the Printrbot Simple Pro, it’s either WiFi-only or tethered to a computer with USB.
Now, to me, as someone who works with 3D printers for a living, I see a lot of things that could have been done better.

Given the choice of a 3D printer with fewer of the fancy, cloud-driven features, no touchscreen, no nothing, and the Printrbot Simple Pro, I would not pick the Simple Pro. Don’t get me wrong, I’d happily use a modern interface as long as it works, is fast and reliable. The Simple Pro with printrbot.cloud, to me, doesn’t feel like that yet. But then again, I’m not the target demographic, I’m already way too deep into it. And I know Brook Drumm, founder and CEO of Printrbot, does agree with me here. So I decided to do something a little different: I gave this printer to my little sister and observed how she’d get along with it.
So even though there are a few shortcomings, it can work. I’m still not quite sure what application would work best with the slow, and high-detail 0.3mm nozzle, sturdy construction, but no heated bed and a simplified and low-feature web and wifi-based interface. But you tell me, I don’t know everyone’s requirements.
So to sum things up:
Mechanically, the Printrbot Simple Pro is extremely well-built, there’s no doubt about that. It prints well, and while I don’t think printbot.cloud is quite good enough yet, let’s say that I do see potential. As of right now, that is July 2017, I would certainly recommend double-checking that the way you’re supposed to use the Simple Pro fits with your expectations. It quite resonate with what I personally expect from a user experience, but that’s fine. Software can be updated.
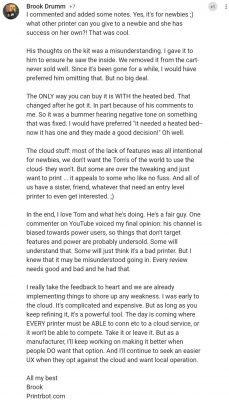
Update 22th of July 2017
After posting this review on G+, Brook Drumm, Printrbots CEO, gave some feedback on the negatives points:
Grab one here and today I want to give special thanks to my Patreon, whose support allows me create independent content and share my unfiltered experiences with you. I’ve never charged manufacturers for reviews and never will, I don’t get paid by anyone to change my opinion on things, and your support on Patreon makes that possible. In particular, I want to give a shoutout to
- Bobby CC Wong
- Open Ballistics
- Rudolff Vang
- Makerparts
- William Devine
- Matthew Byrd
- Stefanie Davis
- Robert Mohnacky
- Jordi Böhme
- Woody Boyd
If you want to get involved, head over to Patreon, we’re doing monthly QnA hangout and some other stuff there. But even just subscribing would be awesome, if you do hit that bell you’ll get a notification when new content gets uploaded.
Have a great day and I’ll see you in the next one!
🛒 Get one [🇺🇸] (currently on sale for $911)
📘 More info