
This is the WhamBam Mutant – patent pending.
You just saw what it does – it’s a quickchange system for 3D printers and light-duty CNCs, be it with a routing head or something like a laser.
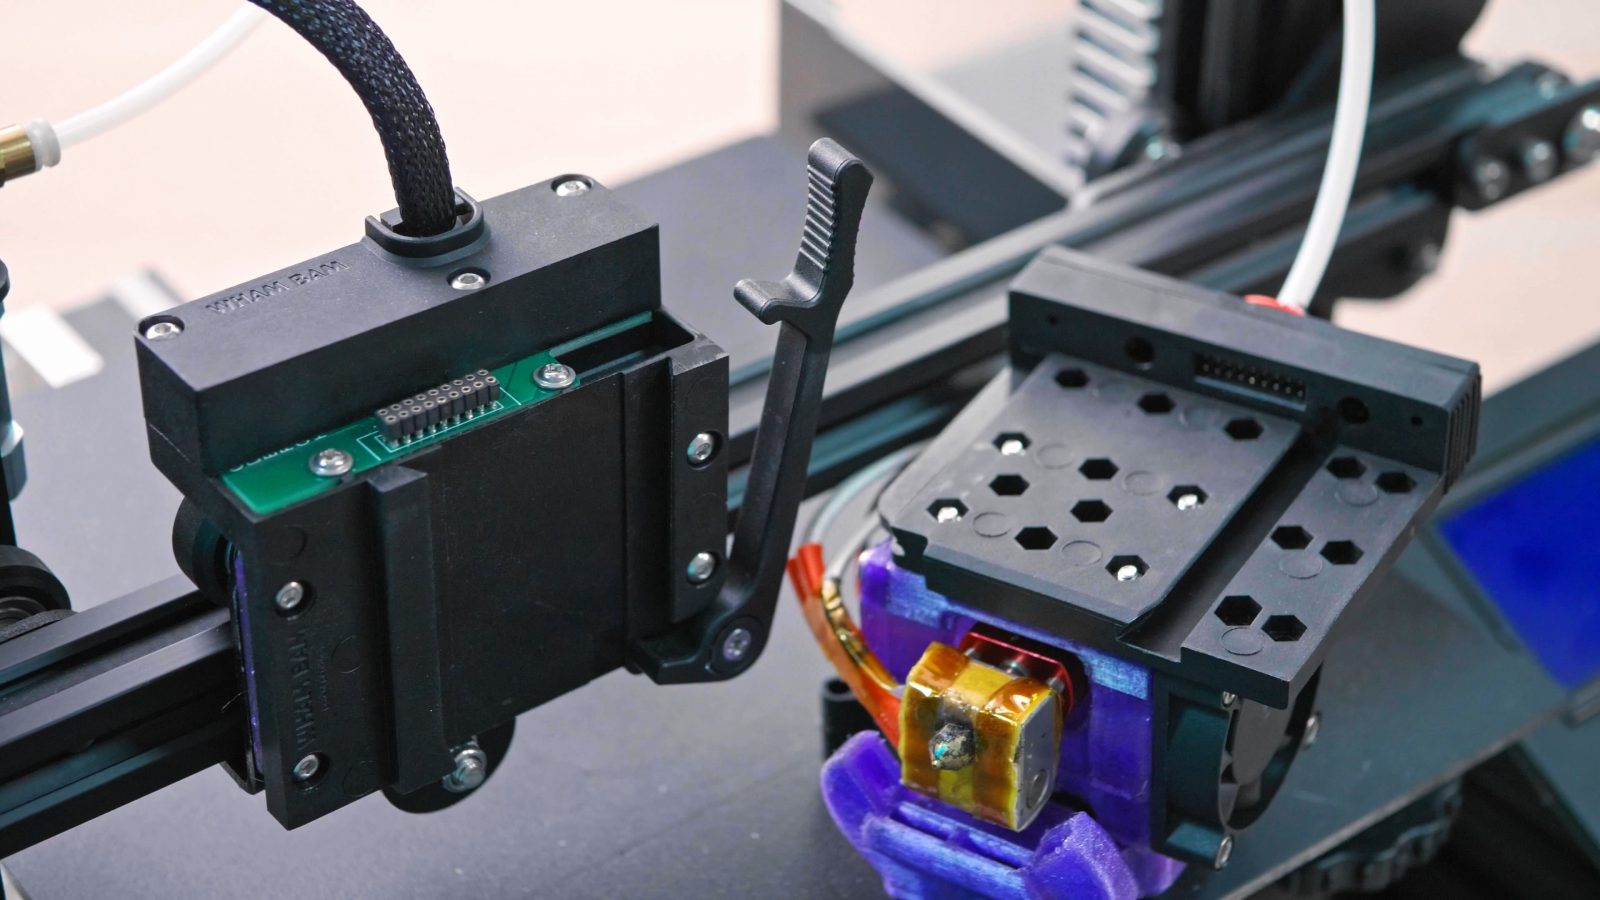
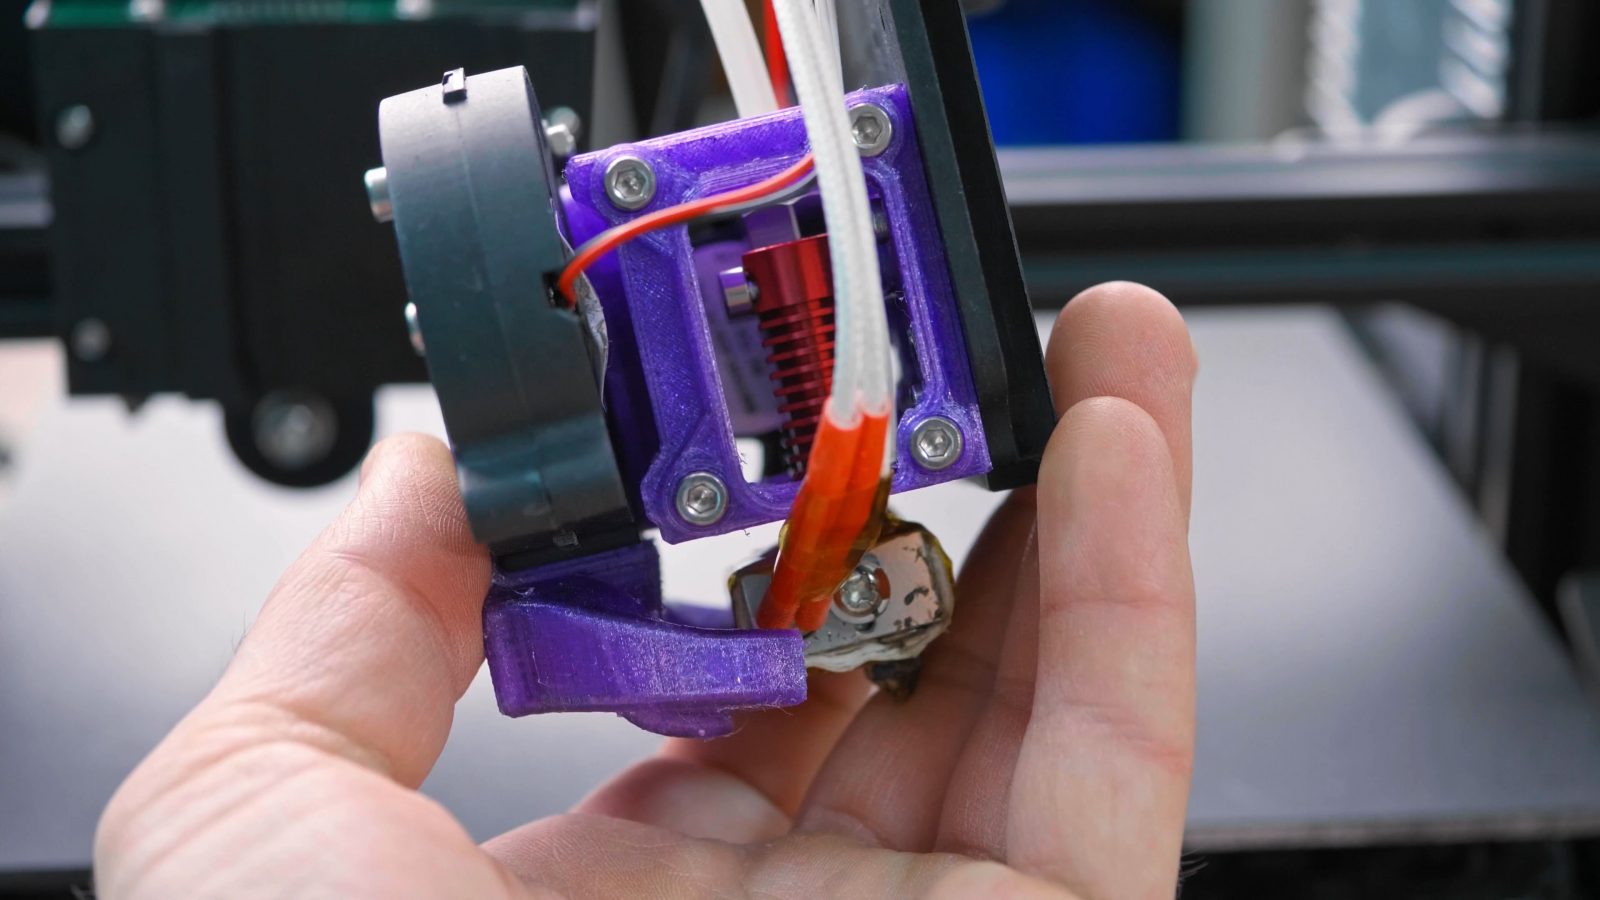
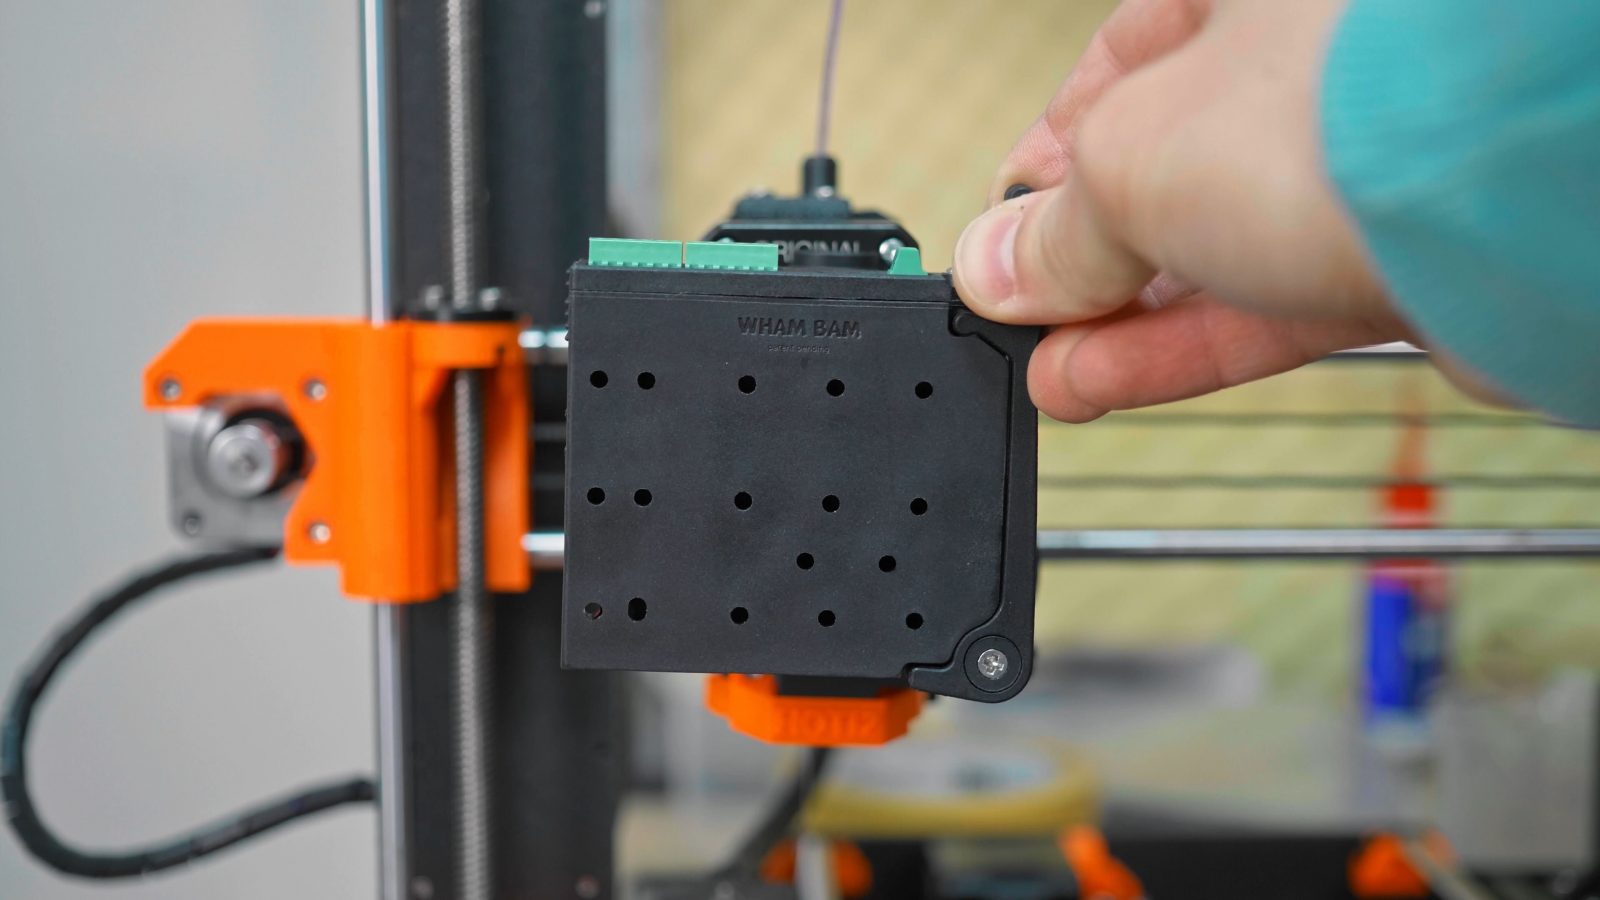
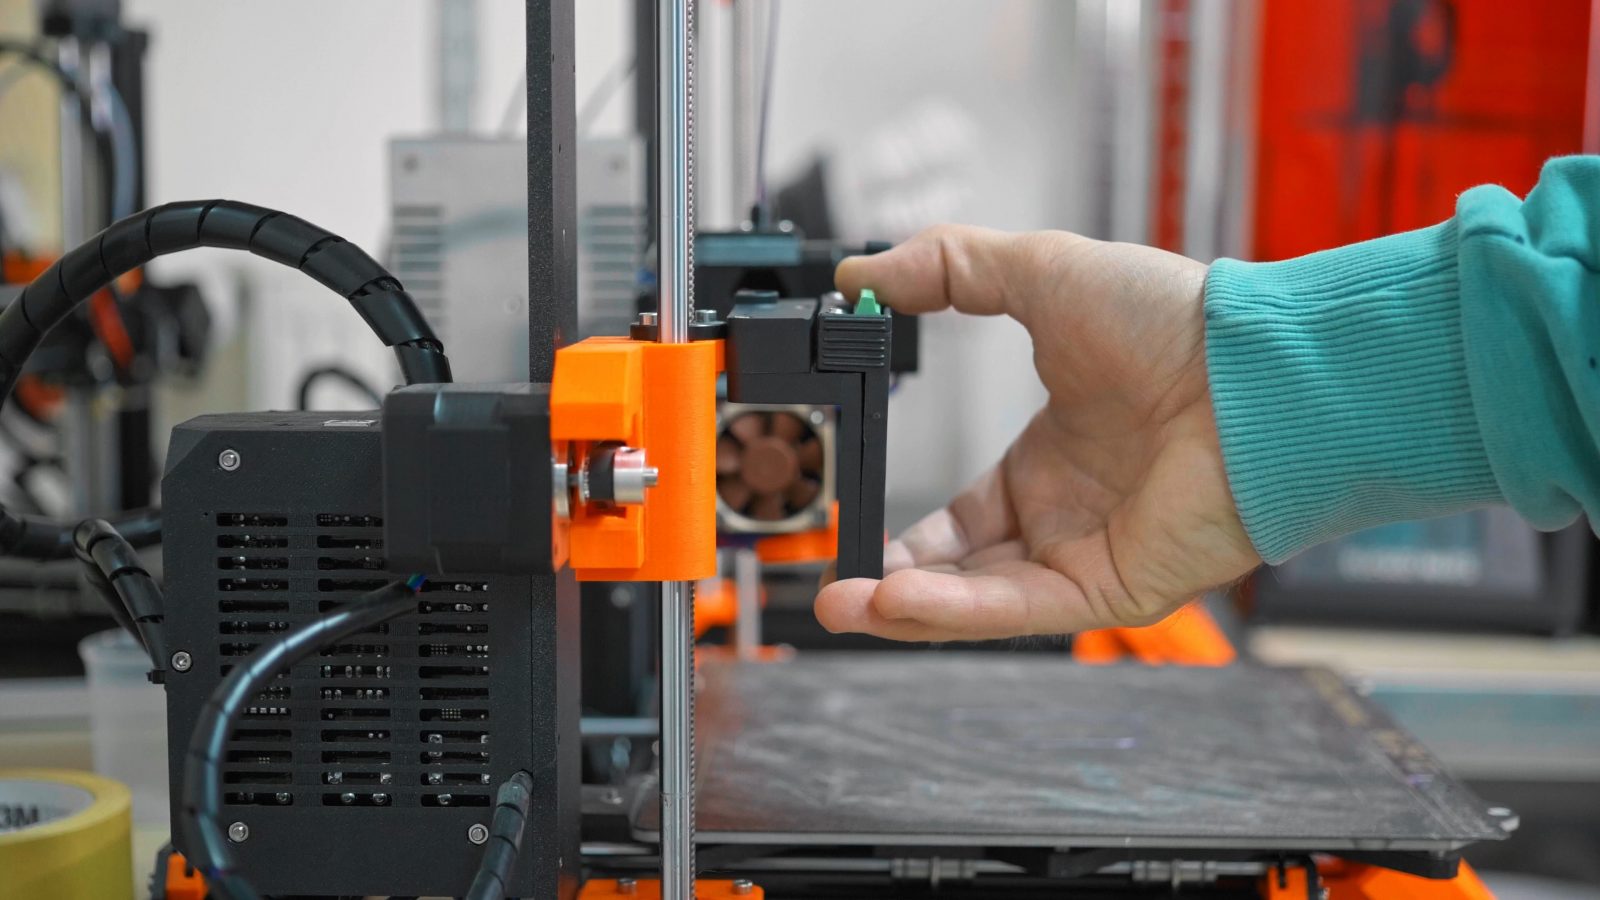
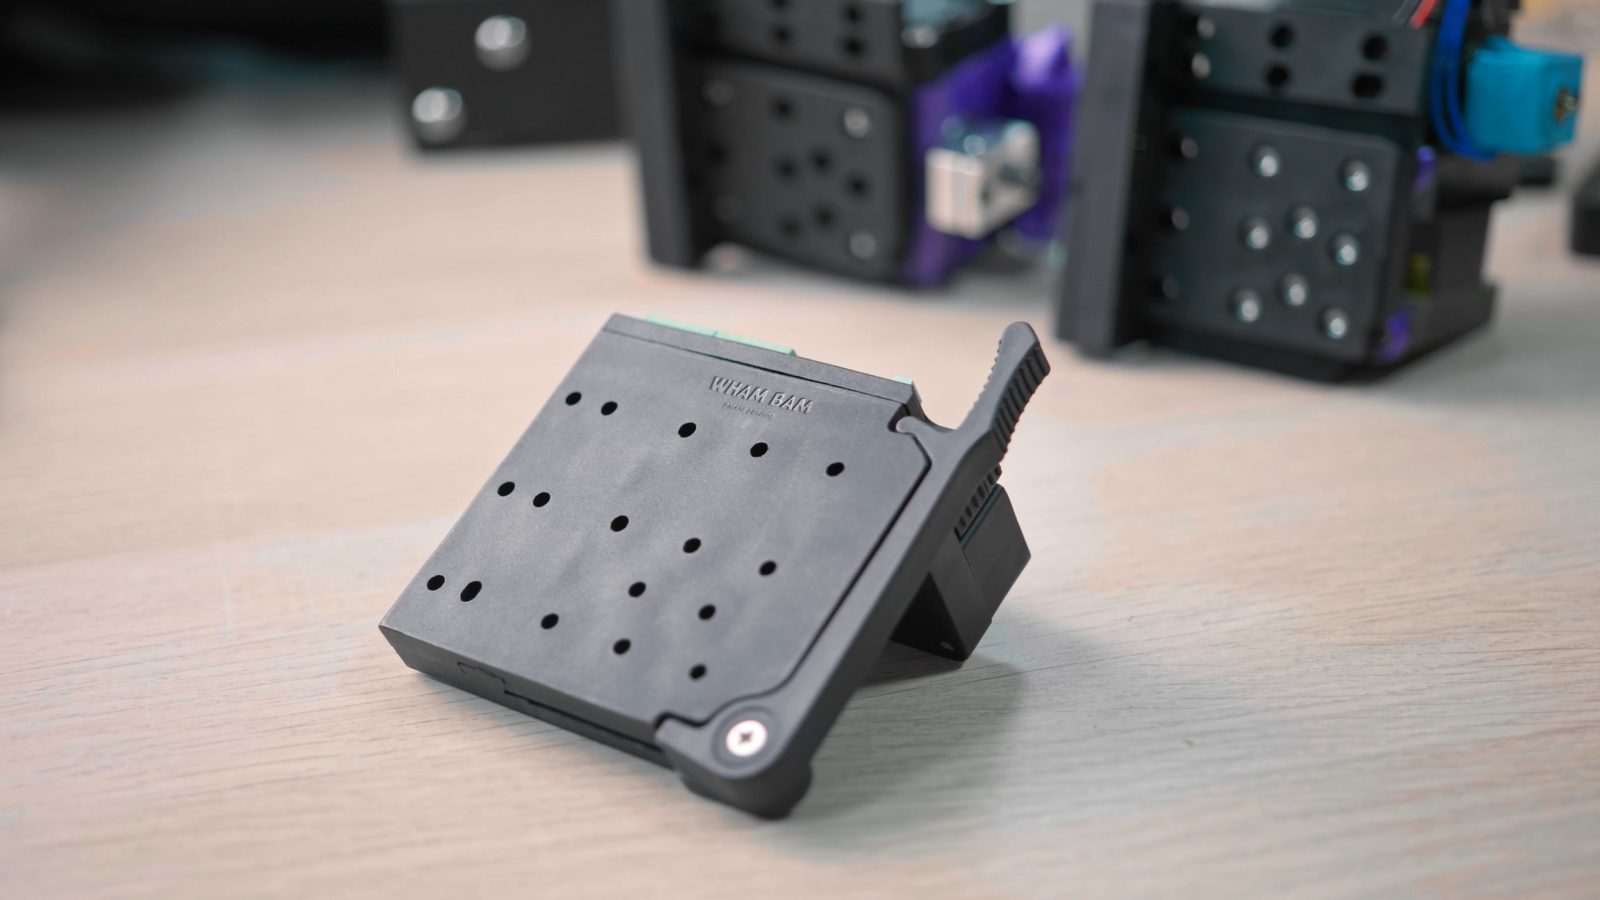
You have one part that stays on the machine, they’re calling this the “Fixed plate”, and one part that stays with the toolhead, that’s the “Mobile Plate”, and they lock together with a pretty simple, but effective mechanism. They slide together with a dovetail and then it’s this lever that locks it all in place. You know, the sliding action actually kinda reminds me of Gameboy cartridges, just that, when these are in place, they’re a lot more solid.
What I was wondering – the Mutant is something entirely different than what the E3D Toolchanger, and also the X-Change that’s currently on Kickstarter, is doing, so why do it like this.
Quick refresher: The Toolchanger has a more planar mount that uses hardened steel mates and a little bayonet grabber that pulls it all tight. And that system is optimized for being able to automatically swap tools during a print job, so that planar coupling really is a result of having to do docking and grabbing by using the motion the printer can already handle. So something like this just wouldn’t have worked for that.
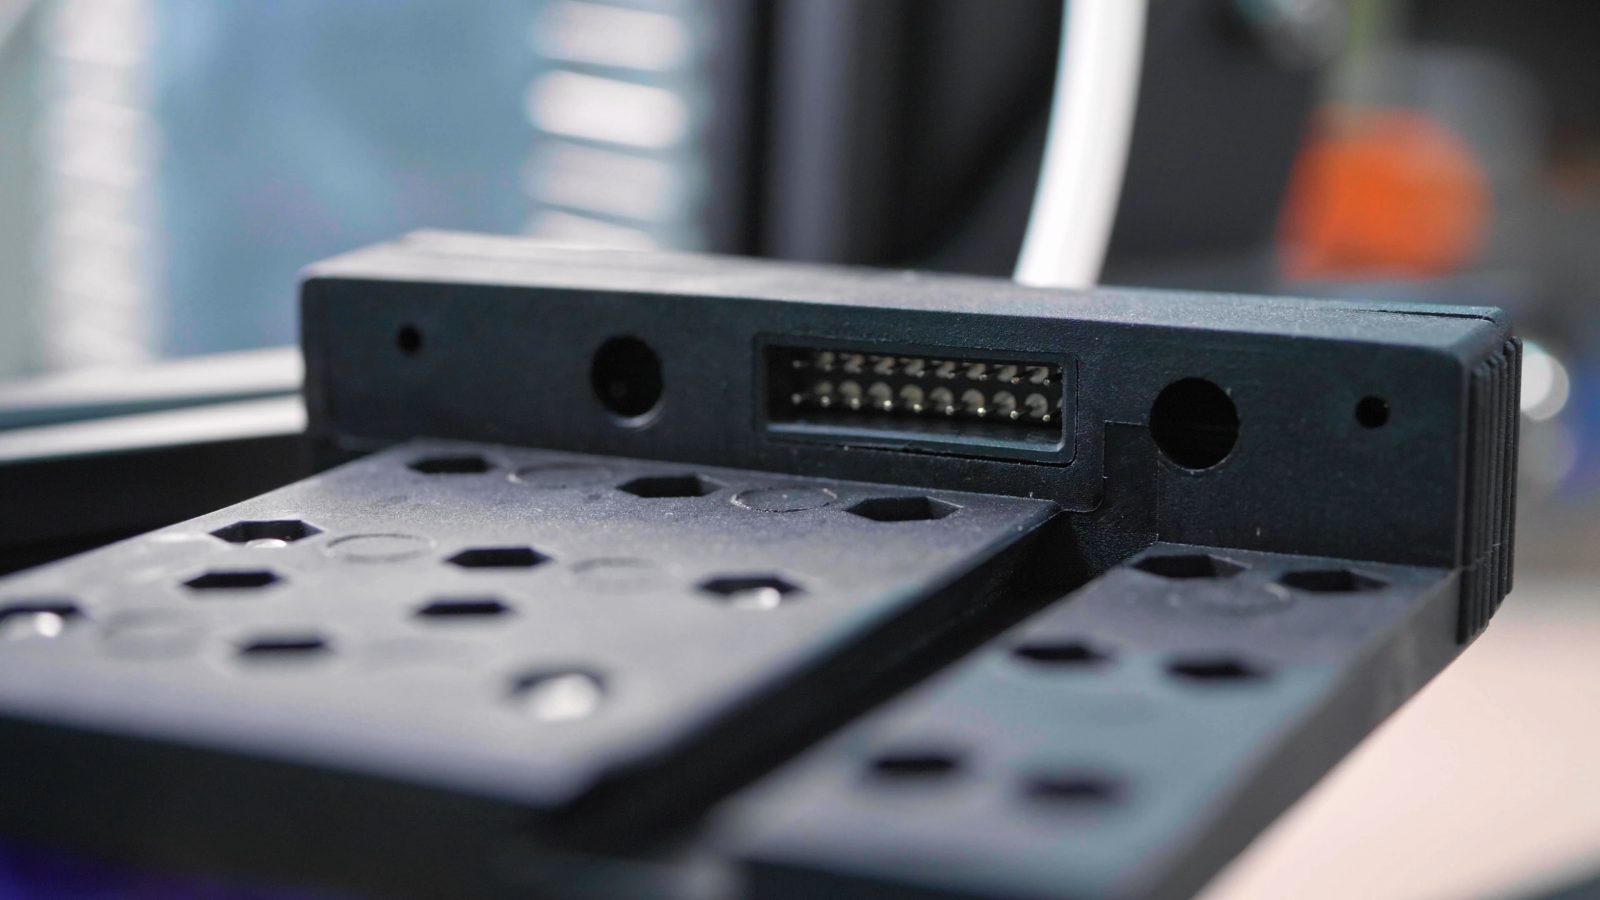
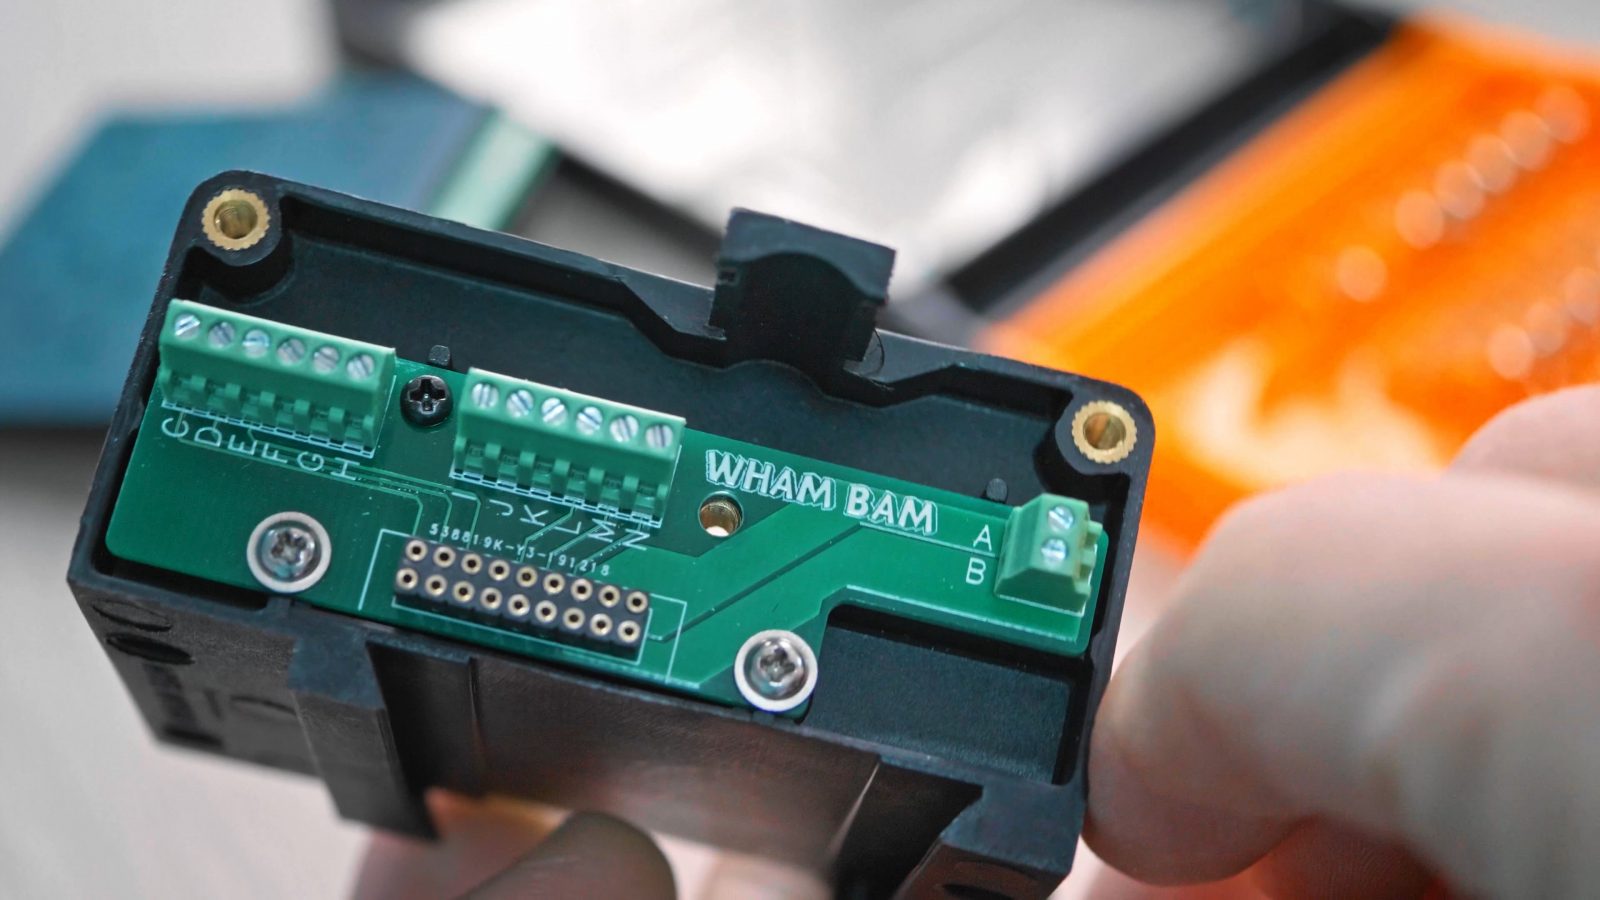
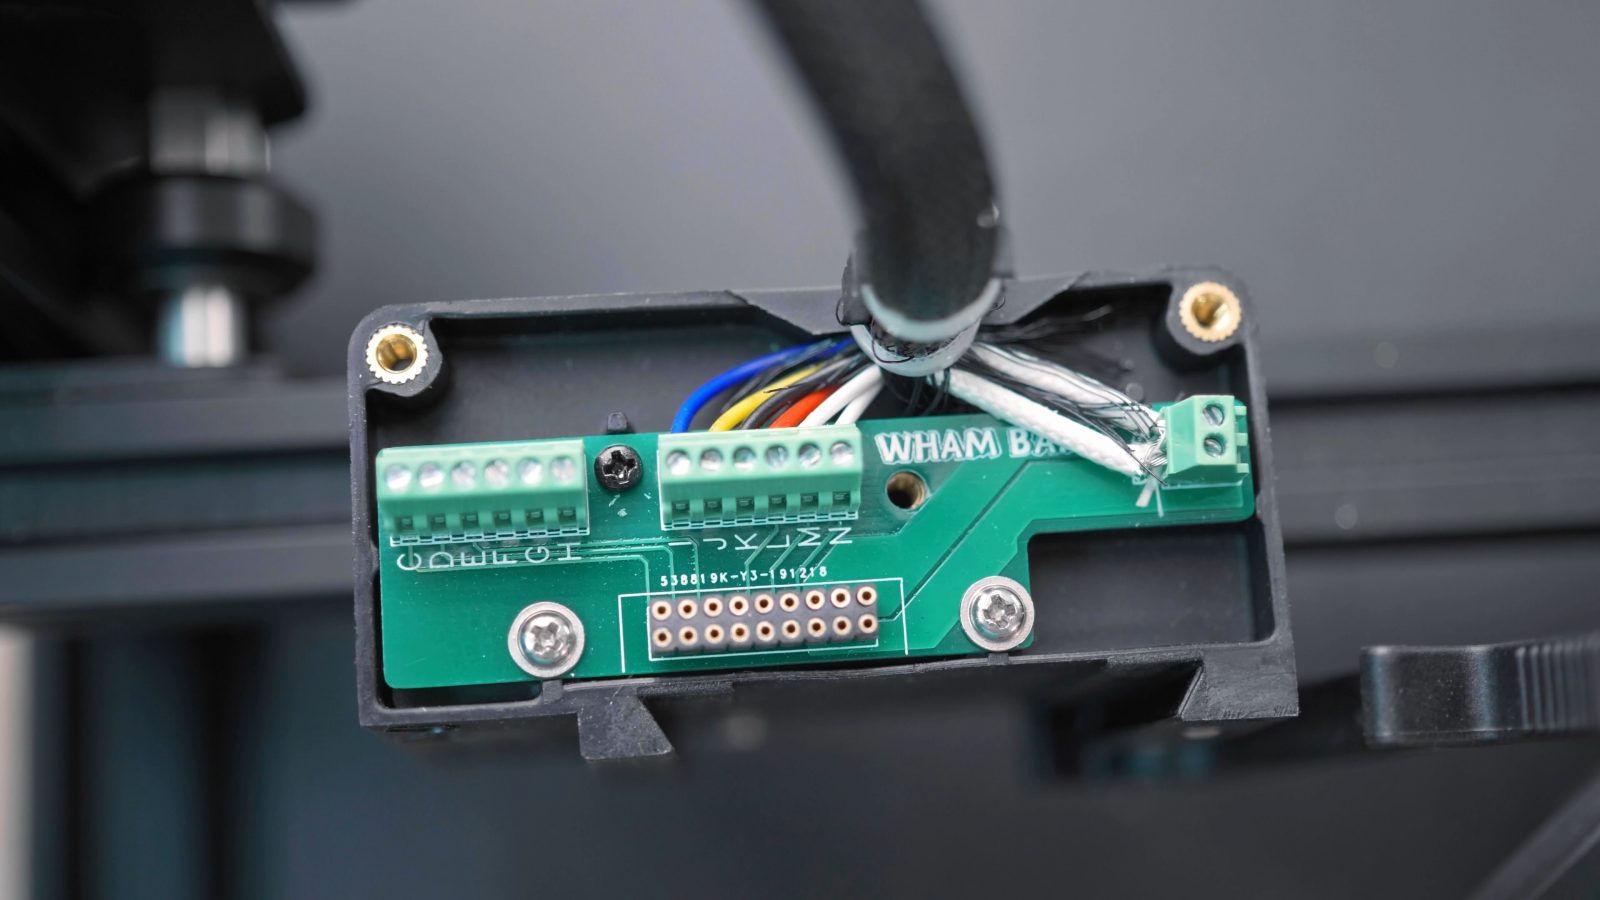
Because WhamBam did not have to account for that use case and made this a 100% manual changeover procedure, this mount actually does a lot more than the Toolchanger. You might have already seen it, but this one has an electrical quickchange as well, so you hook up your printer’s wiring loom into the base plate and then wire your hotend, bed sensor, and all that only to the mobile plate.
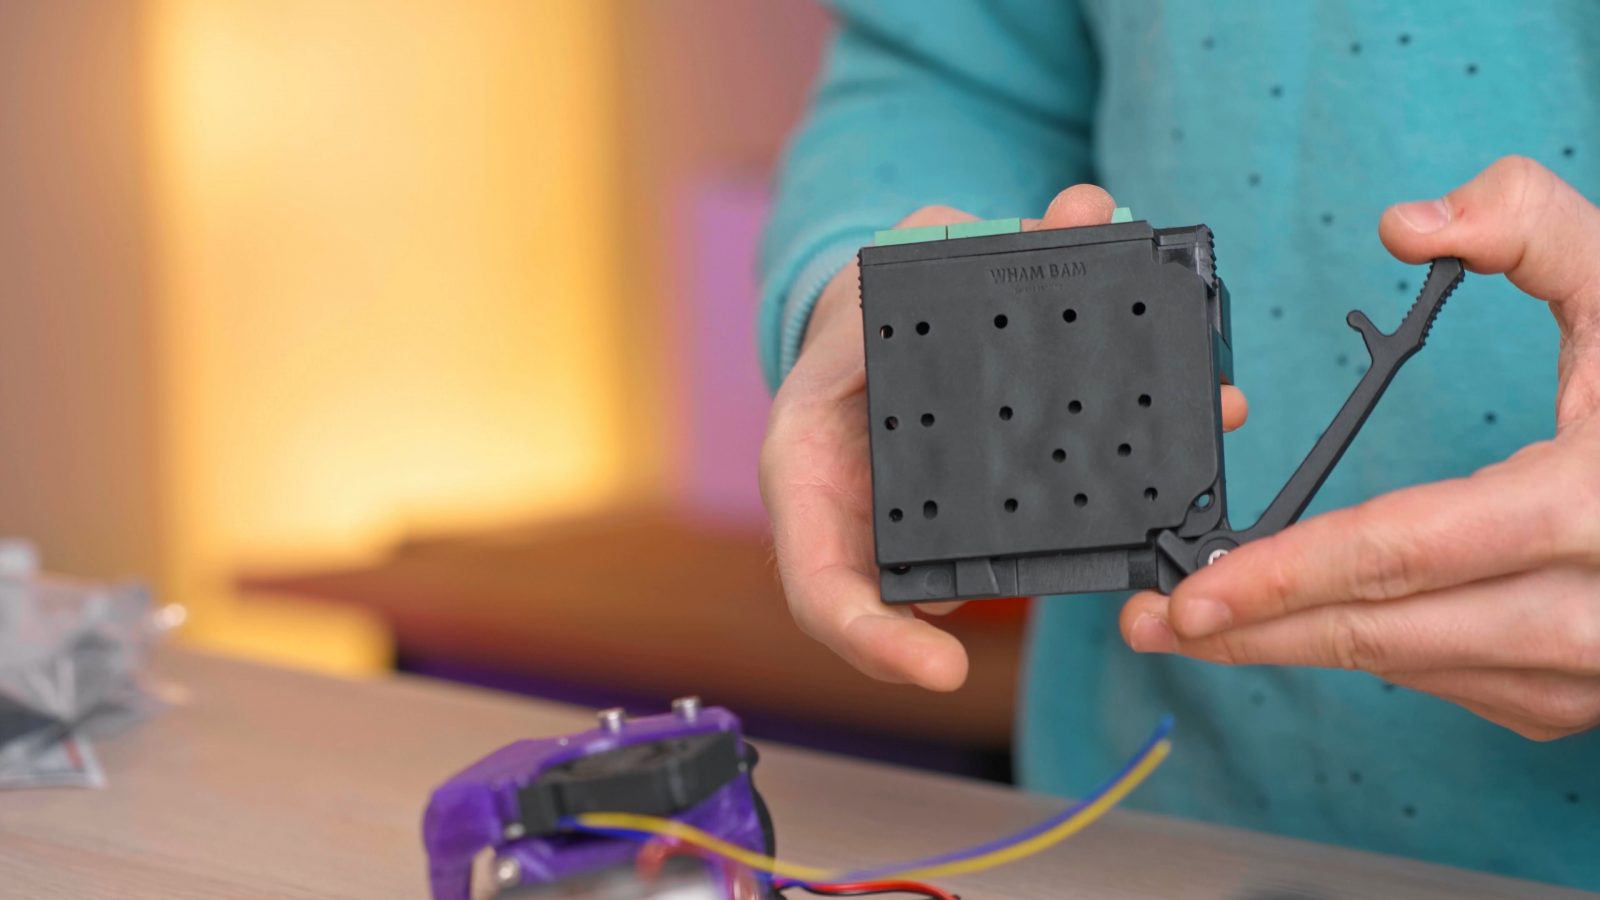
This lock lever actually does double duty not just as a locking feature, but also as a release lever, you can see that down here, where it actively pushes apart the two plates when you try to release them.
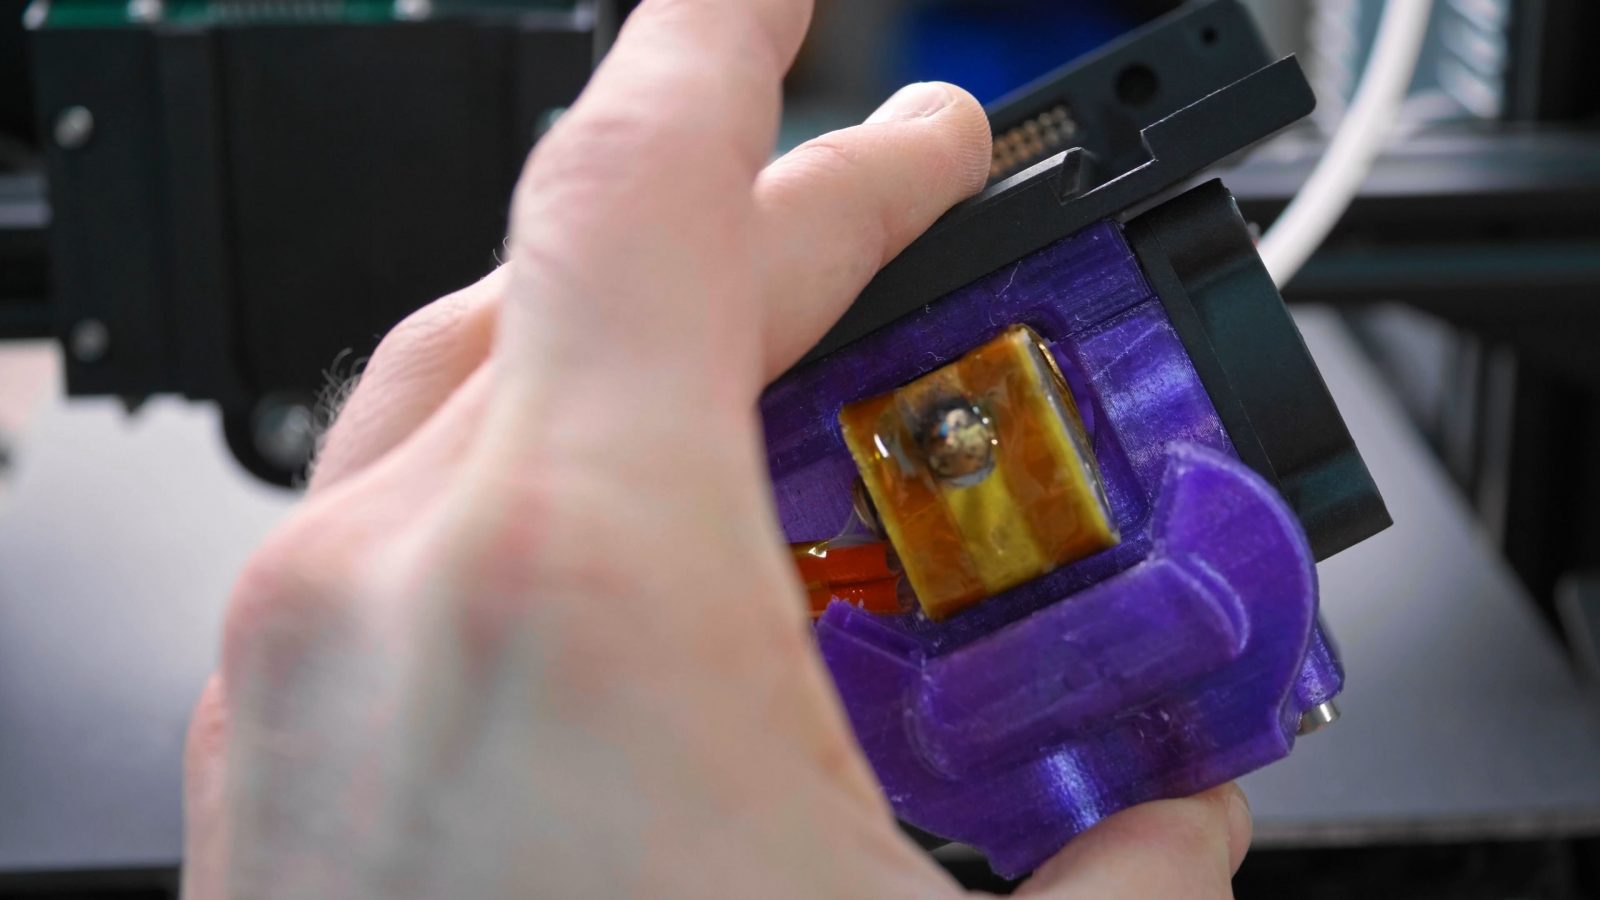
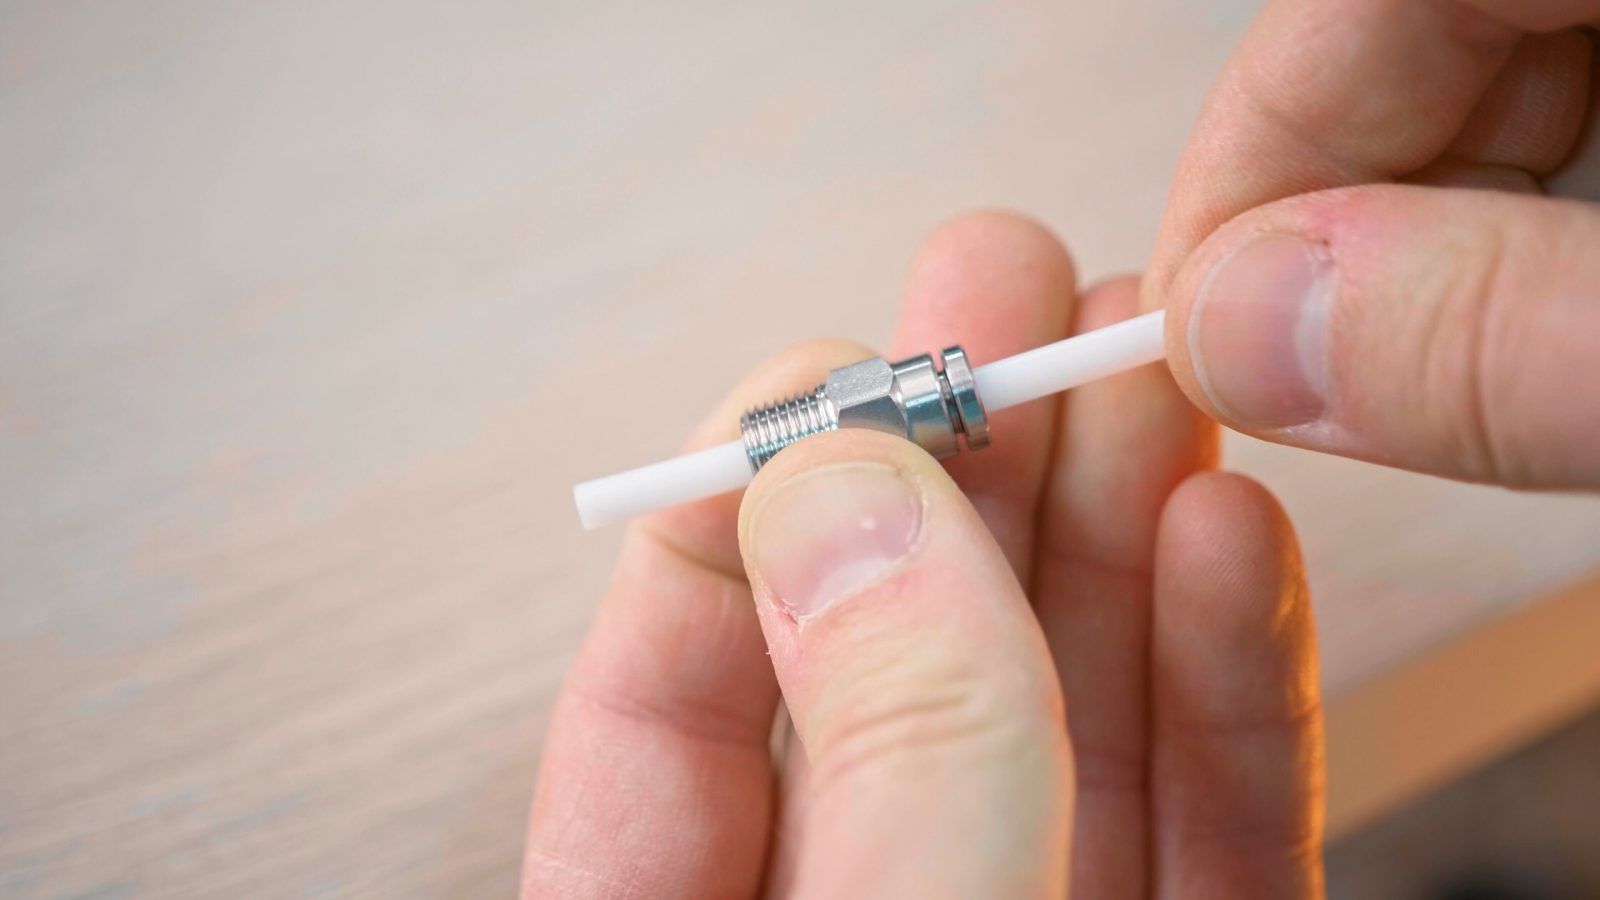
The connector they’re using is a fairly standard pin header type with 2mm pitch, and those take a bit of force not just to plug in, but also to separate again.
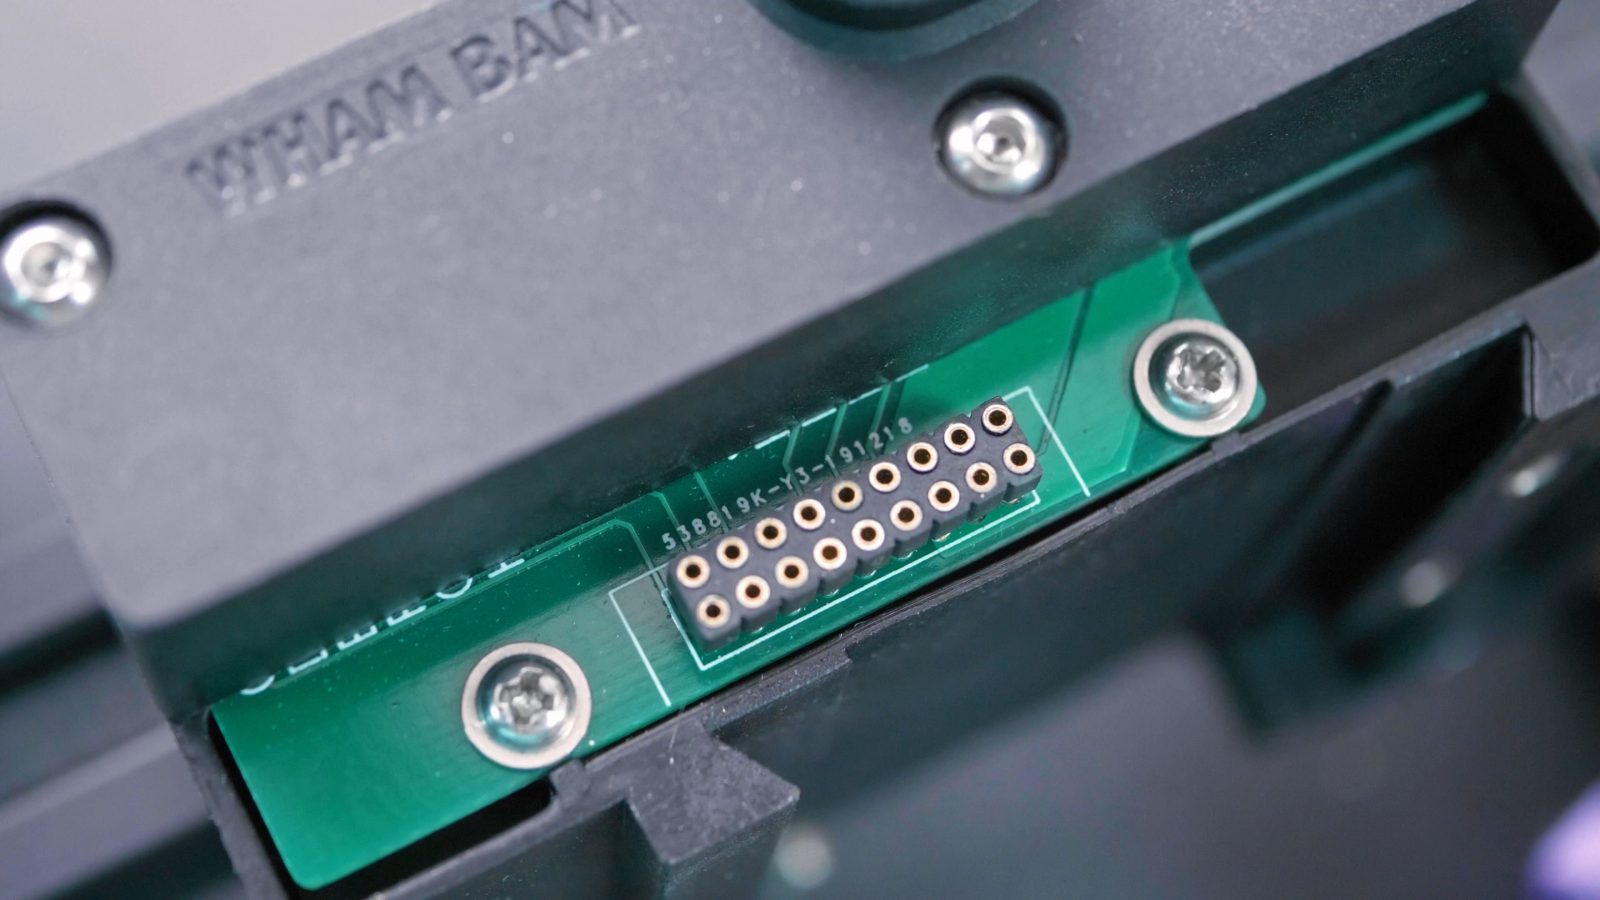
If you’ve ever tried to pull off a RAMPS board from an Arduino Mega, you’ll know what I’m talking about. The official ratings are 2.6A for these 12 “lower rated” contacts and then 10A for the separate pair, which is interesting – the 2.6A terminals use one pin each on the pin header, the 10A terminal uses three, which would mean it’s actually pushing 3.3A per pin on the header.
Of course, I just had to test the 10A claim, so because I don’t have a 10A lab power supply, I just used a heated bed, wired it through the Mutant plates, and adjusted the voltage on the power supply until I got roughly 10A.
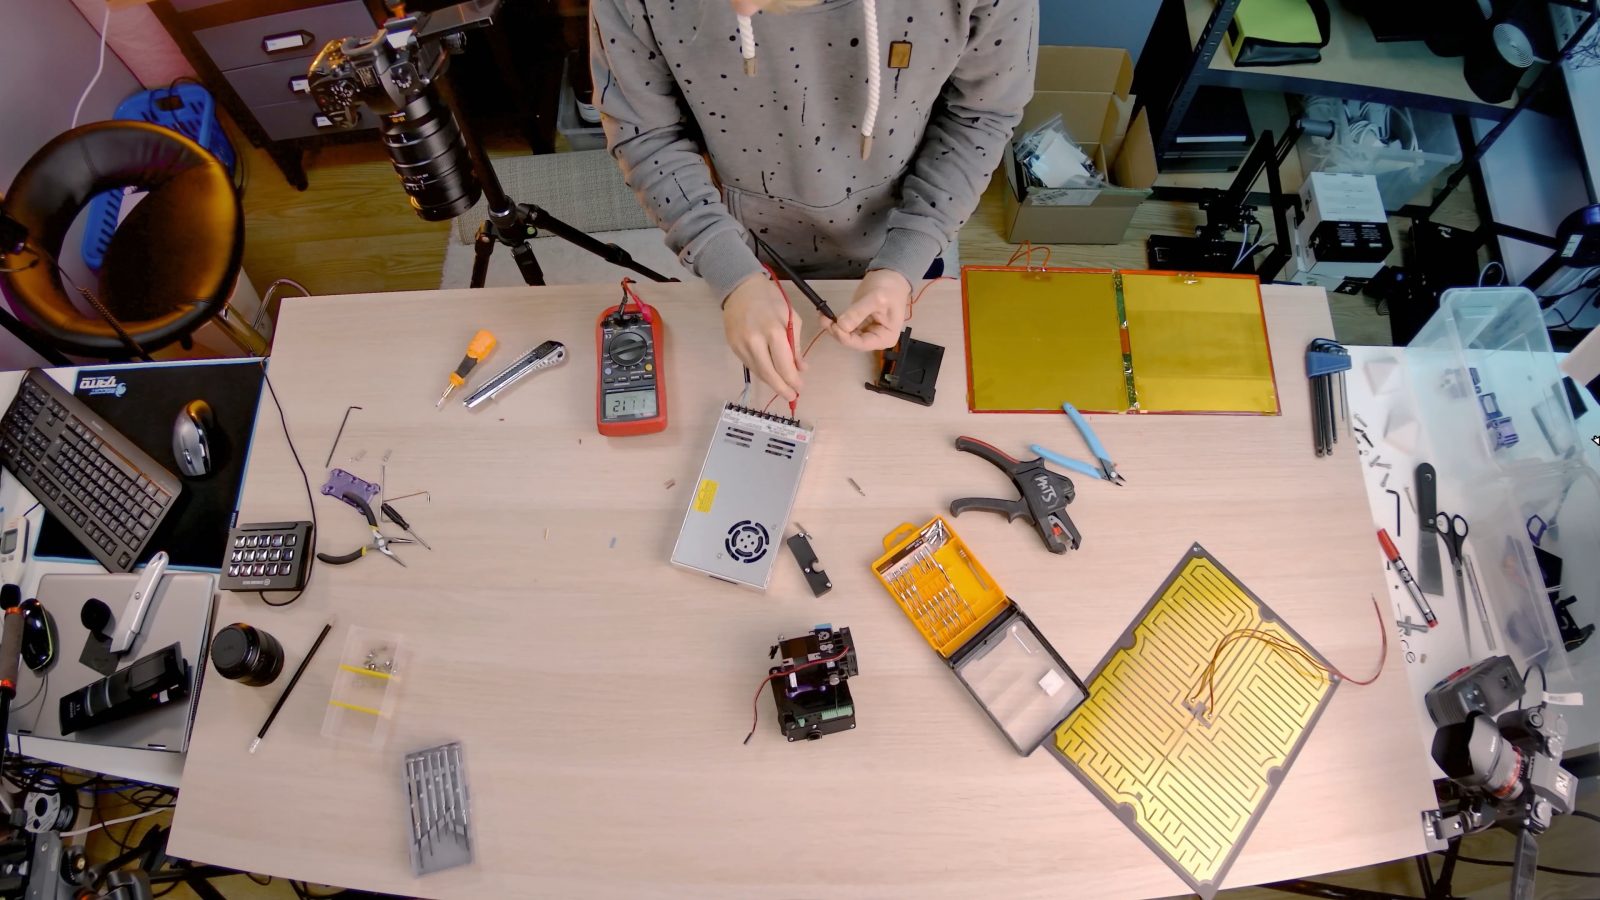
Okay, 11, but this will drop down super quickly once everything heats up, metals like copper have a much higher resistance once they’re hot.
And heat up things did. Now, the Mutant’s parts seemed totally fine, actually, but because the terminals are so tiny, you can only use fairly thin wiring, which will, in turn, heat up much more than everything else in the system, so that is actually going to be your limiting factor.
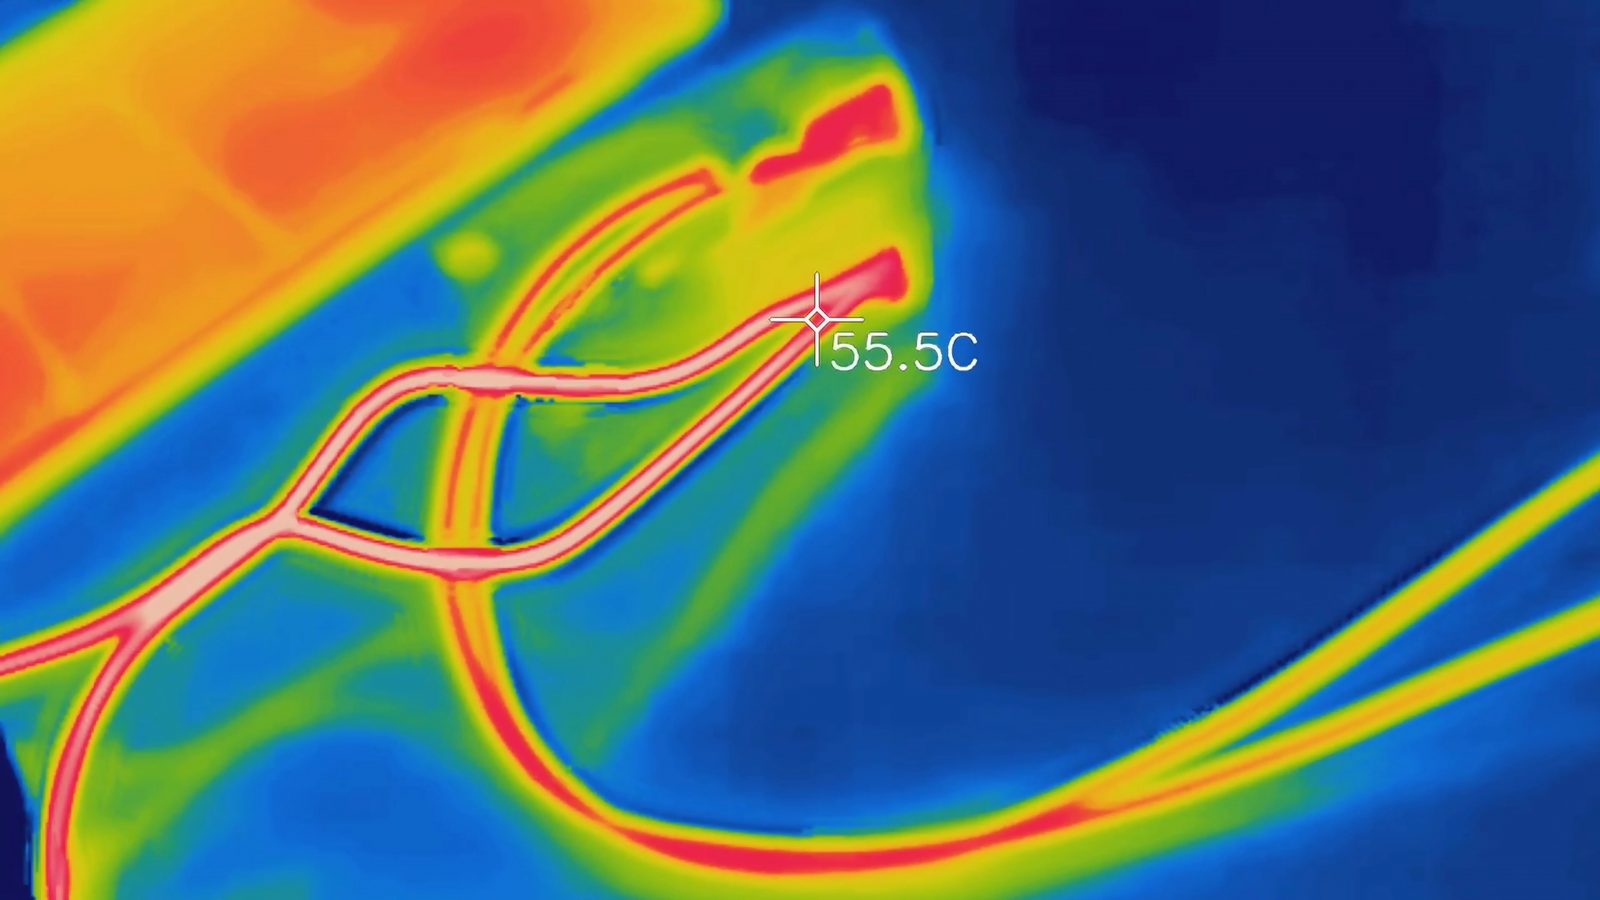
I still wouldn’t want to push a continuous 10A through this, but for a hotend that just needs to heat up once and then maintain temperature, or even for a small router spindle, this will be more than adequate. As far as voltage goes, I think these connectors can officially take a couple hundred volts, but I’d call it quits at 48V DC, and I would definitely not hook up mains to it, because, well, all the connections are exposed, at least when you remove the mobile plate. 48V is going to be a bit of a tingle, but generally still considered “safe”. There’s also no pre-shutoff or any means to turn off your high-current load as you disconnect, so in the case that you disconnect a router spindle or even a high-power hotend while it’s still powered up, you might get some arcing across the header here. Of course, you also need to manually turn off any stepper motors you’re routing through the Mutant before you disconnect it because stepper drivers don’t really like it when you just yank them apart.
As far as the firmware knowing that you’ve swapped something – well, that’s up to you to figure out. The easiest way to do it would be to stick with one type of thermistor and mounting a bed probe onto the mobile plate, which, basically, is going to take care of different length hotends like a volcano or something. The finer adjustments both in height and in printing settings can then be done in the slicer with simply a different profile for each toolhead, which you’re going to need anyway to account for the actually changed tool that you just mounted. There’s also support in Marlin for tool changing, but that’s something you’re going to have to configure yourself.
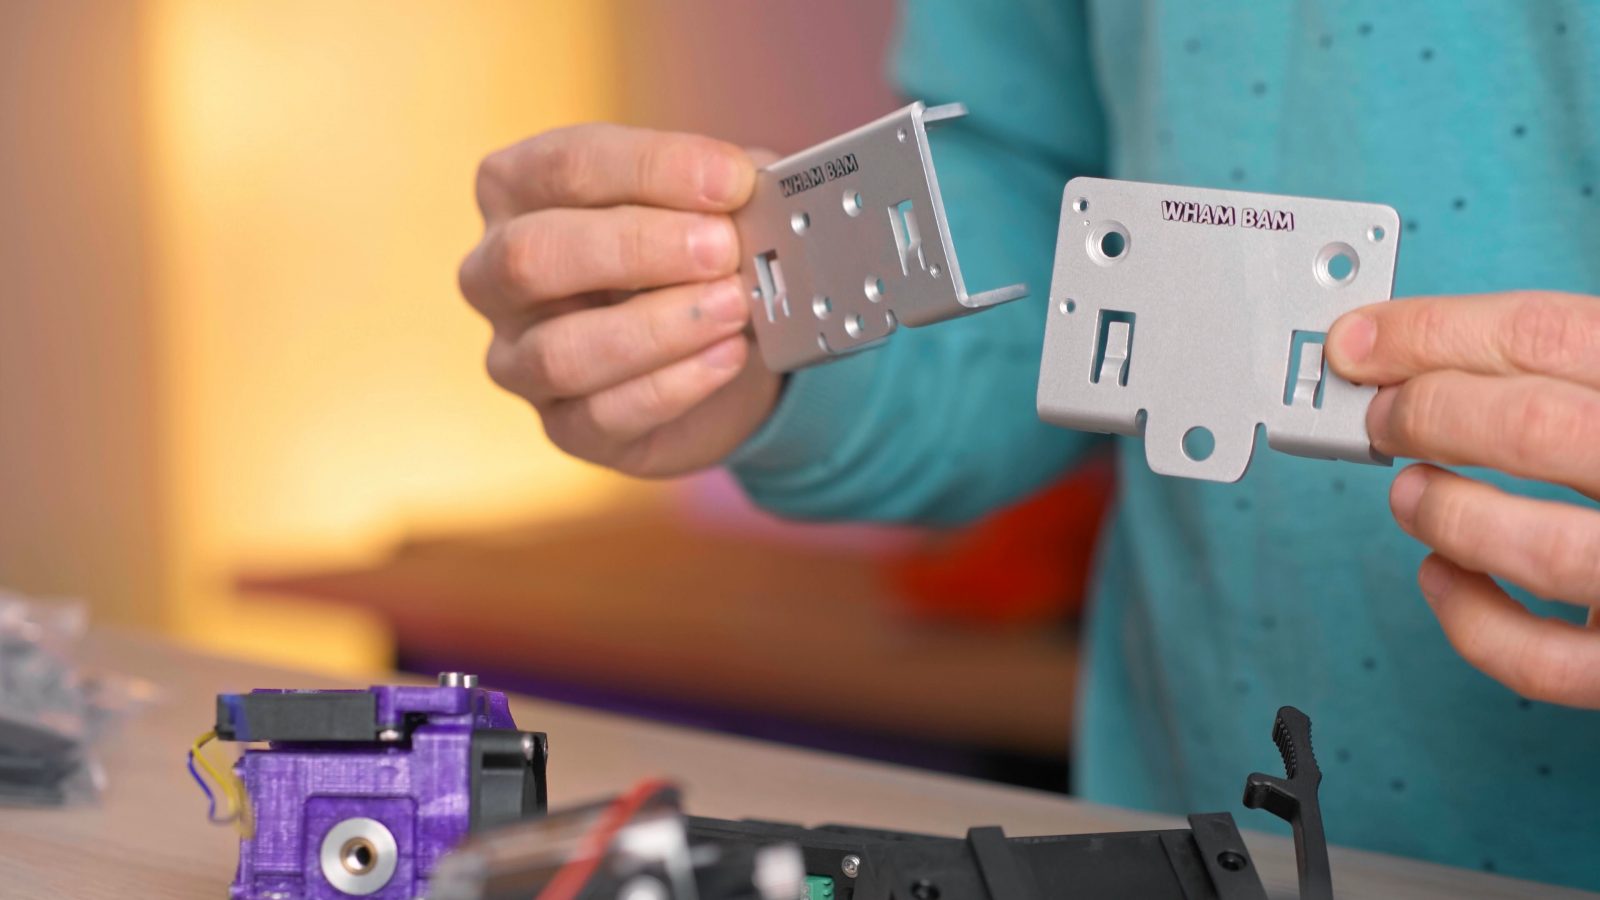
As for the mechanical parts, they’re all an injection molded glass fiber reinforced Nylon, plastic, which is solid, but the parts don’t feel super-high-quality. I mean, they’re robust and all, but they’ve all got pretty sharp flashing edges, and most of the parts are kinda crooked because of the way they’re designed as just big slabs of plastic, and plastic, as you all know, likes to warp when it cools down, especially right after it’s molded when the entire part is still hot and deformable. So you get things like a bent release lever, the mobile and the fixed plate are crooked and they line up with a very ugly gap, which thankfully doesn’t seem to affect how the connector engages.

There are sink marks all over the surface of the mobile plate, they’re probably a couple of tenths, and worst of all, if you look at the strain relief on the fixed plate, it doesn’t line up with the cover. I mean, the parts certainly aren’t pretty, but they work. They all fit together well and they do their job.
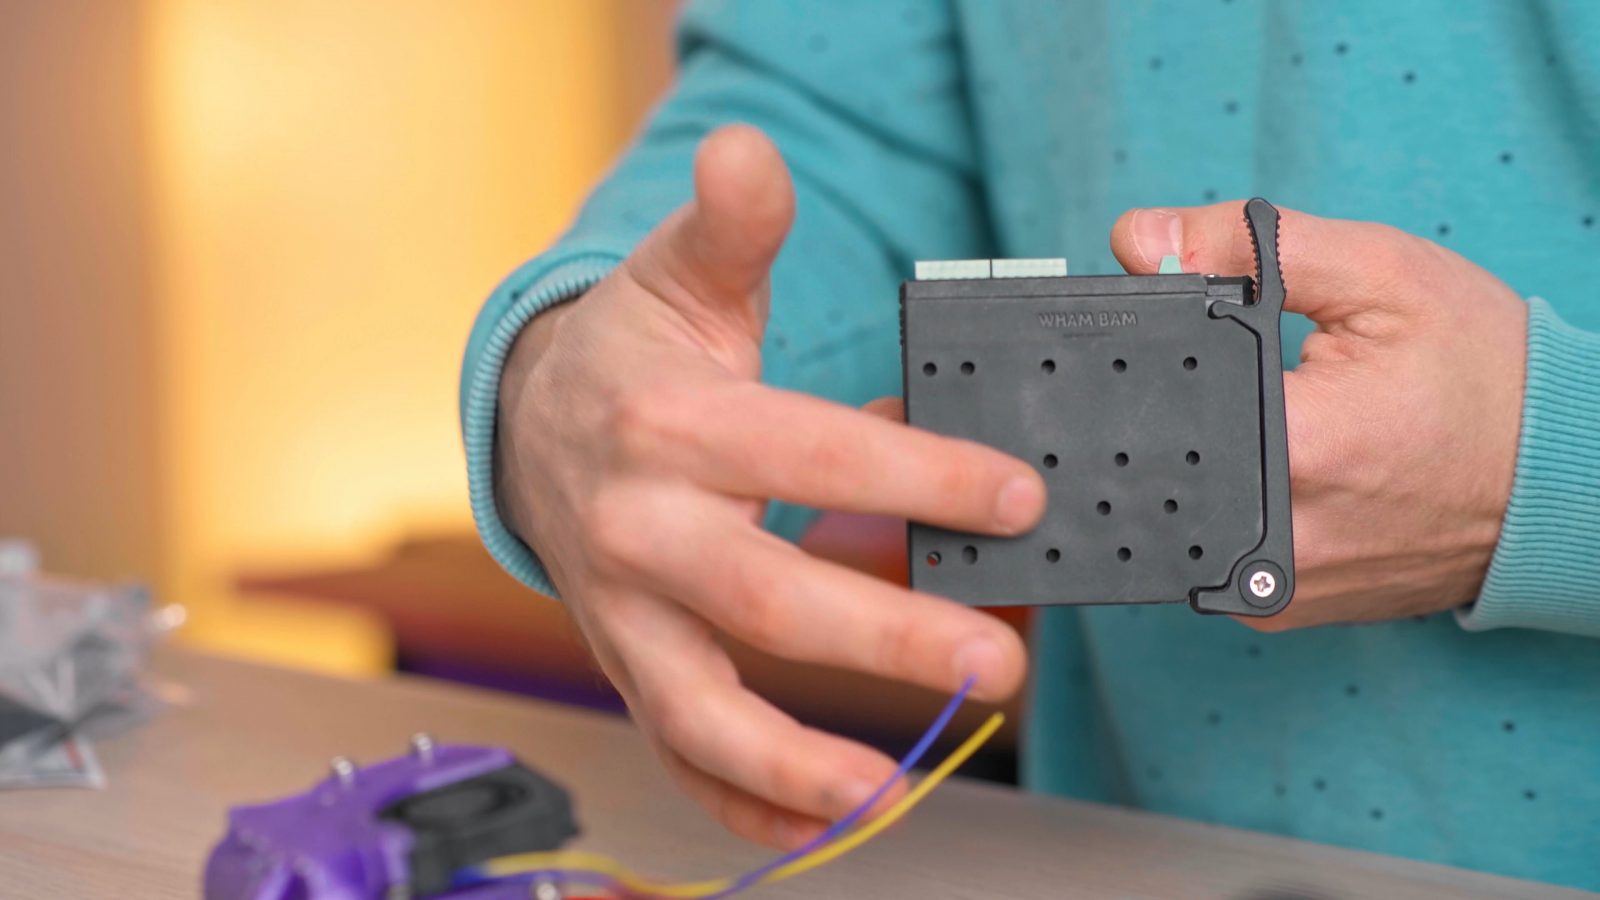

So for actually mounting the fixed and mobile plates to a printer and a toolhead, you are going to need an adapter for almost every situation. Thankfully, the Mutant system has been out with volunteer beta-testers and they’ve already designed tons of mounting parts both for adapting the plates to the printer carriages and the mobile plate to extruders and hotends.
The mobile plate has a ton of holes in different spacings, but the only direct match without an adapter I could find was the Creality hotend from the Ender-3 fitting these bottom holes here. The full Hemera has a hole spacing of 34mm, the plate has a pattern that’s close, but it’s 32mm so that barely doesn’t fit, but you can actually directly mount the Slice engineering Mosquito, but only in the wrong orientation.
I guess this section over here is meant to mount bed leveling sensors, but again, you will need some sort of an adapter. The extra layers of plates and mounts will mean that your toolhead is going to keep sticking out further and further the more adapter plates you add. The Mutant base is 12mm thick, but with a couple of adapter layers, that easily gets bumped to 20 or 25mm. I kinda wish these mounting holes were all just slots – that way, they would directly cover a much wider range of mounting patterns. But, thankfully, because this is such a solid slab of plastic instead of being hyper-optimized for injection molding and weight by using ribs, you can definitely just drill your own pattern into it.

The pattern that comes stock has pockets for M3 hex nuts in the back, I think square nuts would have been nicer, and they would also work better with slots, but you can use these pockets both with a nut to basically screw into the plate or you can stick a cap head screw in the back and screw into a hotend or extruder that already has threads in it.
It’s similar on the fixed plate, but you only get four holes to mount it, you can drill your own, but by default, this didn’t directly fit any printers I have.
WhamBam do offer a custom carriage that directly fits the Mutant, for both linear rail setups and V-wheel setups like in the Ender-3 or all the Ender-3 lookalikes, which simply replaces your entire carriage and provides belt clamping and the mounting points for the Mutant fixed plate. Very chunky and solid.
The general idea, though, is to use the adapters for the fixed and the mobile plates. You can grab those from Thingiverse and Prusaprinters, MediaMan, who has designed the HeroMe system for Creality machines, has already adapted his mounts to the Mutant and you can use those for a pretty big range of hotends.
The thing is though, for printers that don’t follow the Chinese standard “2020 extrusion for the X-axis” design, mounting can be super awkward. For example, on the Mendel 9001 and its flat carriage, this huge hump on the back of the Mutant, it just doesn’t have anywhere to go, so I need to spacer out the entire fixed plate by a good 30mm just to be able to get it attached.

On the Prusa MK3, the hump is also a bit of a problem if you try to mount it too tightly against the carriage because it’s going to crash into the frame up top, and also, the Mutant is a whole lot wider than the stock setup, so you will be losing either range in the X-axis when it crashes into the X-ends, or in the Y-axis, if you spacer it out so far forward that it clears the X-ends.
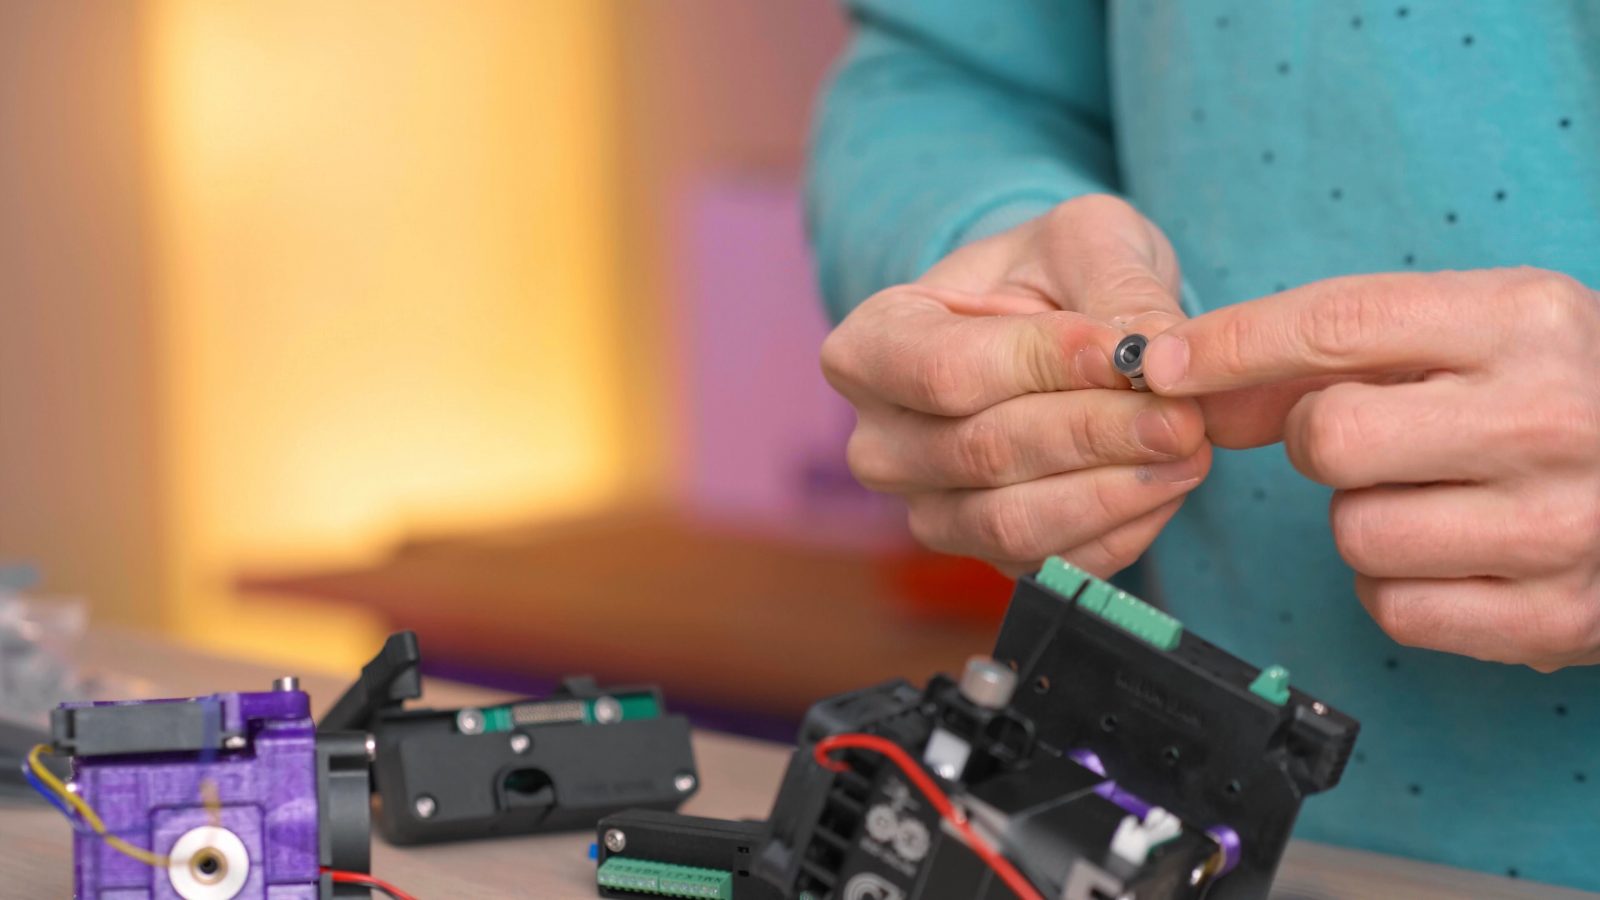
The Mutant system is built for both Bowden and direct-drive setups. You get plenty of electrical connections to run a hotend, bed sensor, extruder, and a pair of fans from it, but with Bowden setups, your hotend is still going to be connected to the extruder with the Bowden tube, which is why they’re also including one of these Bowden connectors that’s supposed to release more easily than the standard brass connectors and shouldn’t chew up the Bowden tube as much.

It seems to work better than the cheap, standard connectors, but honestly, I’d still rather unscrew the connector from the extruder and keep the length of Bowden tube attached to the toolhead than re-clamping it in the connector. Especially for the kind of hotends that use the Bowden tube as a hotend liner, too, like the standard Creality hotends, those I’d definitely adjust and set up once and then just leave them as-is and undo the other end of the Bowden tube. Unless, of course, you do the mod where you split and capture a piece of the Bowden tube in the hotend with a washer underneath the Bowden connector.
One more thing before we get to the price is the fact that this is patent pending. If you want the full version of why I’m not a huge fan of that, check out the latest episode of the Meltzone podcast that I do with Stefan from CNC Kitchen, but short version: So far, patents in 3D printing have served mostly to lock away features that would actually be useful. Belt printers are built with the awkward 45° angle because Makerbot and now Stratasys hold the patent on building them like a normal machine. We can’t really print PEEK or, to an extent, even ABS well, because properly heated chambers are locked behind a patent, too. I mean, the only reason why we have FDM, filament-based 3D printers from anyone other than Stratasys is because the patent they held on that core process expired in 2009, which then spawned the entire RepRap movement. You know, what I’m afraid is going to happen, or possibly, is already happening, is that innovating in the 3D printing space is going to turn into a legal minefield of patents that you’re going to have to navigate around, and in the end, spend people trying to build new things will have to spend more engineering time building clumsy workarounds to avoid proven, but patented solutions, than actually innovating. Now, I don’t know which details of the Mutant will be covered by patents since they’re not public yet, but in general, I’m not a huge fan of where this is heading. Same for the competing X-change, too, by the way.
Okay, let’s get to the price. There are two different packages available for the WhamBam Mutant – the “Base Kit” with just one fixed plate and one mobile plate for $85, plus tax, shipping, etc., and then the “Quad” kit, which, as the name implies, comes with three mobile plates for $149. You can also buy the fixed and mobile plates separately, as well as the pneumatic couplers and the optional adapterless gantries. To me, the Mutant parts are not as cheap as I was hoping they would be, but most of the cost is just going to be down to the relatively small scale manufacturing for accessories like these.
The folks that are really going to benefit from having a quickchange system on their printer are going to know it and for them, these kits will totally make sense.
But here’s two things to consider:
With just the Base Kit and just a single mobile plate, unless you print yourself extra plates for e.g. a pen plotter, you don’t actually get a quick-change-system, you just get a quick-removal-and-reinstall-system. The official use case for that is being able to take off the hotend or extruder and work on that toolhead without it being attached to the printer, and I see how that’s useful, but it’s essentially planning for failure, planning for having to regularly service your toolhead as it keeps breaking. Now, my thinking is – in that case, why not plan for success instead and instead of a quickchange system, invest in something like a Hemera that’s simply not going to need as much servicing.
And for the price of the Quad, you can basically get yourself an extra Ender-3 and have one set up for regular printing or whatever, and have the other with a Volcano or optimized for flexibles or whatever else you would otherwise mount to the extra mobile plates. It also gives you twice the print capacity if that’s something that matters to you. Of course, that’s just two heads instead of three, and in both cases, you don’t actually end up with a quick-change system, but it’s something to consider if you want to get maximum value out of your 3D printer budget.
Like I said, if you want this, you’ll know it. I’m just really happy that quick-change systems are something that is being adopted and being made available – more options are always a good thing. Now, I’m not going to be using the Mutant on my main printers, like my Prusas or the testing platform, the Mendel 9001, because for both of those, it means butchering at least the wiring job and limiting the machines because the Mutant isn’t totally compatible with them. But on the Ender-3, it fits in a lot better. My Ender-3 has been sitting mostly dormant, because, you know, if I actually wanted to print something, I always had better printers to do it on, but I think this is a nice addon to extend what I can use it for.
At the end of the day, the Mutant hardware is certainly not the flashiest or most drool-worthy piece of kit, but it’s functional and it does the job well that it was designed to do. It’s easy to use, it’s robust, it’s electrically decent, I mean it’s not a super complex piece of hardware, but there are still a lot of details that you could mess up.
Now, like I said, I wish a couple of things were different, but this is fine. And if you have a proper use case for a quick-change system like this, then surely the price point will make sense for you.
Get the WhamBam Mutant – 15% off Mutant with code “layers” (valid through Jan. 25th 2021)
💙 Enjoying the videos? Support my work on Patreon!
Product links are affiliate links – I may earn a commission on qualifying purchases (at no extra cost to you)

Check out my second channel “More Layers” on YouTube for livestreams