
OctoPrint is better than ever – time for an updated install guide!
Get it at octoprint.org
Getting started with OctoPrint
Hey everyone, Tom here, and by now, you probably know what OctoPrint is and why using it is better than sacrificing an entire computer just for running your printer. But OctoPrint is pretty rapidly evolving, thanks to Gina Häuge’s and BQ’s commitment to the software, so my 2014 guide for setting it up is kind of outdated and, frankly, incorrect at this point. So today, i’m going to walk you through the easiest way of getting going with the current version.

So just to recap, what OctoPrint does is to hook up your 3D printer to your local network, so instead of having to move SD cards back and forth or tying a PC to your printer with a USB cable, you can access all of your printer’s controls with any computer, phone or tablet on the same network and through WiFi. OctoPrint also comes with the CuraEngine pre installed, which basically means that you won’t even need to slice your files on a computer anymore, you can just send over the stl model and the printer will do the rest.

And since you can now expand OctoPrint through the new plugin system, you can add pretty much as much functionality as you want.
So let’s get going! For this guide, i’ll be using the Raspberry Pi 2, since, out of the available single-PCB computers, it’s both the easiest to set up ,the most common one, and generally the platform i’d currently recommend, but any other Raspberry Pi all the way from the original model A up to the most current Zero works as well, albeit with a small speed penalty, or with a manual install, you can also use most other mini computers like the Beaglebone, the LeMaker BananaPi or Guitar, or even a full x86 computer. For any of the compact one-board computers, you will also need a decent micro USB cable for power, i can personally vouch for Anker cables, since those are both cheap and available worldwide in a consistent quality, but if you have a spare cable from a non-Apple phone or tablet, you can probably use that one as well. Then, as a power supply, most USB phone chargers work well as long as they are rated for more than about one amp of current.
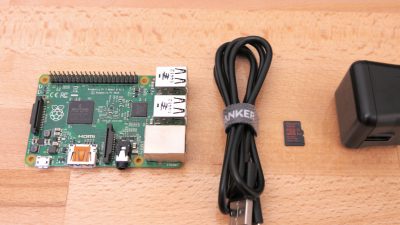
Also, you will need a microSD card with at least 4GB capacity, preferably 8GB or more for the operating system, and for the older Raspberry PIs you’ll need a full-size SD card or use an adapter. Most brand-name cards work well, but i’d still recommend sticking to known-good models. I’ve put a link to full list of “approved” SD cards in the video’s description. And if you don’t have one, grab a USB card reader while you’re at it, you’ll need it to write the image to the SD card.

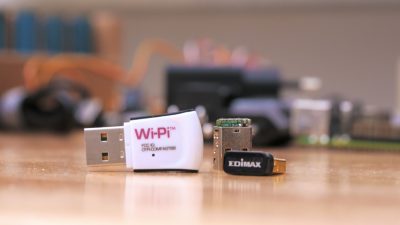
And lastly, for actually connecting all this to the outside world, you can either use the Ethernet jack and connect your PI to the network that way / or, which is probably more convenient, use a USB wifi adapter. Many models work well, including the specifically-made WiPi, which i’ll be using, and many Edimax and Asus models. Again, the full list is linked in the description below.
An optional accessory that is going to make your life much easier is a Webcam. Most common webcams work with no extra configuration at all, like pretty much the entire lineup from Logitech or Microsoft, i’ve personally got the Logitech C170 and C270 in use, which both get the job done equally well. Trust me, that “HD” upscaling on the C270 doesn’t do anything.
I’ve also put Amazon affiliate links to the the full set of components i’m using at the bottom of this post.
Now, the software image we are going to use is Guy Sheffer’s OctoPi, which is basically a preconfigured image with everything that’s needed to get OctoPrint going. Now, the Pi is going to read everything from an SD card, so to get the image file onto one, grab your card reader, and, for Windows users, the Win32DiskImager tool, Linux and MacOS users can find instructions on how to use the dd utility to do the exact same thing / on the Raspberry Pi website. Once you’ve written the image to the card, you are going to see a “boot” partition pop up in your file manager.
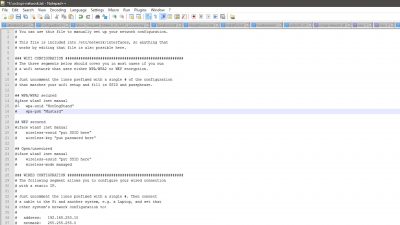
And there’s really only one file of interest on there, and that’s the octopi-network.txt one, where you can configure your wifi, or, if you’re only using wired networking you can completely skip this step. Open that file up with a decent text editor like Notepad++, the Linux and MacOS default editors also work well while Windows’ Notepad does not, and head down to the Wifi configuration section. Modern networks use WPA and WPA2, if your network still uses WEP or no encryption at all, you should really upgrade. So fill out the SSID, so your wifi’s name, as well as the pre-shared key, basically its password. Keep the quotation marks around your SSID and password. Also don’t forget to remove the octothorp at the beginning of the relevant name and password lines as well as the single line above them to enable them all. Hit save and you’re ready to safely remove the SD card from your card reader and insert it into the Raspberry Pi.
At this point, also connect your Wifi Dongle or Ethernet cable, your 3D printer and, if you have one, your webcam before plugging in the microUSB power cord. The Raspberry Pi should now boot up and connect to the network, as indicated by the blinking status LED on the Wifi adapter or the Ethernet section on the Pi. If it does not, try writing the image to the SD card again and double-check your Wifi configuration in the octopi-network.txt file.
If it has successfully connected, you will now be able to access the Raspberry Pi at octopi.local or, through the Raspberry Pi’s IP address, which you can look up in your router’s interface. Each router is a bit different, so i can’t explain it for every single one, but it’s typically either on the front page or in the “network status” menu. And one last way that works on surprisingly many computers is the network autodetection.. configuration upnp thing that you can find in the network environment browser of your operating system.
Before you go dive into the web interface, there are two more things you will need to configure on the Pi. To do that, connect to it via SSH, for Windows, you can use the Putty tool, Mac OS and Linux come with SSH clients included. This is what putty looks like, but the process is the same for any other tool. Enter octopi.local or the Pi’s IP address directly and hit connect. Accept the PI’s encryption fingerprint, and it will then ask you for a username and password, which, by default are the exact same “pi” username and “raspberry” password on every single Raspberry Pi, which is why that’s the first thing we should change. Once you’ve logged in, enter passwd and hit return, this will ask you for your current password and a new one of your choice, try to pick a reasonably safe one there. If you’re unsure about what is generally a good password and what is not, there’s yet another link in the description to Intel’s site, where they’ll grade how secure your password is. Pretty scary stuff, and it will become relevant again in a minute.
Once you’re through the passwd tool, run “sudo raspi-config” and hit return on the first option, expand file system, to allow OctoPrint to use the entire space on the SD card for your print files, updates and log files. Then hit tab twice to select “Finish”, and confirm the reboot.
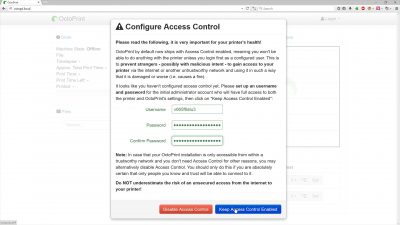
Now once that reboot is done, you can go ahead and open up the OctoPrint web interface with your favorite browser as long as it’s not Internet Explorer 6.0, and again, at octopi.local or the IP address directly. On the first time you open it up, OctoPrint will show you its first run wizard. Which, realistically, isn’t much more than the point where you will get to decide how secure you want your OctoPrint setup to end up. So by default, OctoPrint will want you to set a username and a password. Which makes sense, because everyone who can access your OctoPrint setup, also has the power to burn your printer down. Or at least very seriously damage it. So if a) your printer is on a network where you don’t absolutely trust everyone one there or, b) if you’re even planning to make your printer accessible from the internet, i can’t stress this enough, enable access controls and pick a decent username and a safe password. You’d be surprised how many unsecured OctoPrint instances Google finds with the right search terms.
Now there is a use case where disabling the security features makes sense, and that’s when you’re connecting the PI only to your home network with no insane relatives around and have a decent firewall/router thing handling your internet connection. In that case, feel free to disable the extra security, but keep in mind this is in fact the only layer of security between someone with access to your network and full control over your 3D printer.
Reload the page, and you should have the full interface available. At this point, OctoPrint is likely to offer you an update, which you should do right now to get all the updated features right from the start. If the update does not work or anything else about the interface still feels off at this point, a reboot through OctoPrint’s menu would be a good idea. As a general note, try not to power off the Raspberry Pi by simply yanking the power cord out or turning off the power supply, because while it’s likely that it’s going to boot up just fine the next time, there is a small chance of some part of the Linux system breaking when you do it and you’d have to do the entire setup again. Instead, always use the menu to shut it down first, then wait for the status LEDs to stop flashing and you shouldn’t run into any issues down the road.
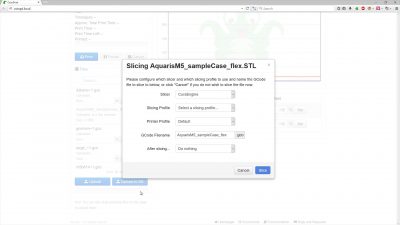
And that’s it for the setup process, OctoPrint is now fully ready to use. You can go ahead and connect to your printer, upload a gcode file and start printing.
Alright folks, i think i’ve brabbled long enough about this entire process. There will be more videos on OctoPrint, exploring its features, so stay tuned and subscribed for those, and leave this video a like if it was helpful to you.
So as always, thanks for watching, and I’ll see you all in the next one.
Intel’s password checker
Raspberry Pi compatibility
SD cards
WiFi adapters
Webcams
[US]
Raspberry Pi 2
32GB microSD card – yes, overkill, but it makes the pi run soo smoothly
Reasonable microSD card
Wifi adpater
USB cables
Power supply
Webcam
[DE]
Raspberry Pi 2
32GB microSD card
Reasonable microSD card
WiFi adapter
USB cables
Power supply
Webcam
OctoPrint is created by Gina Häußge & Sponsored by BQ
The OctoPrint logo was created by Janina Himmen